3DS:New 3DS XL Wireless Charging Mod
Jump to navigation
Jump to search
This tutorial goes over how to add wireless charging to a New 3DS XL. If you've installed the USB-C charging port mod as mentioned here, you can also complete this mod. Both solder joints on the 3DS will have two wires going into each of them.
Requirements
The following materials are required for this mod:
- Wireless charging coil and module. This tutorial will be using this one, and will be assuming you are using the same module for the steps
- Soldering iron, solder, and flux
- Electrical tape
- Stranded wire. This tutorial uses 28 AWG
- File set
- Flush/micro cutter, or something small that will cut through plastic (optional only if a small enough receiver/coil is used so that shell trimming isn't necessary)
Preparation
- Disassemble the 3DS far enough to remove the motherboard that houses the 3DS charging port. IFixIt has a helpful guide here with pictures on how to do so if needed.
- While you could install the receiver and/or the module on the outside of the 3DS under the battery cover, it produces too much of a bulge with the module this tutorial uses. If you do not mind this, or if you have a thinner module, skip to the installation section.
- Take the flush cutters and trim off the top right section of the plastic surrounding the game card reader. The top right will need to be trimmed so that the coil can sit above the reader.
- Once it is trimmed, file down where it was cut with the file set so the coil can fit flat.
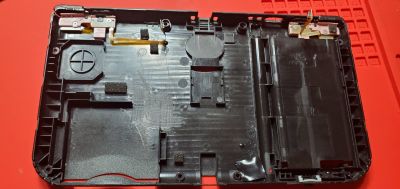
- Above is where the coil and receiver will sit once it's complete. Do not install both into the housing right now. The above pictures are just test fits, since it will be harder to put everything back together if you install the receiver now with how short the cables are.


Installation
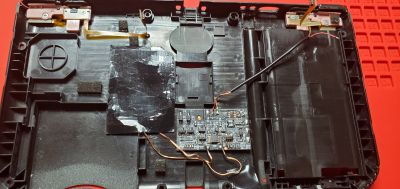
- Turn the 3DS motherboard over so that you can see the solder joints for the charging port.
- Solder the + (positive) wire on the module to the point circled in red
- Solder the - (negative) wire on the module to the point circled in black

- Reassemble the 3DS motherboard.
- Install the receiver and coil into the 3DS housing in the locations shown above. Make sure the coil is face down on the plastic and you have some type of [slightly larger] adhesive on top of it to keep it in place. Not pictured above, but also make sure to put electrical tape over the module so that it doesn't come into contact with anything on the motherboard
- Reassemble the rest of the 3DS, and enjoy wireless charging!
