Genesis:Belt Replacement
One of the most common faults with the model 1 Sega/Mega CD is that the belt which helps move the tray becomes overstretched with age. This can cause issues such as the tray not fully closing or opening, and can prevent the laser mechanism lifting up to read a disc. Thankfully this is a fairly simple fix which only requires simple tools and some patience.
Please note that this guide assumes you have an otherwise functional unit.
Materials and tools required
- JIS/Phillips head screwdrivers
- Spudger
- Replacement belt (best to order this from Console5 as it is an exact replacement)
- Lithium grease (optional)
- Isopropyl/rubbing alcohol (optional)
Procedure (for Sony drives)
- Flip over the Sega CD and remove the six screws on the bottom, then flip it right side up and unscrew the two black screws near the expansion connector. With all the screws removed, lift the top cover off, minding the expansion connector as you go.
- Undo the three screws on the RF shield over the CD drive. There is one located on each side and another at the back, which also screws into the sub board. Lift up the shield and set it aside.
- Undo the four black screws that hold the CD drive to the bottom case. Carefully lift up the drive and disconnect the ribbon cable connecting it to the motherboard.
- With the CD drive removed, unscrew the two screws which secure the top clamp assembly. Lift it out and set it aside.
- See Figure 1.
- Inside the opening near the spindle is a set of teeth which belong to a large black gear. This gear is part of the mechanism which opens the tray and can be manipulated to get the tray open. Using a spudger, rotate the gear clockwise to disengage the laser and open the tray. Be very careful and move it slowly as you may damage the teeth by forcing it.
- See Figure 2.
- With the tray fully open, it can be pulled out from the drive. To do this, you must first remove a small cover located near a tab on the rear of the tray. Twist a flathead screwdriver or spudger underneath it to pop it off.
- See Figure 3.
- Next, locate two tabs near the front of the drive chassis which help hold the tray in place. Insert a small screwdriver or toothpick into the hole on each tab and pull the tab away from the tray while carefully pulling the tray out. After both side tabs are pulled back, pull back on the tab on the rear of the tray (right next to the cover you removed earlier) while continuing to slowly pull the tray out. Patience is key here so do not rush or force the tray out.
- See Figures 4 and 5.
- Now with the tray removed, there is one more piece left to deal with before the tray belt can be accessed, which covers the white pulley the belt is wrapped around. To remove it, release the tab near the spindle then slide the cover to the left. It should drop away, revealing the belt in full.
- See Figures 6, 7 and 8.
- Remove the old belt and carefully place the new belt on.
- See Figures 9 and 10.
- Before putting the new belt on, this would be a good time to relubricate both the tray mechanism and the tray itself, as the original grease can harden with age. To remove the old grease, use a cotton swap dipped in isopropyl alcohol until all the grease is gone. Apply new grease to those same points, but do not apply grease to areas which did not originally have it, including the gear teeth. Pure lithium grease is highly recommended, but white lithium grease also works well. Do not use spray-on lithium grease as it contains additives that can degrade plastic!
- Begin reassembling the drive. Carefully manipulate the large black gear to help you pull the tray back in and lift the laser up. Place the clamp back on top and screw back it in.
- Reconnect the ribbon cable to the drive and place the drive inside the Sega CD. You do not need to screw everything back in just yet.
- Place the top case back onto the Sega CD, then attach a console and connect the setup as normal.
- While testing, make sure that the tray can fully extend and retract without difficulty or making excessive noise. Place a disc into the tray and make sure it loads. If the tray functions normally and the laser can successfully lift up to read the disc, reassemble the rest of the Sega CD.
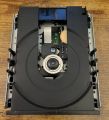
Fig. 1 - The clamp has been removed, exposing the center of the drive.
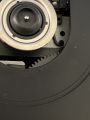
Fig. 2 - The teeth of the main gear that drives the tray are visible near the spindle. Move this gear to open the tray.
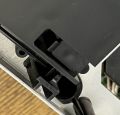
Fig. 3 - This small cover near the rear tray tab needs to be removed before the tray can be removed.
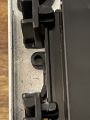
Fig. 4 - Pull this tab on the left side of the tray to help release it...
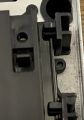
Fig. 5 - and this tab on the right.
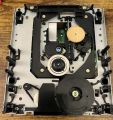
Fig. 6 - The tray has been removed, exposing more of the mechanism underneath. Part of the belt is visible but the rest is concealed under a black cover near the gear.
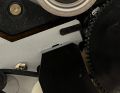
Fig. 7 - Pull this tab to help lift the cover off.
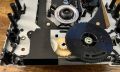
Fig. 8 - The belt cover has been slid over to the left and can now be removed.
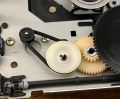
Fig. 9 - Your target.
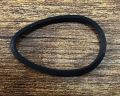
Fig. 10 - This original drive belt is clearly outstretched and must be replaced.


