Xbox 360:ProgSkeet
Jump to navigation
Jump to search
ProgSkeet is a flasher that is capable of using "solderless clips" which, after being soldered to the ProgSkeet, can be clipped onto an Xbox 360 or PS3 motherboard to read/write NAND chips. They are very rarely used for Xbox 360, likely because the clips wear out over time and do not have support forums, so it is not a recommended flasher. The information gathered here is from archived posts by Rogero and Richardlc.
No information was found regarding compatibility with Xenon consoles. If you know something about this, please contact us.
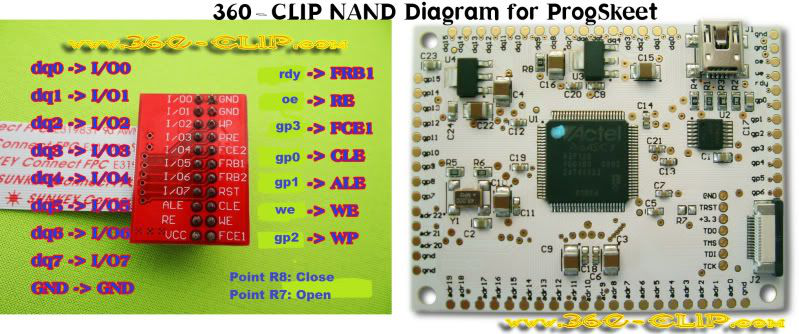
Connection Diagram
Read/Write Usage
- Download and launch WinSkeet and select the NAND tab. Ensure there is a check in the checkbox next to NAND 1 and RAW, and also the "Big Block" option if you have a 256MB/512MB Jasper. Set the other options as follows:
| Xenon | Zephyr | Falcon | Opus | Jasper 16MB | Jasper 256MB | Jasper 512MB | Trinity | Corona v1/v3/v5 | |
|---|---|---|---|---|---|---|---|---|---|
| Pages per Block | N/A^? | 32 | 32 | 32 | 32 | 64 | 64 | 32 | 128^? |
| Block Count | N/A^? | 1024 | 1024 | 1024 | 1024 | 2048 | 4096 | 1024 | 256^? |
- Firmly attach the ProgSkeet clip onto the NAND of the Xbox 360. Connect the ProgSkeet to your PC.
- Plug the Xbox 360 power brick in but **do not turn on the system**.
- In WinSkeet, click the "Dump..." button and save it to a location you will remember. Repeat this again, saving it as a different file name.
- Open J-Runner and select the "..." button next to the Load Source field and choose your first dump. Select the "..." button next to the Additional File field and choose your second dump. Press the "Nand Compare" button and it will list any bad blocks and tell you if the two dumps are an exact match. If they are, you can close J-Runner and proceed to make a modified dump. If they aren't, take more dumps until you get matching ones.
- Once you've modified a dump, select the Common tab and ensure that there is a checkmark next to "Differential Flash", as this will reduce risks by only flashing data that has been modified. Once you are ready, you can select the "Flash..." button to write the modified dump to your console. You may receive a verification error, which is normal.
