VirtualDub2 Lossless Captures
This page shows you how to use the VirtualDub2 software to get excellent quality, uncompressed game captures. While most content creators can simply use OBS to get footage of their games, anyone doing video analysis like comparison shots, or dev work needs a way to capture the exact video their console outputs. Unfortunately, capturing with little to no compression and full accuracy can be a bit confusing, so this page will walk you through it.
See RetroRGB's write-up comparing this video capture method to others.
What's needed
- Any capture card, but one that supports 4:4:4 color space will get you the most accurate results. One such device is a Datapath Vision.
- VirtualDub2
- VirtualDub Pack
- Codecs: The FFV1 uncompressed codec is already included with VDub2. If you'd like to use a compressed format, x264 is good. An alternative would be lagorith.
Setup
- Make sure your capture card is set up and working by opening a preview window, just to confirm operation.
- Download and extract VDub2 to a directory on your PC. Then launch whichever version matches your machine. 'VirtualDub64.exe' will be what most people use.
Capture
You'll have to set most of the following settings each time you capture. Some things are retained, but most things aren't. Don't worry, after doing it a few times, you'll familiarize yourself with the clunky interface and captures will be reasonably easy.
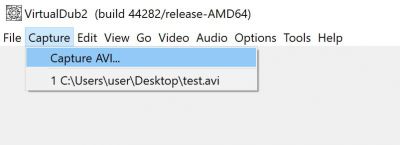
- To enable capture mode, go to Capture \\ Capture avi
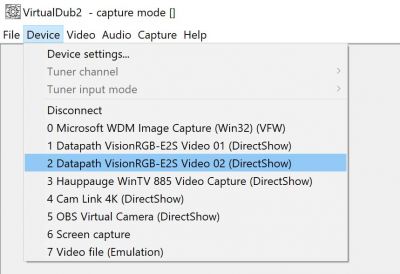
- Select your capture card in the "Device" menu:
- Configure your settings by going to Video \\ Capture Pin:
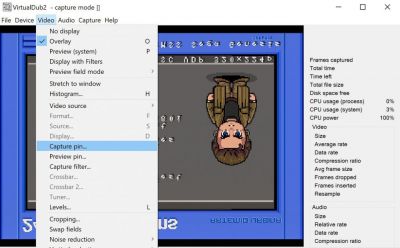
- Here's where you'll need to set color space and the capture resolution. In this example, a OSSC with an RGB source is used, so the color space is RGB. If needed, you can reference your capture card's preview window and confirm that the video signal is 640x480. You might need to flip the image.
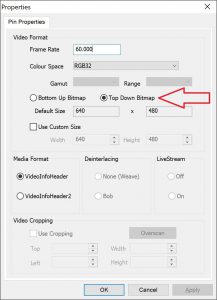
- After hitting "OK", it's possible you won't see an image. That's fine, just go to "Video" and select "Preview (system)". As a note, if your video is flipped upside down in the preview window, try switching the "Bottom Up" or "Top Down" bitmap location, as showed in the picture above.
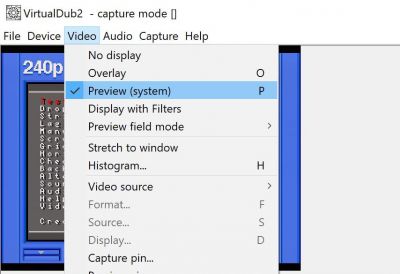
- Select the compression you'd like to use by going to "Video \\ compression":
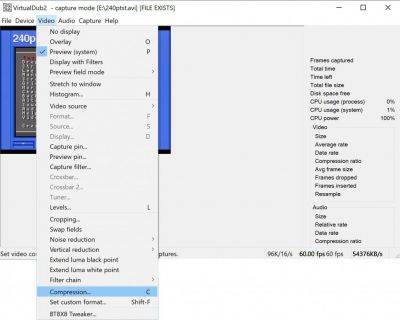
- You can choose anything you'd like here. If you'd just like a quality, yet compressed file (and your PC can handle it), x264 is great. The purpose of this guide is to show you how to get uncompressed captures though, so we'll be selecting the "FFMPEG FFV1 lossless codec". Make sure to hit "configure" and confirm the settings are how you want them. These are some example settings:

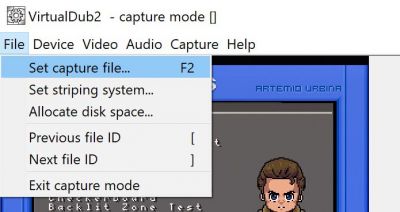
- Set the directory you want to save your video, by going to "File \\ Set capture file". Make sure to rename the target file between recordings, otherwise it will overwrite each time:
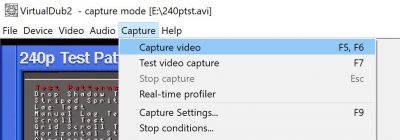
- Go to "Capture \\ Capture Video" to start recording. To stop capturing, either hit escape, or go back to the same drop-down and hit "Stop capture":


Verifying Captures
If your capture card's software allows for uncompressed screenshots (the Datapath's and Epiphan's do), you can verify your video capture settings with a still shot.
- Save a sill picture to a .bmp or .png using your capture software. You'll want a still scene, with something like text, or color bars to do a comparison. Title screen's, or test patterns are really helpful for this.
- Take a short (few-seconds) video of the exact same screen, using VDub2.
- Use software like MPC, or VLC Player (portable versions are available of both) to save a still .bmp or .png image of the video you just took.
- Use photo editing software to scale the image 1000% (10x). You may want to use nearest-neighbor, since these are retro game captures. If the still shot from your capture card's software matches the sill pulled from the VDub2 video, then you've successfully set up uncompressed capture!
As you can see here, the direct capture and VDub2 with proper settings look identical, but when VDub is set to the wrong color space, you can see a difference inside the numbers. Alternatively, using the wrong compression settings can cause things like this as well. If you can't see a difference here, you'll likely need to find a test you're used to, such as Link's face in A Link to the Past.

Direct Capture
This method seems to work with direct analog captures as well, provided your capture card supports it.
For Datapath Vision users: Using the same setup & phase techniques described in the Vision page, you can get an uncompressed "240p" capture. Also, if you already configured the capture size and phase in the Vision window (and left it open), VDub2 automatically detects the proper resolution. You might need to restart VDub2, then manually enter the resolution to match what your capture card detects though: 
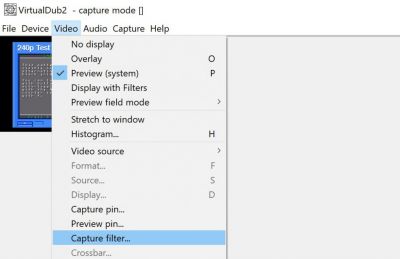
- If your image displays upside down, while in capture mode you can go to "Video \\ Capture Filter":
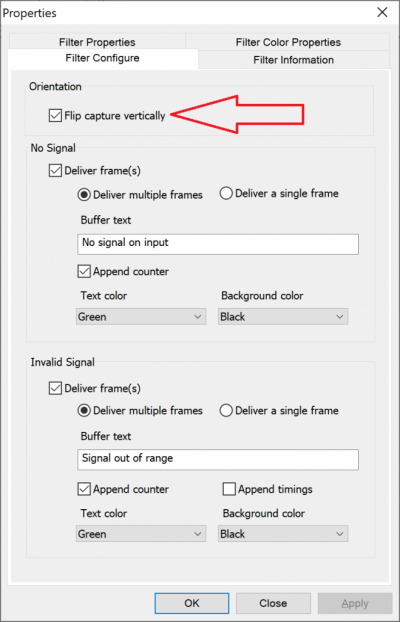
- ... then go to the "Filter Configure" tab and check off "Flip capture vertically":


Problems / Issues
The audio and video may randomly get out of sync and speed. It may seem like the audio was playing much faster than the video (or vice versa). Deleting the configuration in the registry at HKEY\CURRENT\USER\Software\VirtualDub.org may or may not fix this.