|
|
| (6 intermediate revisions by 3 users not shown) |
| Line 1: |
Line 1: |
| [[Category:RetroRGB Migration]]
| | The COMP2DVI takes an analog component YPbPr input and routes the signal to the analog pins of a DVI connector. The Comp Cleaner is an open-source ([https://github.com/db-electronics/UMDv2-kicad/blob/master/license CERN OHLv2]) device, designed to filter 240p - 1080i YPbPr component video signals for use with digital devices, such as flat-screen TV's and capture cards. This will allow more flexibility to your setup, depending on your target capture card or device. |
| The Comp Cleaner is _not_ a scaler!!! It simply routes the _analog_ signal to the _analog_ pins on the DVI connector!!! Visualize it exactly as if it was a Comp-to-Comp device, just with a different connector on the output side for interfacing with capture cards and displays' analog inputs. Please read this page for more info: | |
|
| |
|
| [[[File:Comp2DVIv2.2-1024x576.jpg)](https://cdn.retrorgb.com/wp-content/uploads/2019/08/Comp2DVIv2.2.jpg]] | | The source gerbers, as well as the Eagle design files, can be downloaded here: |
| | * [https://github.com/retrorgb/COMP2DVI/releases/tag/2.1 Source Files (GitHub)] |
|
| |
|
| The Comp Cleaner is an open-source ([https://github.com/db-electronics/UMDv2-kicad/blob/master/license CERN OHLv2]) device, designed filter 240p - 1080i YPbPr component video signals for use with digital devices, such as flat-screen TV's and capture cards. I’d someday like to see a Comp2VGA version that’s identical, but with a male VGA output connector, instead of the DVI; This will allow more flexibility to your setup, depending on your target capture card or device.
| | == DIP Switch Settings == |
|
| |
|
| This device has been tested and seems to work well at all resolutions. The gerbers, as well as the Eagle design files can be downloaded here:
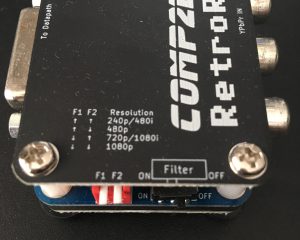
| | The settings are printed on the back of the PCB, but can be referenced here: <br> [[File:Comp2DVIv2DIP-300x240.jpg]] |
|
| |
|
| [https://github.com/retrorgb/COMP2DVI/releases/tag/2.1 https://github.com/retrorgb/COMP2DVI/releases/tag/2.1] [https://github.com/retrorgb/COMP2DVI/blob/master/COMP2DVI_BOM.xlsx https://github.com/retrorgb/COMP2DVI/blob/master/COMP2DVI\_BOM.xlsx]
| | == DVI-I Cable / Connector == |
|
| |
|
|
| | This can connect to your capture card via a DVI-I or DVI-A cable or coupler. Ensure your DVI cable you are using has the analog pins, otherwise it won't work! |
|
| |
|
| **Introduction** | | * DVI-I Cables: [https://www.amazon.com/gp/product/B00IAUYW0G] [https://www.amazon.com/gp/product/B0002GRUHI] |
| | * DVI-I Coupler: [https://ebay.to/2DUk9BD https://ebay.to/2DUk9BD] [https://www.mycablemart.com/store/cart.php?m=product_detail&p=5987 https://www.mycablemart.com/store/cart.php?m=product\_detail&p=5987] |
|
| |
|
| This device is powered by USB and has a DIP switch for the built in low-pass filters, tailored to each resolution. I'd expect in most cases you'd need the LPF on, but as a rule, you only want one LPF in any chain. I suggest starting with it off and try toggling to see if it removes noise. Detailed information can be found here: [http://www.retrorgb.com/datapathcapture.html http://www.retrorgb.com/datapathcapture.html]
| | == Full Bill Of Materials == |
| | |
|
| |
| | |
| ==== **DIP Switch Settings** ==== | |
| | |
| The settings are printed on the back of the PCB, but can be referenced here (click for full-size): [[[File:Comp2DVIv2DIP-300x240.jpg)](https://cdn.retrorgb.com/wp-content/uploads/2019/08/Comp2DVIv2DIP.jpg]]
| |
| | |
|
| |
| | |
| **DVI-I Cable / Connector**
| |
| | |
| This can connect to your capture card via a DVI-I cable or coupler. Make _sure_ whatever your connection is using has the analog pins, otherwise it won't work!
| |
| | |
| DVI-I Cables: [https://amzn.to/2Ndxglu https://amzn.to/2Ndxglu] [https://amzn.to/2T2QuQb https://amzn.to/2T2QuQb]
| |
| | |
| DVI-I Coupler: [https://ebay.to/2DUk9BD https://ebay.to/2DUk9BD] [https://www.mycablemart.com/store/cart.php?m=product_detail&p=5987 https://www.mycablemart.com/store/cart.php?m=product\_detail&p=5987]
| |
| | |
| DVI to BNC: Coming soon
| |
| | |
| DVI to RCA: Coming soon
| |
| | |
|
| |
| | |
| **Other Cables &** **Accessories**
| |
| | |
| If you're keeping the Comp2DVI close to your capture card for the least amount of signal loss, you'll want some short cables. I also like to have a cable tie, to help with strain relief when a coupler is used:
| |
| | |
| 1Ft Micro USB Cable: [https://amzn.to/2WsrG35 https://amzn.to/2WsrG35] Cable tie: [https://amzn.to/2GShtrc https://amzn.to/2GShtrc] RCA to 3.5mm adapter for audio: [https://amzn.to/2IqadW9 https://amzn.to/2IqadW9]
| |
| | |
|
| |
| | |
| **Full Bill Of Materials**
| |
|
| |
|
| [https://github.com/retrorgb/COMP2DVI/blob/master/COMP2DVI_BOM.xlsx https://github.com/retrorgb/COMP2DVI/blob/master/COMP2DVI\_BOM.xlsx] | | [https://github.com/retrorgb/COMP2DVI/blob/master/COMP2DVI_BOM.xlsx https://github.com/retrorgb/COMP2DVI/blob/master/COMP2DVI\_BOM.xlsx] |
|
| |
|
| |
|
| |
|
| |
|
| |
| A detailed guide on how to use this device with your capture setup can be found here: [https://www.retrorgb.com/videocapture.html https://www.retrorgb.com/videocapture.html]
| |
The COMP2DVI takes an analog component YPbPr input and routes the signal to the analog pins of a DVI connector. The Comp Cleaner is an open-source (CERN OHLv2) device, designed to filter 240p - 1080i YPbPr component video signals for use with digital devices, such as flat-screen TV's and capture cards. This will allow more flexibility to your setup, depending on your target capture card or device.
The source gerbers, as well as the Eagle design files, can be downloaded here:
DIP Switch Settings
The settings are printed on the back of the PCB, but can be referenced here:
DVI-I Cable / Connector
This can connect to your capture card via a DVI-I or DVI-A cable or coupler. Ensure your DVI cable you are using has the analog pins, otherwise it won't work!
Full Bill Of Materials
https://github.com/retrorgb/COMP2DVI/blob/master/COMP2DVI\_BOM.xlsx
