AV:Datapath Vision Lossless Captures: Difference between revisions
m (RetroRGB moved page RetroRGB Migration:Datapathcapture to AV:Datapath Vision Lossless Capture: Moving to NS) |
No edit summary |
||
| (8 intermediate revisions by 2 users not shown) | |||
| Line 1: | Line 1: | ||
This page will show you how to configure your Datapath's Vision software to get near-perfect captures, directly from your console's output with no scaler. You can also use the Vision as an "HDMI" capture card, with simply an HDMI to DVI adapter. It won't accept audio though, so you'll need an audio extractor for HDMI sources. | |||
This page will show you how to configure your Datapath's Vision software to get near-perfect captures, directly from your console's output with no scaler. | |||
See [https://www.retrorgb.com/videocapture.html RetroRGB's write-up] comparing this video capture method to others. | |||
{{Warning|This software has a major bug that will wipe any settings you just set. See the end of this page for details on how to work around it.}} | |||
For HDMI, you'll also need: | == Required Hardware == | ||
* '''Datapath Vision''' E1, E1S or E2s Capture card | |||
* For HDMI, you'll also need: | |||
** [https://www.retrorgb.com/hdmi-2-0b-1x2-splitter-audio-extractor.html HDMI Audio Extractor] | |||
** HDMI to DVI Cable | |||
A note about "E" vs "Es": The main difference is the non-s models might have issues capturing 1080p60 with both the Vision window and OBS (or capture software) window open at the same time, due to the 480MB/s bandwidth (as opposed to the E1s' 650MB/s). It would definitely have issues if you somehow had three windows accessing it as well. There shouldn't be issues below 1080p60 and this isn't a likely scenario; You only need to keep the Vision open to retain analog video capture settings. HDMI/Digital inputs can just be accessed through your capture software. | |||
A note about "E" vs "Es": | |||
You can do some back of the envelope calculations to confirm exactly what it can handle: | You can do some back of the envelope calculations to confirm exactly what it can handle: | ||
width x height x bits per pixel x fps / 8 / 1024 / 1024 The result of that calculation needs to be below 480MB/s For NV12, bpp is 12, for YUY2, bpp is 16, for RGB24, bpp is 24, and for RGB32/XRGB, bpp is 32. | width x height x bits per pixel x fps / 8 / 1024 / 1024 The result of that calculation needs to be below 480MB/s For NV12, bpp is 12, for YUY2, bpp is 16, for RGB24, bpp is 24, and for RGB32/XRGB, bpp is 32. | ||
Also, older VGA versions of the Datapath cards may work with these same instructions below, but your results may vary. | |||
{{Note|The digital receiver in the VisionRGB cards are extremely sensitive to bad cables, cheap adapters, and long cable runs. This often results in pink or green "speckles" across the screen in higher resolutions. If you're using your Vision for HDMI capture, it's recommended to run the signal through an HDMI splitter or audio extractor to "normalize" the signal.}} | |||
== Required Software == | |||
'''Datapath Vision Software''' (VisionInstall): https://www.datapathsoftware.com/downloads/?_sft_language=english ([https://web.archive.org/web/20210723024521/https://www.datapath.co.uk/datapath-current-downloads/vision-capture-card-downloads/vision-drivers/vision-drivers-1/572-visioninstall-v7-20-1 archive]) | |||
== Prepping for Capture == | |||
'''Digital Capture''': | |||
:If you're capturing from an HDMI or DVI source, there's not much that needs to be done. The only other setting you might ever need to change is the color domain, between RGB and YUV in the Window\\Input Settings tab (screenshots below). You'll definitely know right away if it's set wrong, as the colors will look very off. That's pretty much all you'll need to know for digital capture though. The only other thing to note, is the same tab you'll find the color setting will also list the detected resolution, which can come in handy. | |||
'''Analog Capture''': | |||
:Before even opening the capture software, you'll need to start by determining the exact resolution of the game you're trying to capture. Some consoles like the Genesis will be easy, as all games output at 320x256, except the ones on [http://www.firebrandx.com/downloads/Genesis-256-Mode-List.txt this list FirebrandX created]. Other console resolutions might be harder to find, so you may want to work around it by loading an emulator, setting the video to 1:1 and taking a screenshot, then referencing that resolution. In this example, a Genesis game is used that always runs at 320x256. You'll also sometimes run into games that switch between 240p and 480i, as well as games with multiple modes! | |||
== Configuring Vision == | |||
Now that you know the resolution, load up the Vision software. | |||
# Power on your console and load the game you're looking to capture. | |||
# Load the Vision software and go to Window \\ Input Settings. | |||
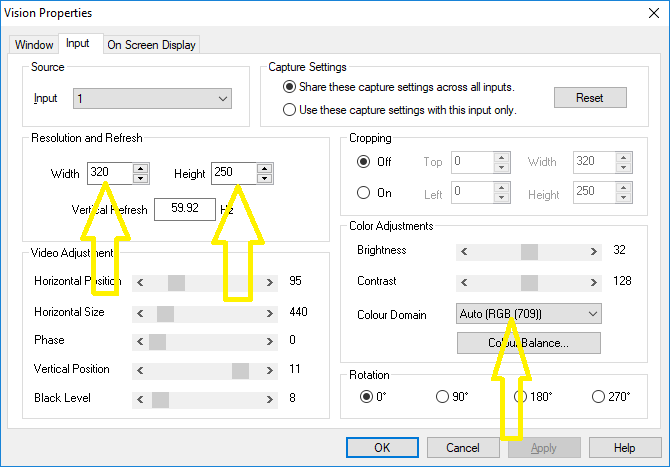
# Hit the "reset" button and note the resolution. Make SURE you've loaded the game and are in a main gameplay section before doing this, as many games use different resolutions for title screens or menus! Note the width and height listed - they will be different from the game resolution, but are important. | |||
# The color adjustments need to be set to YUV for component. You can normally leave it on Auto for RGB. <br> [[File:DatapathVisionInput1.png]] | |||
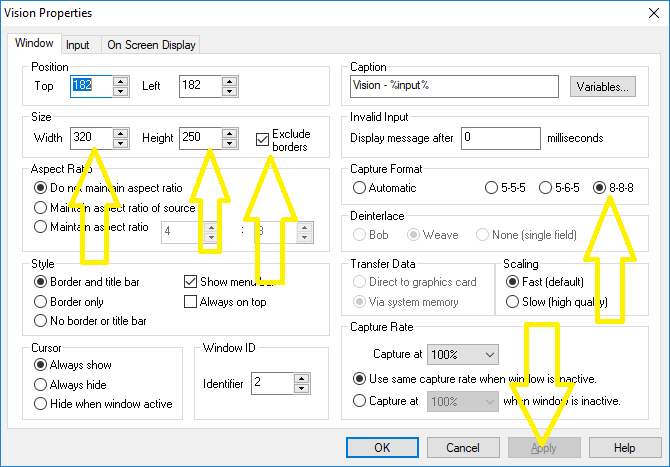
# Switch to the "Window" tab. <br> [[File:DatapathVisionWindow1.png]] | |||
# Set the resolution to match exactly what was listed in the Input tab. | |||
## Check off "Exclude Borders". | |||
## Set capture format to 8-8-8 | |||
## You can leave the scaling at "fast". | |||
## Hit Apply | |||
# Go back to the Input tab. | |||
# Now we need to determine the Horizontal Size. The easiest way to do this is by checking the R3 wiki to see if someone has already calculated this: http://r3.fyi/ | |||
#* For Sega Genesis 320, it's already been determined that the exact hsize required is 427.50. Unfortunately, the Vision software has to round up to single numbers, sometimes making perfect configuration impossible. For Genesis, you can usually use 427, but you can try 428 if you have issues. | |||
#* If there isn't already a determined hsize, you can try to find another game with the same horizontal resolution (samples). For example a SNES game running at 256x240 will have an hsize of 341. That means (in the context of this guide) any other 256 game should have an hsize of 341. | |||
#* If all else fails, you can try eyeballing it. As long as you've followed the steps above (reset and set the window size properly), you can attempt to change the hsize and Horizontal Position until the game just fits the window. | |||
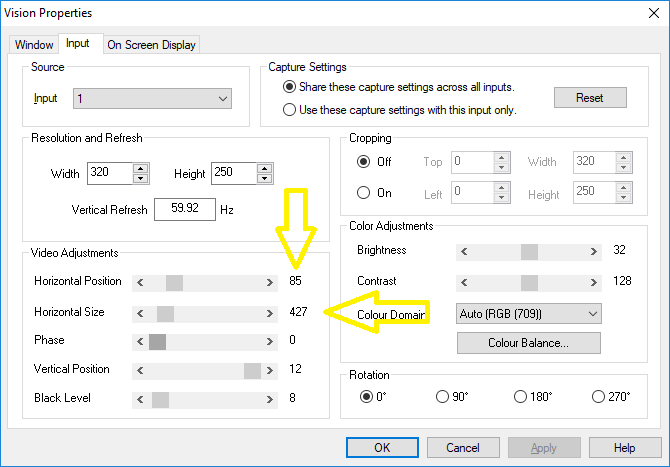
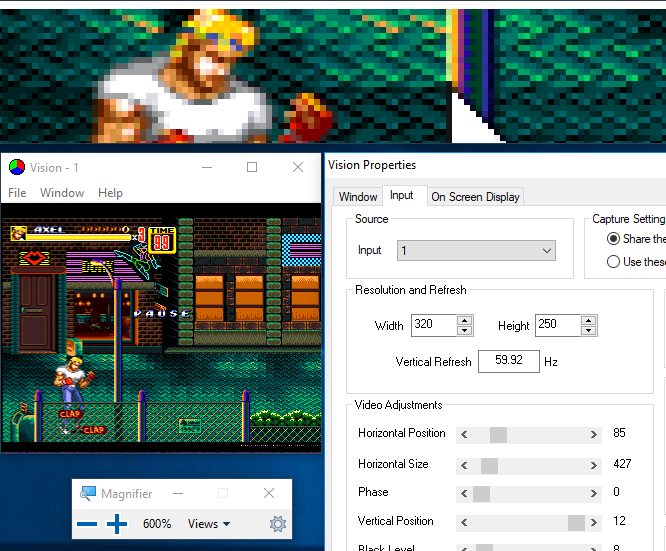
# Enter the hsize determined; 427 for this game. Move the Horizontal Position slider until the game perfectly fills the window. 85 was right for this example, but it might be slightly different. | |||
# Set the Vertical Position to wherever it looks good. Generally, 11 or 12 is OK. You can crop if you'd like, but it may be preferable to do that with other software. <br> [[File:DatapathVisionInput2.png]] | |||
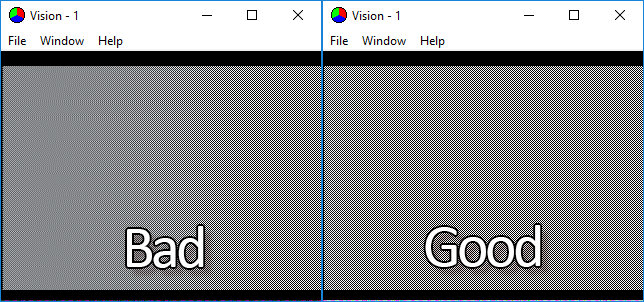
# Now we have to determine phase. This will be different pretty much every time. Different consoles, different filter settings, toggling the sync stripper. Pretty much everything effects phase and you should count on tweaking it each time you're ready to capture. By far the easiest way to dial in phase is by loading up a checkerboard pattern. You can then just move the phase slider until there's no noise on the screen. Sometimes there's no perfect position though. In those cases, just try to get it as good as possible. <br> [[File:DatapathVisionPhase.png]] | |||
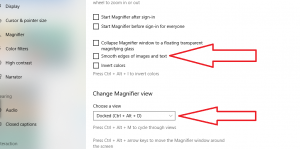
#* If you don't have the ability to load a checkerboard pattern, try to find a screen with lines on it and see if you can dial it in that way. Windows Magnifier can help with this. Load it up and uncheck "smooth edges". Also, the "docked" view may make things easier to manage. <br> [[File:WindowsMagnifier-300x149.png]] | |||
#* Now hover your mouse over the Vision window with the magnifier loaded and dial in the phase until there's no noise on the screen. <br> [[File:DatapathManualPhase.png]] [[File:DatapathManualPhase2.png]] | |||
# Everything else is easy compared to phase. Once you've gotten used to it, dialing in the settings takes seconds. Phase is always a pain. | |||
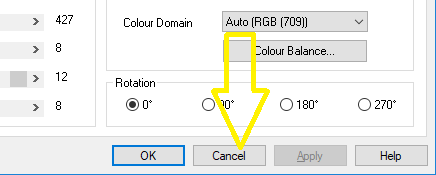
# Now for the strangest piece. In order to save these settings, you first need to hit '''cancel''', then "'''no'''": | |||
#* First hit the cancel button: <br> [[File:DatapathInputCancel.png]] | |||
#* Now, hit "'''no'''", confirming that you don't want to "undo" the changes. <br> [[File:DatapathVisionNo.png]] | |||
#* If you had hit "apply" or "cancel" instead, '''all of your settings would have changed and you'd have to re-set everything'''. To make matters worse, if you saved these settings to a file through the Vision window, it has a chance to save on it's own with different settings at some point. | |||
# Make sure to leave this window open. Even when you open other software to access it, the configured window '''must stay open'''! | |||
Latest revision as of 13:58, 14 July 2023
This page will show you how to configure your Datapath's Vision software to get near-perfect captures, directly from your console's output with no scaler. You can also use the Vision as an "HDMI" capture card, with simply an HDMI to DVI adapter. It won't accept audio though, so you'll need an audio extractor for HDMI sources.
See RetroRGB's write-up comparing this video capture method to others.
| This software has a major bug that will wipe any settings you just set. See the end of this page for details on how to work around it. |
Required Hardware
- Datapath Vision E1, E1S or E2s Capture card
- For HDMI, you'll also need:
- HDMI Audio Extractor
- HDMI to DVI Cable
A note about "E" vs "Es": The main difference is the non-s models might have issues capturing 1080p60 with both the Vision window and OBS (or capture software) window open at the same time, due to the 480MB/s bandwidth (as opposed to the E1s' 650MB/s). It would definitely have issues if you somehow had three windows accessing it as well. There shouldn't be issues below 1080p60 and this isn't a likely scenario; You only need to keep the Vision open to retain analog video capture settings. HDMI/Digital inputs can just be accessed through your capture software.
You can do some back of the envelope calculations to confirm exactly what it can handle:
width x height x bits per pixel x fps / 8 / 1024 / 1024 The result of that calculation needs to be below 480MB/s For NV12, bpp is 12, for YUY2, bpp is 16, for RGB24, bpp is 24, and for RGB32/XRGB, bpp is 32.
Also, older VGA versions of the Datapath cards may work with these same instructions below, but your results may vary.
| The digital receiver in the VisionRGB cards are extremely sensitive to bad cables, cheap adapters, and long cable runs. This often results in pink or green "speckles" across the screen in higher resolutions. If you're using your Vision for HDMI capture, it's recommended to run the signal through an HDMI splitter or audio extractor to "normalize" the signal. |
Required Software
Datapath Vision Software (VisionInstall): https://www.datapathsoftware.com/downloads/?_sft_language=english (archive)
Prepping for Capture
Digital Capture:
- If you're capturing from an HDMI or DVI source, there's not much that needs to be done. The only other setting you might ever need to change is the color domain, between RGB and YUV in the Window\\Input Settings tab (screenshots below). You'll definitely know right away if it's set wrong, as the colors will look very off. That's pretty much all you'll need to know for digital capture though. The only other thing to note, is the same tab you'll find the color setting will also list the detected resolution, which can come in handy.
Analog Capture:
- Before even opening the capture software, you'll need to start by determining the exact resolution of the game you're trying to capture. Some consoles like the Genesis will be easy, as all games output at 320x256, except the ones on this list FirebrandX created. Other console resolutions might be harder to find, so you may want to work around it by loading an emulator, setting the video to 1:1 and taking a screenshot, then referencing that resolution. In this example, a Genesis game is used that always runs at 320x256. You'll also sometimes run into games that switch between 240p and 480i, as well as games with multiple modes!
Configuring Vision
Now that you know the resolution, load up the Vision software.
- Power on your console and load the game you're looking to capture.
- Load the Vision software and go to Window \\ Input Settings.
- Hit the "reset" button and note the resolution. Make SURE you've loaded the game and are in a main gameplay section before doing this, as many games use different resolutions for title screens or menus! Note the width and height listed - they will be different from the game resolution, but are important.
- The color adjustments need to be set to YUV for component. You can normally leave it on Auto for RGB.
- Switch to the "Window" tab.
- Set the resolution to match exactly what was listed in the Input tab.
- Check off "Exclude Borders".
- Set capture format to 8-8-8
- You can leave the scaling at "fast".
- Hit Apply
- Go back to the Input tab.
- Now we need to determine the Horizontal Size. The easiest way to do this is by checking the R3 wiki to see if someone has already calculated this: http://r3.fyi/
- For Sega Genesis 320, it's already been determined that the exact hsize required is 427.50. Unfortunately, the Vision software has to round up to single numbers, sometimes making perfect configuration impossible. For Genesis, you can usually use 427, but you can try 428 if you have issues.
- If there isn't already a determined hsize, you can try to find another game with the same horizontal resolution (samples). For example a SNES game running at 256x240 will have an hsize of 341. That means (in the context of this guide) any other 256 game should have an hsize of 341.
- If all else fails, you can try eyeballing it. As long as you've followed the steps above (reset and set the window size properly), you can attempt to change the hsize and Horizontal Position until the game just fits the window.
- Enter the hsize determined; 427 for this game. Move the Horizontal Position slider until the game perfectly fills the window. 85 was right for this example, but it might be slightly different.
- Set the Vertical Position to wherever it looks good. Generally, 11 or 12 is OK. You can crop if you'd like, but it may be preferable to do that with other software.
- Now we have to determine phase. This will be different pretty much every time. Different consoles, different filter settings, toggling the sync stripper. Pretty much everything effects phase and you should count on tweaking it each time you're ready to capture. By far the easiest way to dial in phase is by loading up a checkerboard pattern. You can then just move the phase slider until there's no noise on the screen. Sometimes there's no perfect position though. In those cases, just try to get it as good as possible.
- If you don't have the ability to load a checkerboard pattern, try to find a screen with lines on it and see if you can dial it in that way. Windows Magnifier can help with this. Load it up and uncheck "smooth edges". Also, the "docked" view may make things easier to manage.
- Now hover your mouse over the Vision window with the magnifier loaded and dial in the phase until there's no noise on the screen.

- If you don't have the ability to load a checkerboard pattern, try to find a screen with lines on it and see if you can dial it in that way. Windows Magnifier can help with this. Load it up and uncheck "smooth edges". Also, the "docked" view may make things easier to manage.
- Everything else is easy compared to phase. Once you've gotten used to it, dialing in the settings takes seconds. Phase is always a pain.
- Now for the strangest piece. In order to save these settings, you first need to hit cancel, then "no":
- First hit the cancel button:
- Now, hit "no", confirming that you don't want to "undo" the changes.
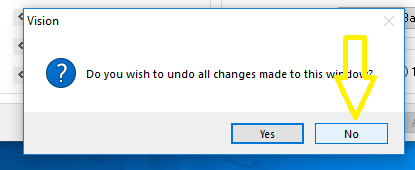
- If you had hit "apply" or "cancel" instead, all of your settings would have changed and you'd have to re-set everything. To make matters worse, if you saved these settings to a file through the Vision window, it has a chance to save on it's own with different settings at some point.
- First hit the cancel button:
- Make sure to leave this window open. Even when you open other software to access it, the configured window must stay open!


