Jaguar:Reverse Polarity Protection Diode: Difference between revisions
Jump to navigation
Jump to search
(Created page with "The Atari Jaguar and CD addon both lack protection from reverse polarity. If you are servicing a Jaguar, you may want to perform this quick mod to protect the Jaguar from ever having the wrong power supply plugged in and frying the power regulator, two capacitors, and a resistor. == Atari Jaguar == You will need a 1N5400 (protection up to 3A) rectifier diode. You can also use a higher voltage rated diode. # Desolder the wire that connects a ferrite filter to the posit...") |
No edit summary |
||
| Line 13: | Line 13: | ||
If you soldered the diode backwards, the console won’t power on. | If you soldered the diode backwards, the console won’t power on. | ||
== Atari Jaguar CD == | |||
You will need a 1N5400 (protection up to 3A) rectifier diode. You can also use a higher voltage rated diode. | |||
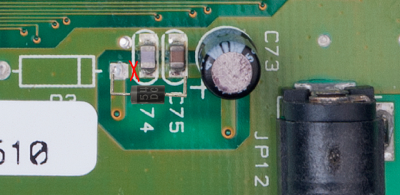
# Locate C74 & C75 beside the Power Supply Jack. Use a razor to carefully cut the trace (denoted by a red X above) between C74 and the pad beside it. You don’t need to cut a big gash. Cut two clean, thin lines perpendicular to the trace to sever it. | |||
#: [[File:Jag-CD-Diode-1.png|400px]] | |||
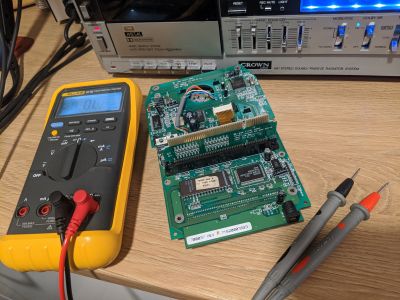
# Use a multimeter to confirm there is no longer continuity between C74 and the pad. | |||
#: [[File:IMG_20200208_192407.jpg|400px]] | |||
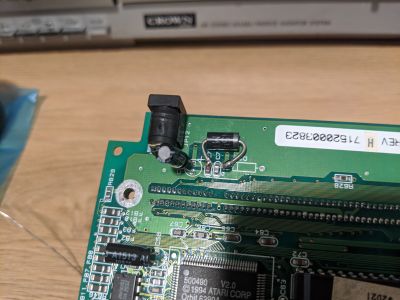
# Solder the diode as shown below. The cathode side of the diode (denoted by a bar or line) attaches to the pad, and the opposite anode side is soldered to C75. Clean any flux left on the PCB from the work with isopropyl alcohol. | |||
#: [[File:IMG_20200208_193204.jpg|400px]] | |||
If you soldered the diode on backwards, the console won’t power on. | |||
Latest revision as of 04:30, 25 September 2023
The Atari Jaguar and CD addon both lack protection from reverse polarity. If you are servicing a Jaguar, you may want to perform this quick mod to protect the Jaguar from ever having the wrong power supply plugged in and frying the power regulator, two capacitors, and a resistor.
Atari Jaguar
You will need a 1N5400 (protection up to 3A) rectifier diode. You can also use a higher voltage rated diode.
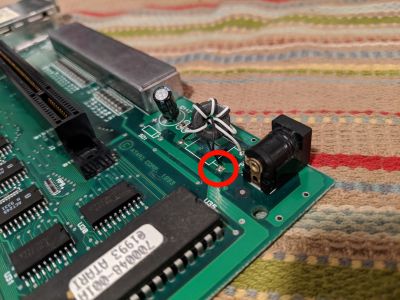
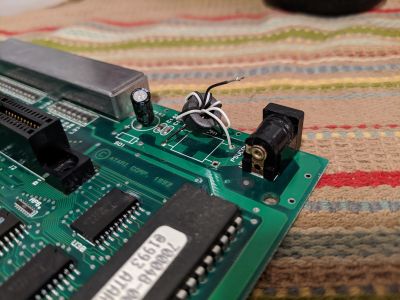
- Desolder the wire that connects a ferrite filter to the positive pin on the side of power supply terminal. Some Jaguar revisions have different wire colors, so the wire may be be black, red, or white. Pay close attention to the location of the wire in the photo below, not its color!
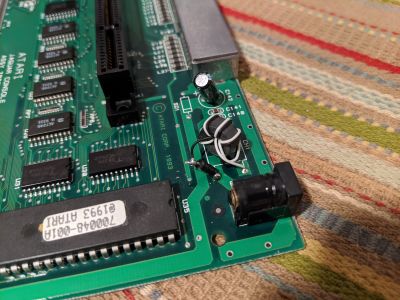
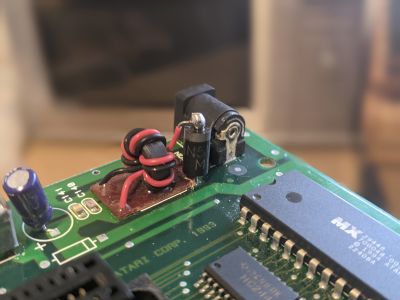
- Solder a diode to the (now empty) trace where the filter wire connected. The bar or line on your diode denoting the cathode (negative) side should face up and the anode (positive) side should be soldered to the PCB.
- Solder the filter wire to the cathode side of the diode with the bar. Clean any flux left on the PCB with isopropyl alcohol.
If you soldered the diode backwards, the console won’t power on.
Atari Jaguar CD
You will need a 1N5400 (protection up to 3A) rectifier diode. You can also use a higher voltage rated diode.
- Locate C74 & C75 beside the Power Supply Jack. Use a razor to carefully cut the trace (denoted by a red X above) between C74 and the pad beside it. You don’t need to cut a big gash. Cut two clean, thin lines perpendicular to the trace to sever it.
- Use a multimeter to confirm there is no longer continuity between C74 and the pad.
- Solder the diode as shown below. The cathode side of the diode (denoted by a bar or line) attaches to the pad, and the opposite anode side is soldered to C75. Clean any flux left on the PCB from the work with isopropyl alcohol.
If you soldered the diode on backwards, the console won’t power on.
