Xbox:CH341A EEPROM Reader: Difference between revisions
Bomb Bloke (talk | contribs) (Created page with "thumb|center ''This page is based upon [https://imgur.com/gallery/fNIaNs9 Harcroft's 2020 guide on Imgur.]'' This is a cheap CH341a programmer, which can be used to read or write to the Xbox:EEPROM chip of an original Xbox. Make sure the jumper is in that exact location (depending on your model). Flip the level up the right up. You will be using the right 8 slots on the ZIF socket. These progr...") |
m (Text replacement - "coloured" to "colored") |
||
| (One intermediate revision by one other user not shown) | |||
| Line 3: | Line 3: | ||
''This page is based upon [https://imgur.com/gallery/fNIaNs9 Harcroft's 2020 guide on Imgur.]'' | ''This page is based upon [https://imgur.com/gallery/fNIaNs9 Harcroft's 2020 guide on Imgur.]'' | ||
This is a cheap CH341a programmer, which can be used to read or write to the [[Xbox:EEPROM]] chip of an [[Xbox:Original Xbox Mods Wiki|original Xbox]]. Make sure the jumper is in that exact location (depending on your model). Flip the | This is a cheap CH341a programmer, which can be used to read or write to the [[Xbox:EEPROM]] chip of an [[Xbox:Original Xbox Mods Wiki|original Xbox]]. Make sure the jumper is in that exact location (depending on your model). Flip the lever up to start with. You will be using the right 8 slots on the ZIF socket. | ||
These programmers can be purchased cheaply on [https://www.amazon.com amazon.com], [https://www.ebay.com ebay.com], or other such places. Make sure you buy one with a clip and pre-assembled adapter board such as this one: https://www.amazon.com/dp/B07SHSL9X9 | These programmers can be purchased cheaply on [https://www.amazon.com amazon.com], [https://www.ebay.com ebay.com], or other such places. Make sure you buy one with a clip and pre-assembled adapter board such as this one: https://www.amazon.com/dp/B07SHSL9X9 | ||
| Line 15: | Line 15: | ||
# [[File:Xbox CH341A EEPROM reader - adapter.jpg|thumb|right]]Slide your adapter board into the rightmost eight slots and fold the lever down to lock it in place. Make sure pin 1 matches pin 1 on the programmer slot, per the red arrow pictured to the side.<br clear="all"> | # [[File:Xbox CH341A EEPROM reader - adapter.jpg|thumb|right]]Slide your adapter board into the rightmost eight slots and fold the lever down to lock it in place. Make sure pin 1 matches pin 1 on the programmer slot, per the red arrow pictured to the side.<br clear="all"> | ||
# [[File:Xbox CH341A EEPROM reader - clip ribbon.jpg|thumb|right]]Once the adapter board is seated firmly and the lever is down locking it in place, connect the 8 pin connector from the clip to the adapter board. Make sure the red line is on the same side as pin 1, this is critical so you do not connect the clip to the chip backwards.<br clear="all"> | # [[File:Xbox CH341A EEPROM reader - clip ribbon.jpg|thumb|right]]Once the adapter board is seated firmly and the lever is down locking it in place, connect the 8 pin connector from the clip to the adapter board. Make sure the red line is on the same side as pin 1, this is critical so you do not connect the clip to the chip backwards.<br clear="all"> | ||
# [[File:Xbox CH341A EEPROM reader - EEPROM 1.6.jpg|thumb|right]]This is a 1.6 Xbox. The small 8 pin chip with the marking L02 next to the lettering U7D1 is the EEPROM chip. The little dot in the bottom left corner is pin 1. It's been marked here with a red dot to make it stand out.<br><br>Your Xbox should be off and unplugged before attempting to dump the EEPROM with this method.<br><br>Ignore the copper | # [[File:Xbox CH341A EEPROM reader - EEPROM 1.6.jpg|thumb|right]]This is a 1.6 Xbox. The small 8 pin chip with the marking L02 next to the lettering U7D1 is the EEPROM chip. The little dot in the bottom left corner is pin 1. It's been marked here with a red dot to make it stand out.<br><br>Your Xbox should be off and unplugged before attempting to dump the EEPROM with this method.<br><br>Ignore the copper colored heatsink on the bottom, you wouldn't normally see that inside an Xbox.<br><br>If you are attempting this on something other than a 1.6 Xbox, skip down to step 6.<br clear="all"> | ||
# [[File:Xbox CH341A EEPROM reader - EEPROM clipped1.jpg|thumb|right]]Connect the clip as shown here. Be very gentle and take your time. The clip should be able to hold itself in place without assistance. Make sure to orient the clip with the red wire on the side of pin 1.<br clear="all"> | # [[File:Xbox CH341A EEPROM reader - EEPROM clipped1.jpg|thumb|right]]Connect the clip as shown here. Be very gentle and take your time. The clip should be able to hold itself in place without assistance. Make sure to orient the clip with the red wire on the side of pin 1.<br clear="all"> | ||
# [[File:Xbox CH341A EEPROM reader - EEPROM clipped2.jpg|thumb|right]]Another angle showing the plastic from the clip gripping the sides of the EEPROM chip.<br clear="all"> | # [[File:Xbox CH341A EEPROM reader - EEPROM clipped2.jpg|thumb|right]]Another angle showing the plastic from the clip gripping the sides of the EEPROM chip.<br clear="all"> | ||
# [[File:Xbox CH341A EEPROM reader - EEPROM 1.0.jpg|thumb|right]]This is a 1.0 Xbox. There are surface mount components too close to the EEPROM. You likely will not be able to get a clip around this chip to dump it.<br><br>Instead, use long dupont jumpers from the adapter board. You may be able to hold or tape the jumpers in place, if not soldering may be required: https://www.amazon.com/dp/B0815S6P8Y<br>• Adapter pin 4 to LPC pin 2 for ground<br>• Adapter pin 5 to LPC pin 14 for SDA<br>• Adapter pin 6 to LPC pin 13 for SCL<br>• Adapter pin 8 to LPC pin 15 for 3.3V<br clear="all"> | # [[File:Xbox CH341A EEPROM reader - EEPROM 1.0.jpg|thumb|right]]This is a 1.0 Xbox. There are surface mount components too close to the EEPROM. You likely will not be able to get a clip around this chip to dump it.<br><br>Instead, use long dupont jumpers from the adapter board. You may be able to hold or tape the jumpers in place, if not soldering may be required: https://www.amazon.com/dp/B0815S6P8Y<br>• Adapter pin 4 to LPC pin 2 for ground<br>• Adapter pin 5 to LPC pin 14 for SDA<br>• Adapter pin 6 to LPC pin 13 for SCL<br>• Adapter pin 8 to LPC pin 15 for 3.3V<br><br>You may alternatively connect the ground to a motherboard screw, or to the console's RF shield. If your console is able to start under its own power, you can leave out the 3.3V line - but do ''not'' connect your Xbox to the mains and LPC pin 15 to your programmer at the same time!<br clear="all"> | ||
# [[File:Xbox CH341A EEPROM reader - ZIF layout.jpg|thumb|right]]If you're working without the adapter, wires can be directly locked into the programmer's ZIF socket like so:<br>• ZIF 4 to LPC pin 2 for ground<br>• ZIF 13 to LPC pin 14 for SDA<br>• ZIF 14 to LPC pin 13 for SCL<br>• ZIF 16 to LPC pin 15 for 3.3V<br clear="all"> | |||
# [[File:Xbox CH341A EEPROM reader - CH341A Programmer.png|thumb|right]]Download the [[:File:CH341A.zip|CH341A v1.31 free package]]. The files contained have been scanned and been given a clean bill of health with MalwareBytes Anti Malware and Bitdefender Total Security.<br><br>Install the provided driver, or connect your device and manually install the driver by selecting the .inf file.<br><br>Launch the CH341AFree executable from the CH341A v1.31 free folder.<br>With your programmer connected, the program will say Device state: Connected.<br>If it does not, reinstall the driver or connect the device to a different USB port.<br clear="all"> | # [[File:Xbox CH341A EEPROM reader - CH341A Programmer.png|thumb|right]]Download the [[:File:CH341A.zip|CH341A v1.31 free package]]. The files contained have been scanned and been given a clean bill of health with MalwareBytes Anti Malware and Bitdefender Total Security.<br><br>Install the provided driver, or connect your device and manually install the driver by selecting the .inf file.<br><br>Launch the CH341AFree executable from the CH341A v1.31 free folder.<br>With your programmer connected, the program will say Device state: Connected.<br>If it does not, reinstall the driver or connect the device to a different USB port.<br clear="all"> | ||
# [[File:Xbox CH341A EEPROM reader - select reader.png|thumb|right]]With the programmer connected to USB, the adapter board and clip connected, the clip connected to the EEPROM firmly and in the right direction, you are ready to perform your dump. The programmer's 3. | # [[File:Xbox CH341A EEPROM reader - select reader.png|thumb|right]]With the programmer connected to USB, the adapter board and clip connected, the clip connected to the EEPROM firmly and in the right direction, you are ready to perform your dump. The programmer's 3.3V power line is connected to more than just your EEPROM on your Xbox motherboard, so there will be a fairly high power draw. Do not leave your programmer connected to the Xbox motherboard for more than a few minutes, otherwise the voltage regulator on your programmer could overheat.<br><br>If the Device state indicator on the bottom right of the window switches to red and says NotConnect, you may have the clip or another part connected backwards. Your programmer will also heat up very quickly and could be damaged - make sure you connect pin 1 on the 24xx side of the programmer to pin 1 of your EEPROM!<br><br>If the Device state indicator stays Connected in black text select the 24 EEPROM radio button. Open the drop down menu and select 24C02.<br clear="all"> | ||
# [[File:Xbox CH341A EEPROM reader - read.png|thumb|right]]Click Read. If your clip is connected properly, the data window should populate in less than a second.<br clear="all"> | # [[File:Xbox CH341A EEPROM reader - read.png|thumb|right]]Click Read. If your clip is connected properly, the data window should populate in less than a second.<br clear="all"> | ||
# [[File:Xbox CH341A EEPROM reader - example dump.png|thumb|right]]A valid EEPROM dump should look something like this.<br clear="all"> | # [[File:Xbox CH341A EEPROM reader - example dump.png|thumb|right]]A valid EEPROM dump should look something like this.<br clear="all"> | ||
Latest revision as of 18:34, 30 June 2024
This page is based upon Harcroft's 2020 guide on Imgur.
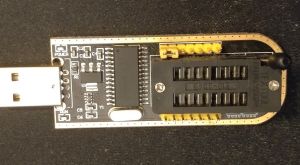
This is a cheap CH341a programmer, which can be used to read or write to the Xbox:EEPROM chip of an original Xbox. Make sure the jumper is in that exact location (depending on your model). Flip the lever up to start with. You will be using the right 8 slots on the ZIF socket.
These programmers can be purchased cheaply on amazon.com, ebay.com, or other such places. Make sure you buy one with a clip and pre-assembled adapter board such as this one: https://www.amazon.com/dp/B07SHSL9X9
You may also want some dupont jumpers if you are attempting this on an Xbox with components that are too close to the EEPROM for a clip to fit: https://www.amazon.com/dp/B0815S6P8Y
Standard warning: If you break it, it's your fault. Anything you do inside your Xbox can damage it and render it unusable. If you can't accept that, find another way to dump your EEPROM.
Additional: Although it works just fine with 1.6 Xboxes, the AMS1117 on the CH341a can't handle powering everything on 1.0 & 1.1 boards and fails to read them without an external power source (untested with 1.2 - 1.4 boards). The device is poorly designed and there's a small risk you can damage your motherboard. It runs 3.3V power to power up the chip it's connected to, but it programs at 5V.
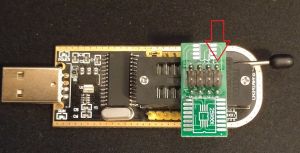
- Slide your adapter board into the rightmost eight slots and fold the lever down to lock it in place. Make sure pin 1 matches pin 1 on the programmer slot, per the red arrow pictured to the side.
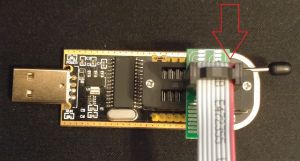
- Once the adapter board is seated firmly and the lever is down locking it in place, connect the 8 pin connector from the clip to the adapter board. Make sure the red line is on the same side as pin 1, this is critical so you do not connect the clip to the chip backwards.
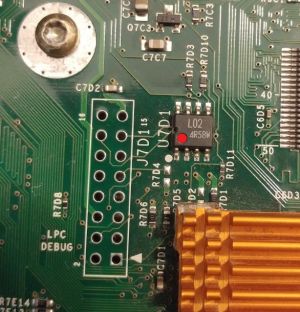
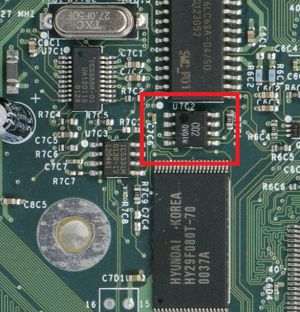
- This is a 1.6 Xbox. The small 8 pin chip with the marking L02 next to the lettering U7D1 is the EEPROM chip. The little dot in the bottom left corner is pin 1. It's been marked here with a red dot to make it stand out.
Your Xbox should be off and unplugged before attempting to dump the EEPROM with this method.
Ignore the copper colored heatsink on the bottom, you wouldn't normally see that inside an Xbox.
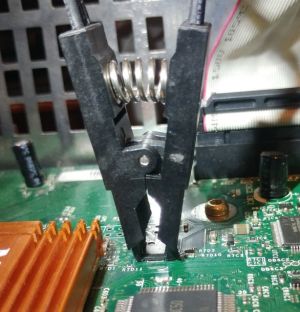
If you are attempting this on something other than a 1.6 Xbox, skip down to step 6. - Connect the clip as shown here. Be very gentle and take your time. The clip should be able to hold itself in place without assistance. Make sure to orient the clip with the red wire on the side of pin 1.
- Another angle showing the plastic from the clip gripping the sides of the EEPROM chip.
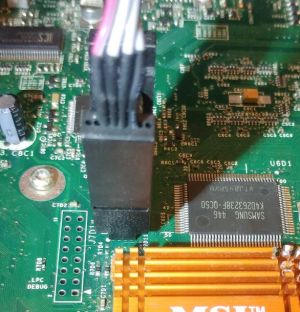
- This is a 1.0 Xbox. There are surface mount components too close to the EEPROM. You likely will not be able to get a clip around this chip to dump it.
Instead, use long dupont jumpers from the adapter board. You may be able to hold or tape the jumpers in place, if not soldering may be required: https://www.amazon.com/dp/B0815S6P8Y
• Adapter pin 4 to LPC pin 2 for ground
• Adapter pin 5 to LPC pin 14 for SDA
• Adapter pin 6 to LPC pin 13 for SCL
• Adapter pin 8 to LPC pin 15 for 3.3V
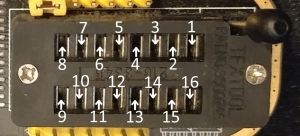
You may alternatively connect the ground to a motherboard screw, or to the console's RF shield. If your console is able to start under its own power, you can leave out the 3.3V line - but do not connect your Xbox to the mains and LPC pin 15 to your programmer at the same time! - If you're working without the adapter, wires can be directly locked into the programmer's ZIF socket like so:
• ZIF 4 to LPC pin 2 for ground
• ZIF 13 to LPC pin 14 for SDA
• ZIF 14 to LPC pin 13 for SCL
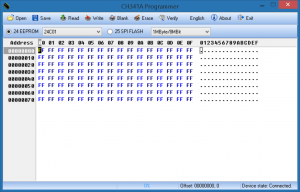
• ZIF 16 to LPC pin 15 for 3.3V - Download the CH341A v1.31 free package. The files contained have been scanned and been given a clean bill of health with MalwareBytes Anti Malware and Bitdefender Total Security.
Install the provided driver, or connect your device and manually install the driver by selecting the .inf file.
Launch the CH341AFree executable from the CH341A v1.31 free folder.
With your programmer connected, the program will say Device state: Connected.
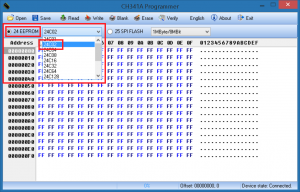
If it does not, reinstall the driver or connect the device to a different USB port. - With the programmer connected to USB, the adapter board and clip connected, the clip connected to the EEPROM firmly and in the right direction, you are ready to perform your dump. The programmer's 3.3V power line is connected to more than just your EEPROM on your Xbox motherboard, so there will be a fairly high power draw. Do not leave your programmer connected to the Xbox motherboard for more than a few minutes, otherwise the voltage regulator on your programmer could overheat.
If the Device state indicator on the bottom right of the window switches to red and says NotConnect, you may have the clip or another part connected backwards. Your programmer will also heat up very quickly and could be damaged - make sure you connect pin 1 on the 24xx side of the programmer to pin 1 of your EEPROM!
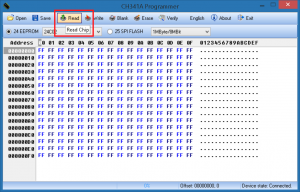
If the Device state indicator stays Connected in black text select the 24 EEPROM radio button. Open the drop down menu and select 24C02. - Click Read. If your clip is connected properly, the data window should populate in less than a second.
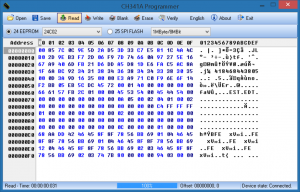
- A valid EEPROM dump should look something like this.
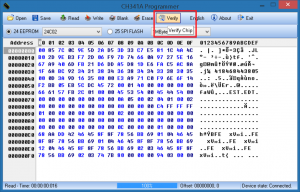
- Once you have successfully dumped your EEPROM, click the verify button to make sure your dump matches the contents of the chip.
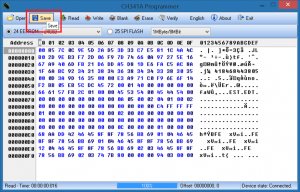
- Once you have verified your EEPROM dump, click the save button and back it up to multiple locations.
Gently remove the clip from your Xbox EEPROM. Load a secondary copy of your EEPROM into Xbox:LiveInfo or another application to verify it is a valid dump. - Use your EEPROM dump for profit?
