Dreamcast:Removing 12v Regulator: Difference between revisions
Jump to navigation
Jump to search
(created page) |
No edit summary |
||
| (2 intermediate revisions by one other user not shown) | |||
| Line 1: | Line 1: | ||
This tutorial goes over how to remove the | This tutorial goes over how to remove the 12V voltage regulator on the power supply. This is only recommended whenever using an ODE such as the GDEMU or MODE, as these do not use the 12V rail. As a result, the voltage regulator will produce more heat without a load and could cause overheating issues. | ||
==Requirements== | ==Requirements== | ||
| Line 10: | Line 10: | ||
==Removal== | ==Removal== | ||
# | # Undo the four screws holding together the Dreamcast and remove the top shell. [https://www.ifixit.com/Guide/Sega+Dreamcast+Top+Cover+Replacement/1570 iFixIt has a helpful guide here with pictures on how to remove the top cover if needed.] | ||
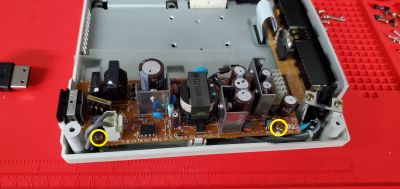
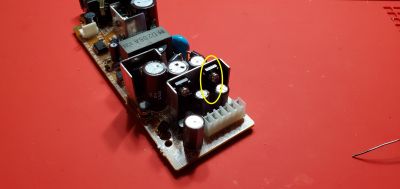
# Once the top cover is off remove the | # Once the top cover is off, remove the two Philips screws holding the power supply into place, and take note where the regulator is (as shown below): | ||
[[File:Dc psu removal.jpg|400px]] | [[File:Dc psu removal.jpg|400px]] | ||
| Line 17: | Line 17: | ||
[[File:Dc 12v.jpg|400px]] | [[File:Dc 12v.jpg|400px]] | ||
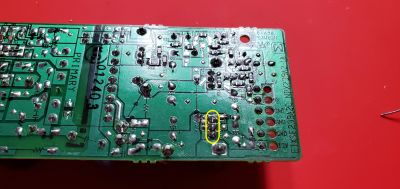
# Flip the power supply over and desolder the 3 legs of the regulator. | # <li value="3">Flip the power supply over and desolder the 3 legs of the regulator.</li> | ||
[[File:Dc 12v desolder.jpg|400px]] | [[File:Dc 12v desolder.jpg|400px]] | ||
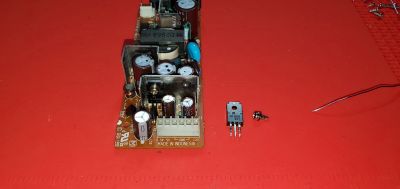
# Flip the power supply back over and unscrew the Philips screw holding the regulator in place, and then pull it out. | # <li value="4">Flip the power supply back over and unscrew the Philips screw holding the regulator in place, and then pull it out. Make sure to keep the regulator in a safe place in case you decide to reinstall the GD-ROM drive.</li> | ||
[[File:Dc 12v done.jpg|400px]] | [[File:Dc 12v done.jpg|400px]] | ||
Revision as of 15:26, 7 October 2024
This tutorial goes over how to remove the 12V voltage regulator on the power supply. This is only recommended whenever using an ODE such as the GDEMU or MODE, as these do not use the 12V rail. As a result, the voltage regulator will produce more heat without a load and could cause overheating issues.
Requirements
The following materials are required for this mod:
- Desoldering equipment, such as a desoldering gun, desolder pump, or wick
- Philips screwdriver
Removal
- Undo the four screws holding together the Dreamcast and remove the top shell. iFixIt has a helpful guide here with pictures on how to remove the top cover if needed.
- Once the top cover is off, remove the two Philips screws holding the power supply into place, and take note where the regulator is (as shown below):
- Flip the power supply over and desolder the 3 legs of the regulator.
- Flip the power supply back over and unscrew the Philips screw holding the regulator in place, and then pull it out. Make sure to keep the regulator in a safe place in case you decide to reinstall the GD-ROM drive.


