WiiU:De Fuse: Difference between revisions
No edit summary |
No edit summary |
||
| (2 intermediate revisions by 2 users not shown) | |||
| Line 12: | Line 12: | ||
== Software Setup == | == Software Setup == | ||
# Download the latest release of [https://github.com/shinyquagsire23/wii_u_modchip/releases de_Fuse]. | # Download the latest release of [https://github.com/shinyquagsire23/wii_u_modchip/releases de_Fuse]. | ||
#* If you are going to use an | #* If you are going to use an SD Card, copy the <code>boot1.img</code> file out of the <code>.zip</code> file. Flash it to the SD Card with [https://etcher.balena.io/ BalenaEtcher]. | ||
#* The <code>boot1.img</code> has a premade MBR for 1GiB SD Cards. If you are using an SD Card bigger than this, it is recommended to resize the FAT32 partition to use the full card. Windows users will need to use a 3rd party tool, Linux users can use gparted, macOS users can use Disk Utility. | #* The <code>boot1.img</code> has a premade MBR for 1GiB SD Cards. If you are using an SD Card bigger than this, it is recommended to resize the FAT32 partition to use the full card. Windows users will need to use a 3rd party tool, Linux users can use gparted, macOS users can use Disk Utility. | ||
# If you have it, copy the <code>otp.bin</code> file from the console you are de_Fusing to the root of the SD Card. If you do not have it, don't worry about it for now. | # If you have it, copy the <code>otp.bin</code> file from the console you are de_Fusing to the root of the SD Card. If you do not have it, don't worry about it for now. | ||
| Line 36: | Line 36: | ||
** If you have the Pico plugged into a PC and have the logging software open, you should see the Pico glitch the console and then succeed. | ** If you have the Pico plugged into a PC and have the logging software open, you should see the Pico glitch the console and then succeed. | ||
* What you do from now on is up to you. You can select <code>Patch (sd) and boot IOS (slc)</code> to boot into the OS. | * What you do from now on is up to you. You can select <code>Patch (sd) and boot IOS (slc)</code> to boot into the OS. | ||
** If you didn't copy the <code>otp.bin</code> file to the SD Card earlier, go to <code> Backup and Restore</code> | ** If you didn't copy the <code>otp.bin</code> file to the SD Card earlier, go to <code> Backup and Restore</code> → <code>Dump OTP with PRSHhax</code>. The <code>otp.bin</code> should be dumped to the SD Card, and you can now boot the console with the option mentioned above. | ||
[[Category:Wii U]] | |||
Latest revision as of 02:54, 5 November 2024
de_Fuse is a mod-chip for the Wii U created by shinyquagsire23. It allows you to boot unsigned code directly after the boot ROM, which can be used to restore NAND backups, boot custom firmware (ie. stroopwafel) very early in the boot chain, and use whatever other plugins you would like BEFORE the OS has even started. The downside of this is you must always boot with an SD Card, due to needing to load the OTP from somewhere.
Logging through the Pico is also doable with de_Fuse. You will need to have the Pico plugged into the PC at all times for this, and you would need to use special software on the PC for it. TeraTerm for Windows and minicom on Linux should work. It is also possible to hijack one of the Wii U's USB ports so you can close the console while still having access to the logs produced. Whatever you want to do for this is up to you, but you can probably get away with just using minute_minute through HDMI.
What You Need
- Soldering experience. This is a hardware mod, so this is a requirement.
- It is recommended you use 38AWG magnet wire, however you can get by with up to 32AWG magnet wire.
- An RP2040-based device. A RPi Pico works fine, but anything with the RP2040 will work. The guide assumes you are using a Pico.
- For setup within a de_Fused environment, you will need a <=2GiB SD Card. The SD Card cannot be SDHC or SDXC due to the boot ROM not supporting those.
- Alternatively you can boot into minute_minute via the Browser Exploit/PayloadLoader + the fw.img loader to flash a boot1 image to the SLCCMPT and bypass the need for an SD Card. Instructions will not be provided here (yet).
Software Setup
- Download the latest release of de_Fuse.
- If you are going to use an SD Card, copy the
boot1.imgfile out of the.zipfile. Flash it to the SD Card with BalenaEtcher. - The
boot1.imghas a premade MBR for 1GiB SD Cards. If you are using an SD Card bigger than this, it is recommended to resize the FAT32 partition to use the full card. Windows users will need to use a 3rd party tool, Linux users can use gparted, macOS users can use Disk Utility.
- If you are going to use an SD Card, copy the
- If you have it, copy the
otp.binfile from the console you are de_Fusing to the root of the SD Card. If you do not have it, don't worry about it for now. - Copy the
fw.imgfile and thewiiufolder from the.zipto the root of the SD Card. Also copy thepico_defuse.uf2file, but leave it in your Downloads. - Hold the BOOT button on the Pico and then plug it into your PC while still holding the button.
- A new drive should appear called
RPI-RP2, copy thepico_defuse.uf2file to this new drive. The drive should automatically remove itself when fully copied over. - The Pico should now have the LED illuminated.
Installing the mod chip
Now for the really fun stuff!
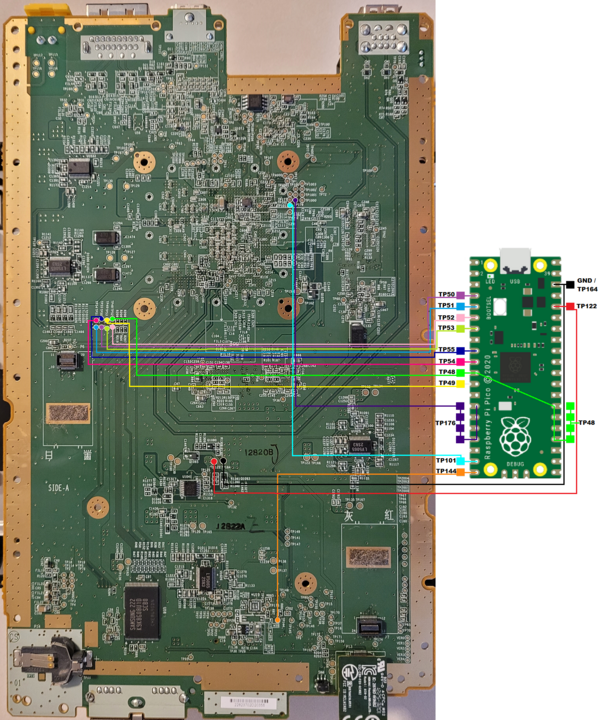
- There is a detailed diagram on the de_Fuse GitHub repo showing each connection you must make. Courtesy of JadeStrike to take the time and create the diagram.
- If you flashed the boot1 image to the SLCCMPT, and don't plan on using an SD Card in the future, you don't need to have TP176 and TP101 (EXI) connected.
- R677 can be used as an alternate point to TP144 (nRST).
- TP122 (3v3) can be left unconnected if you plan to keep the console open and power the Pico through its USB port.
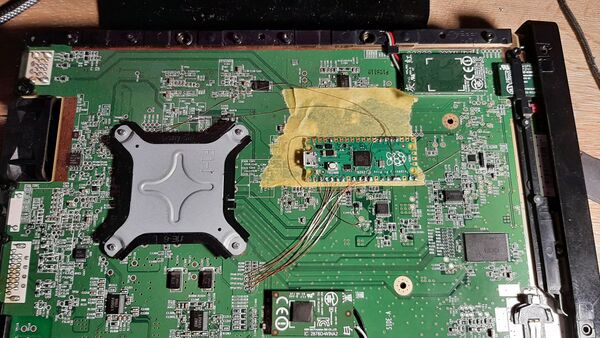
After all of that work, hopefully you didn't rip any pads! The final result could look similar to this:
- Now is the time to try and turn on the console!
- Plug in the LEDs, put on the heatsink, plug it into power, (optionally) plug in the Pico to PC through USB and if everything went well, you will see the front LED flash some colors! Success!
- If you have the Pico plugged into a PC and have the logging software open, you should see the Pico glitch the console and then succeed.
- What you do from now on is up to you. You can select
Patch (sd) and boot IOS (slc)to boot into the OS.- If you didn't copy the
otp.binfile to the SD Card earlier, go toBackup and Restore→Dump OTP with PRSHhax. Theotp.binshould be dumped to the SD Card, and you can now boot the console with the option mentioned above.
- If you didn't copy the

