DIY Ethernet Adapter
mNo edit summary |
No edit summary |
||
| Line 3: | Line 3: | ||
Thankfully there is a relatively easy hardware/software modification that allows inexpensive USB Realtek RTL8152 adapters to be used! | Thankfully there is a relatively easy hardware/software modification that allows inexpensive USB Realtek RTL8152 adapters to be used! | ||
[https://github.com/isage/vita-usb-ether Full technical details are available here.] | |||
'''Note:''' | '''Note:''' Ad hoc multiplayer is not supported via ethernet and will continue to use a WiFi connection. | ||
== Compatible ethernet adapters == | == Compatible ethernet adapters == | ||
Finding a RTL8152 USB ethernet adapter is often the most difficult step. Thankfully there is one easily acquired adapter, the Amazon PS92LQ, better known as [https://www.amazon. | Finding a RTL8152 USB ethernet adapter is often the most difficult step. Thankfully there is one easily acquired adapter, the Amazon PS92LQ, better known as [https://www.amazon.com/Amazon-Ethernet-Adapter-Fire-Devices/dp/B074TC662N/ "Amazon Ethernet Adapter for Amazon Fire TV Devices"]. | ||
This adapter is ideal as it requires no modification to be used on a 2nd generation PS Vita, PCH-20xx. | This adapter is ideal as it requires no modification to be used on a 2nd generation PS Vita, PCH-20xx. | ||
== Software installation== | == Software installation== | ||
# Transfer <code>ether-enabler.skprx</code> to <code>ur0:/tai/</code> using FTP mode in [[Vita:VitaShell|VitaShell]] | Installing the software required to enable ethernet on the PS Vita is essentially [[Vita:Installing Plugins|the typical plugin installation process]]. | ||
# | # Transfer <code>ether-enabler.skprx</code> and <code>usb_ether_mtl.skprx</code> to <code>ur0:/tai/</code> using FTP mode in [[Vita:VitaShell|VitaShell]] | ||
# Copy the <code>ur0:/tai/config.txt</code> file to your PC and open the file with a text editor | |||
# Under the <code>*KERNEL</code> section add: | # Under the <code>*KERNEL</code> section add: | ||
#: <code>ur0:/tai/ether-enabler.skprx</code> | #: <code>ur0:/tai/ether-enabler.skprx</code> | ||
#: <code>ur0:/tai/usb_ether_mtl.skprx</code> | #: <code>ur0:/tai/usb_ether_mtl.skprx</code> | ||
# Save the file, close it, and transfer it back to <code>ur0:/tai/</code> on your PS Vita | # Save the file, close it, and transfer it back to <code>ur0:/tai/</code> on your PS Vita | ||
# Reboot your PS Vita | # Reboot your PS Vita. | ||
== Hardware == | == Hardware == | ||
=== PCH- | === PCH-1xxx === | ||
[[File:PCH-1000 ethernet mod.jpg|thumb|PCH-1000 with modified Amazon PS92LQ adapter]] | [[File:PCH-1000 ethernet mod.jpg|thumb|PCH-1000 with modified Amazon PS92LQ adapter]] | ||
If you are using a 1st generation PS Vita "PCH- | If you are using a 1st generation PS Vita "PCH-1xxx" you will have to modify your ethernet adapter before it can be used. The 1st generation PS Vitas do not use micro USB-B, and instead use a proprietary connector that does not supply power. Thankfully, third party cables and standalone connectors can be bought for under $5 USD and can be easily modified to connect to an ethernet adapter. | ||
This is especially easy with an Amazon PS92LQ adapter as power is supplied externally. If you are using a different ethernet adapter you will have to supply 5V DC externally as the PS Vita will not provide it. | This is especially easy with an Amazon PS92LQ adapter as power is supplied externally. If you are using a different ethernet adapter, you will have to supply 5V DC externally as the PS Vita will not provide it. | ||
'''Note: For PDEL-10xx units DO NOT CONNECT THE 5v LINE ON THE USB CONNECTION TO THE VITA. THIS WILL DAMAGE THE CONSOLE.''' | '''Note: For PDEL-10xx units DO NOT CONNECT THE 5v LINE ON THE USB CONNECTION TO THE VITA. THIS WILL DAMAGE THE CONSOLE.''' | ||
==== Modifying an Amazon PS92LQ ==== | ==== Modifying an Amazon PS92LQ ==== | ||
Cut a PS Vita USB cable in half, and cut the micro USB-B connector off the PS92LQ adapter. Make sure you leave a lot of cable length to work with. | Cut a PS Vita USB cable in half, and cut the micro USB-B connector off the PS92LQ adapter. If you don't want to modify the adapter itself, you can also cut [https://www.amazon.com/s?k=micro+USB+extension+cable a micro USB extension cable]. Make sure you leave a lot of cable length to work with. | ||
Strip back the insulation on both cables to expose the wires inside. Connect the green, white, red, and black wires to the corresponding wires in the other cable. This will allow the PS Vita to communicate with the ethernet adapter and charge at the same time. | Strip back the insulation on both cables to expose the wires inside. Connect the green, white, red, and black wires to the corresponding wires in the other cable. This will allow the PS Vita to communicate with the ethernet adapter and charge at the same time. | ||
| Line 46: | Line 46: | ||
#: If successful the '''Internet Connection Settings''' screen will now show '''Connected (LAN Cable)''' | #: If successful the '''Internet Connection Settings''' screen will now show '''Connected (LAN Cable)''' | ||
# You can now close the settings application. | # You can now close the settings application. | ||
[[Category:Vita]] | |||
Latest revision as of 22:14, 3 September 2024
PS Vita Devkits and Testkits come with ethernet dongles but they are expensive, and not compatible with retail/consumer units. This is unfortunate because WiFi on the Vita is often painfully slow during file transfers. Thankfully there is a relatively easy hardware/software modification that allows inexpensive USB Realtek RTL8152 adapters to be used!
Full technical details are available here.
Note: Ad hoc multiplayer is not supported via ethernet and will continue to use a WiFi connection.
Compatible ethernet adapters
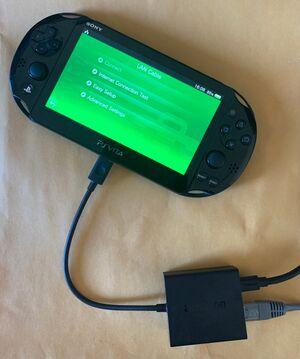
Finding a RTL8152 USB ethernet adapter is often the most difficult step. Thankfully there is one easily acquired adapter, the Amazon PS92LQ, better known as "Amazon Ethernet Adapter for Amazon Fire TV Devices". This adapter is ideal as it requires no modification to be used on a 2nd generation PS Vita, PCH-20xx.
Software installation
Installing the software required to enable ethernet on the PS Vita is essentially the typical plugin installation process.
- Transfer
ether-enabler.skprxandusb_ether_mtl.skprxtour0:/tai/using FTP mode in VitaShell - Copy the
ur0:/tai/config.txtfile to your PC and open the file with a text editor - Under the
*KERNELsection add:ur0:/tai/ether-enabler.skprxur0:/tai/usb_ether_mtl.skprx
- Save the file, close it, and transfer it back to
ur0:/tai/on your PS Vita - Reboot your PS Vita.
Hardware
PCH-1xxx
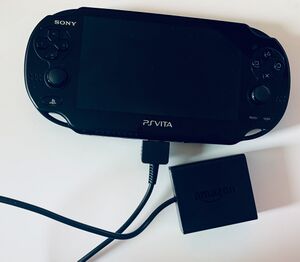
If you are using a 1st generation PS Vita "PCH-1xxx" you will have to modify your ethernet adapter before it can be used. The 1st generation PS Vitas do not use micro USB-B, and instead use a proprietary connector that does not supply power. Thankfully, third party cables and standalone connectors can be bought for under $5 USD and can be easily modified to connect to an ethernet adapter. This is especially easy with an Amazon PS92LQ adapter as power is supplied externally. If you are using a different ethernet adapter, you will have to supply 5V DC externally as the PS Vita will not provide it.
Note: For PDEL-10xx units DO NOT CONNECT THE 5v LINE ON THE USB CONNECTION TO THE VITA. THIS WILL DAMAGE THE CONSOLE.
Modifying an Amazon PS92LQ
Cut a PS Vita USB cable in half, and cut the micro USB-B connector off the PS92LQ adapter. If you don't want to modify the adapter itself, you can also cut a micro USB extension cable. Make sure you leave a lot of cable length to work with.
Strip back the insulation on both cables to expose the wires inside. Connect the green, white, red, and black wires to the corresponding wires in the other cable. This will allow the PS Vita to communicate with the ethernet adapter and charge at the same time.
For more details please see the github link above for a wiring diagram.
PCH-20xx
If you are using a 2nd generation PS Vita "PCH-20xx" and Amazon PS92LQ adapter no modifications are required. Simply connect ethernet and power to the adapter and plug it into your PS Vita.
Enabling LAN
- On your PS Vita open the Settings application
- Select Network
- Select Internet Connection Settings
- Under Connection Method select LAN Cable
- Select Connect
- If successful the Internet Connection Settings screen will now show Connected (LAN Cable)
- You can now close the settings application.

