DIY USB Fume Extractor: Difference between revisions
Jump to navigation
Jump to search
(Created page with "thumb|Completed fume extractor mounted on the side of a soldering station using an L bracket When soldering, flux or rosin will release harmful and annoying fumes. Therefore, it's recommended to have a fume extractor to suck fumes away from your face while you're soldering for both visibility and avoiding inhalation. Activated carbon (charcoal) filters are able to filter gasses and particles out of air, so combining a filter with a che...") |
mNo edit summary |
||
| (2 intermediate revisions by 2 users not shown) | |||
| Line 1: | Line 1: | ||
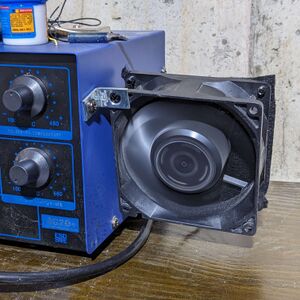
[[File:DIY_USB_Fume_Extractor.jpg|thumb|Completed fume extractor mounted on the side of a soldering station using an L bracket]] | [[File:DIY_USB_Fume_Extractor.jpg|thumb|Completed fume extractor mounted on the side of a soldering station using an L bracket]] | ||
When soldering, flux or rosin will release harmful and annoying fumes. Therefore, it's recommended to have a fume extractor to suck fumes away from your face while you're soldering for both visibility and avoiding inhalation. Activated carbon (charcoal) filters are able to filter gasses and particles out of air, so combining a filter with a cheap PC fan you may have laying around makes an inexpensive solution. | When soldering, flux or rosin will release harmful and annoying fumes. Therefore, it's recommended to have a fume extractor to suck fumes away from your face while you're soldering for both visibility and avoiding inhalation. Activated carbon (charcoal) filters are able to filter gasses and particles out of air, so combining a filter with a cheap PC fan you may have laying around makes an inexpensive solution. Note that activated charcoal filters may release some charcoal dust out the backside. | ||
Alternatively, you can buy [https://www.aliexpress.us/item/3256805973149879.html this device] which allows you to solderlessly plug in a fan and use the knob for speed control. | |||
Materials needed: | Materials needed: | ||
* A 5V to 12V fan and screws; PC fans generally are 12V, so the 5V input will run the fan at slightly less than half speed which is a good compromise between noise air movement. | * A 5V to 12V fan and screws; PC fans generally are 12V, so the 5V input will run the fan at slightly less than half speed which is a good compromise between noise and air movement. | ||
* A USB cable to cut up. Optionally, you can get a USB cable with a power button in the middle. | * A USB cable to cut up. Optionally, you can get a USB cable with a power button in the middle. | ||
* An activated carbon (charcoal) filter to cut to size. | * An activated carbon (charcoal) filter to cut to size. | ||
Latest revision as of 10:27, 31 March 2024
When soldering, flux or rosin will release harmful and annoying fumes. Therefore, it's recommended to have a fume extractor to suck fumes away from your face while you're soldering for both visibility and avoiding inhalation. Activated carbon (charcoal) filters are able to filter gasses and particles out of air, so combining a filter with a cheap PC fan you may have laying around makes an inexpensive solution. Note that activated charcoal filters may release some charcoal dust out the backside.
Alternatively, you can buy this device which allows you to solderlessly plug in a fan and use the knob for speed control.
Materials needed:
- A 5V to 12V fan and screws; PC fans generally are 12V, so the 5V input will run the fan at slightly less than half speed which is a good compromise between noise and air movement.
- A USB cable to cut up. Optionally, you can get a USB cable with a power button in the middle.
- An activated carbon (charcoal) filter to cut to size.
Powering the Fan
- Cut the connector off of your fan cable.
- Examine the cable connected to your fan. It will have either 2, 3, or 4 wires. You will only need the black and red (5V) wires, so if there are more wires, you may want to trim them shorter and tape them in place so they are not dangling.
- Cut off the end of the USB cable that you don't need and expose the wires. You will only need the black and red wires, so you can trim the rest of them.
- Strip and solder the black wires together and the red wires together.
- Plug in the USB cable and see if the fan turns on.
- If it doesn't, or just periodically twitches, take a look where the wires connect to the PCB in the center of the fan. There may be an unused pad next to where the black and red (and maybe white) wires connect. If this is the case, try soldering a wire from the red wire pad to the unused pad.
Mounting the Filter
- Use scissors to cut the carbon filter so it is slightly bigger than the fan itself. This will give you some leeway for the screws to mount without tearing to the edge of the filter.
- Use a drill (preferably) against some wood or something pointy to poke a hole in each corner for the screws to go through.
- Screw the filter onto the fan. Preferably, mount it on the exhaust side so it doesn't get sucked into the fan.
- Mount the fan to something. Depending on the fan, it likely will not stay still up on it's own when it's on, so anchoring it to something via screw is best.
