Xbox 360:Programming Gowin-based X360ACE Chips: Difference between revisions
m (Text replacement - "Category:Xbox360" to "Category:Xbox 360") |
No edit summary |
||
| (One intermediate revision by the same user not shown) | |||
| Line 1: | Line 1: | ||
This article will explain how to program .fs timings on to the Gowin-based X360ACE glitch chips, a supported programmer is required (xFlasher will work, as will any FT2232 device) | This article will explain how to program .fs timings on to the Gowin-based X360ACE glitch chips, a supported programmer is required (xFlasher will work, as will any FT2232 device). | ||
- X360ACE V3+ | - X360ACE V3+ | ||
| Line 11: | Line 11: | ||
== Programming == | == Programming == | ||
1) Download Gowin EDA from [https://www.gowinsemi.com/en/support/download_eda/ Gowin] (account required) | 1) Download Gowin EDA from [https://www.gowinsemi.com/en/support/download_eda/ Gowin]. (account required) | ||
2) Install Gowin EDA after it downloads. You only need the Gowin Programmer, but you can install the main Gowin package if you want | 2) Install Gowin EDA after it downloads. You only need the Gowin Programmer, but you can install the main Gowin package if you want. | ||
3) When the installer finishes, ensure that you check the box to install the drivers for your operating system (not needed for xFlasher users, the xFlasher drivers are sufficient) | 3) When the installer finishes, ensure that you check the box to install the drivers for your operating system. (not needed for xFlasher users, the xFlasher drivers are sufficient) | ||
4) Launch Gowin Programmer | 4) Launch Gowin Programmer. | ||
[[File:Gowinlaunch.png]] | [[File:Gowinlaunch.png]] | ||
5) Change the “Series” to “GW1N”, and ensure the “Device” is set to “GW1N-1” | 5) Change the “Series” to “GW1N”, and ensure the “Device” is set to “GW1N-1”. | ||
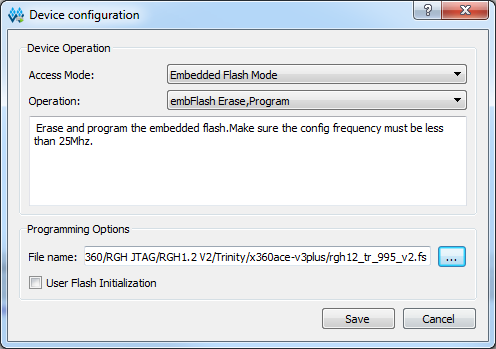
6) Double click under “Operation” to open the “Device configuration” | 6) Double click under “Operation” to open the “Device configuration”. | ||
7) Change the “Access Mode” to “embFlash Erase, Program” | 7) Change the “Access Mode” to “embFlash Erase, Program”. | ||
8) Under “File name”, set the .fs you wish to program | 8) Under “File name”, set the .fs you wish to program. | ||
[[File:Gowindeviceconfig.png]] | [[File:Gowindeviceconfig.png]] | ||
9) The entry should now look | 9) The entry should now look as follows. | ||
[[File:Gowinentry.png]] | [[File:Gowinentry.png]] | ||
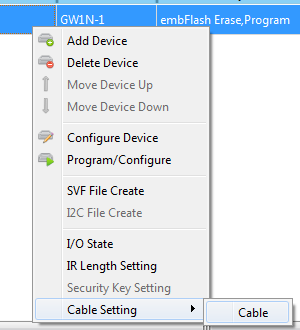
10) Right click anywhere on the entry, and click "Cable Setting", "Cable" | 10) Right click anywhere on the entry, and click "Cable Setting", "Cable". | ||
[[File:Gowincable1.png]] | [[File:Gowincable1.png]] | ||
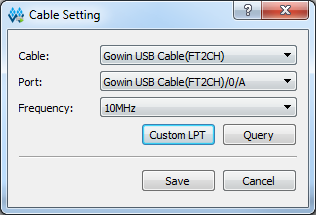
11) Set the "Frequency" to "10MHz" and click "Save", if this does not work, you can try other values | 11) Set the "Frequency" to "10MHz" and click "Save", if this does not work, you can try other values. | ||
[[File:Gowincable2.png]] | [[File:Gowincable2.png]] | ||
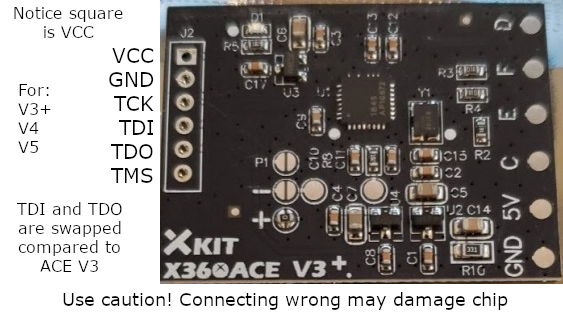
12) Connect your programming cable to the chip according to the below picture, as the pinout does not match other glitch chips | 12) Connect your programming cable to the chip according to the below picture, as the pinout does not match other glitch chips. | ||
[[File:V3pv4v5pinout.png]] | [[File:V3pv4v5pinout.png]] | ||
13) Click the “Program/Configure” button | 13) Click the “Program/Configure” button. | ||
[[File:Gowinprogconf.png]] | [[File:Gowinprogconf.png]] | ||
| Line 60: | Line 60: | ||
== Troubleshooting == | == Troubleshooting == | ||
==== "Cable open failed" ==== | ==== "Cable open failed" ==== | ||
Wait at least 5 seconds after connecting your programmer before clicking “Program/Configure”, and ensure drivers are installed | Wait at least 5 seconds after connecting your programmer before clicking “Program/Configure”, and ensure drivers are installed. | ||
==== "ID code mismatch" ==== | ==== "ID code mismatch" ==== | ||
Cable not connected correctly, or chip is damaged | Cable not connected correctly, or chip is damaged. | ||
==== Other Errors ==== | ==== Other Errors ==== | ||
Disconnect everything from power and your PC, then connect back and try again | Disconnect everything from power and your PC, then connect back and try again. Try other frequencies in "Cable Setting". | ||
Try other frequencies in "Cable Setting" | |||
[[Category:Xbox 360]] | [[Category:Xbox 360]] | ||
Latest revision as of 22:00, 3 December 2024
This article will explain how to program .fs timings on to the Gowin-based X360ACE glitch chips, a supported programmer is required (xFlasher will work, as will any FT2232 device).
- X360ACE V3+
- X360ACE V4
- X360ACE V5
Supported Timings
- RGH1.2 V2 (Trinity/Corona only)
Programming
1) Download Gowin EDA from Gowin. (account required)
2) Install Gowin EDA after it downloads. You only need the Gowin Programmer, but you can install the main Gowin package if you want.
3) When the installer finishes, ensure that you check the box to install the drivers for your operating system. (not needed for xFlasher users, the xFlasher drivers are sufficient)
4) Launch Gowin Programmer.
5) Change the “Series” to “GW1N”, and ensure the “Device” is set to “GW1N-1”.
6) Double click under “Operation” to open the “Device configuration”.
7) Change the “Access Mode” to “embFlash Erase, Program”.
8) Under “File name”, set the .fs you wish to program.
9) The entry should now look as follows.
10) Right click anywhere on the entry, and click "Cable Setting", "Cable".
11) Set the "Frequency" to "10MHz" and click "Save", if this does not work, you can try other values.
12) Connect your programming cable to the chip according to the below picture, as the pinout does not match other glitch chips.
13) Click the “Program/Configure” button.
Troubleshooting
"Cable open failed"
Wait at least 5 seconds after connecting your programmer before clicking “Program/Configure”, and ensure drivers are installed.
"ID code mismatch"
Cable not connected correctly, or chip is damaged.
Other Errors
Disconnect everything from power and your PC, then connect back and try again. Try other frequencies in "Cable Setting".


