Dreamcast:Playing Dreamcast Online with DreamPi: Difference between revisions
No edit summary |
|||
| Line 49: | Line 49: | ||
=== Accessing Dial-Up Settings === | === Accessing Dial-Up Settings === | ||
In order to change dial-up settings, you must use software that is not built into the Dreamcast either by using an official disc or by burning a disc. Custom software such as the 'Sylverant PSO Patcher v2.0' may also be required for online play on certain games, and anyone using a Dreamcast who doesn't have an alternate solution for running custom software should seek to get the means to burn Dreamcast discs. | |||
==== (Option 1) Using XDP Web Browser ==== | ==== (Option 1) Using XDP Web Browser ==== | ||
# Navigate to [https://dreamcastlive.net/downloads/ DreamcastLive.net] and scroll down to their Games / Software section and download the "XDP Web Browser". | # Navigate to [https://dreamcastlive.net/downloads/ DreamcastLive.net] and scroll down to their Games / Software section and download the "XDP Web Browser". | ||
# Extract the zip file and [[Dreamcast:Burning Discs|burn "XDP Limited Edition R4.cdi" to a disc]]. | # Extract the zip file and [[Dreamcast:Burning Discs|burn "XDP Limited Edition R4.cdi" to a disc]], or if you are using an ODE, load it onto the ODE storage. | ||
# | # Boot up the XDP Web Browser. If all goes well, you should see the XDP Dreams startup screen below. | ||
#:[[File:XDP Dreams.png]] | #:[[File:XDP Dreams.png]] | ||
#* If XDP Web Browser does not launch, you might have a tired laser or a bad burn. Older and more worn out units can struggle reading burned discs. Before you give up, power cycle the console a couple times to see if you can coax it to read. Try a couple more burns, and make sure you are burning at the lowest speed possible. | #* If XDP Web Browser does not launch when using a disc, you might have a tired laser or a bad burn. Older and more worn out units can struggle reading burned discs. Before you give up, power cycle the console a couple times to see if you can coax it to read. Try a couple more burns, and make sure you are burning at the lowest speed possible. | ||
==== (Option 2) Using an Official Disc ==== | ==== (Option 2) Using an Official Disc ==== | ||
Revision as of 06:53, 13 February 2022
The following is a guide for those looking to get their Dreamcast online. The Dreamcast still has a small but passionate community that regularly meet up to play Phantasy Star Online, Quake 3 Arena, Ooga Booga, Alien Front Online, Worms World Pary, and more! Dreamcast online compatibility is possible due to the the work of dedicated and talented enthusiasts. Join the community at Dreamcast-Talk.com and Dreamcastlive.net.
An up-to-date list of online games can be found here: https://dreamcastlive.net/games/
This page was created and ported over by Old Kid from Old-Kid.com.
Legacy Connection
The Dreamcast was the first video game console with built in online capabilities. Back in the day, there were two options to connect your Dreamcast to the internet - the built-in 56K dial-up modem and the broadband adapter (BBA). While the broadband adapter was a faster means of connecting to the internet, it was not adopted by every game developer and only a handful of games supported it. Another strike against the BBA is that in modern times it has become a rare commodity, and can cost over $150 used!
Thankfully, every commercially released game in the Dreamcast's library with online functionality supported the 56k modem. For these reasons, the 56k modem is the more popular means of getting online, and this guide assumes you'll be getting online with the original factory-installed modem.
Modern Connection
While it is still technically possible to have a telephone line in your home and a dial-up ISP service to connect to, it was already becoming an outdated way to get online when the Dreamcast was new! More than likely, you have a broadband or DSL cable modem with a WiFi or wired Ethernet router in your home. This is what we will be using in this guide.
Another obstacle with trying to connect today is that the servers for online play and DLC extras for Dreamcast games have long been shut down. For many games to work properly, either custom online servers are required, such as Sylverant Server for Phantasy Star Online (more on this later), or the hard-coded addresses that the games try to connect to need to be changed or redirected.
Each game has a unique situation that needs to be resolved, and as mentioned earlier, the folks at Dreamcast Live have made a great list of online games and outline any obstacles for each game. Don't let any of this scare you off, however, as most games have a plug-and-play solution that requires very little fuss from the user.
DreamPi
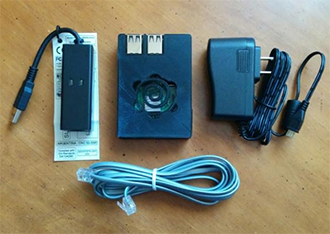
DreamPi is the most up-to-date, simplest and feature-rich solution for getting your Dreamcast online. DreamPi is software developed by Kazade that runs on a Raspberry Pi single board computer. It uses a USB dial-up modem to connect to the Dreamcast's built-in 56k modem.
DreamPi solves both sides of the "legacy equipment" problems at once by passing your modern network's WiFi or Ethernet connection to your Dreamcast through the USB modem and using scripts to handle routing for specific game connection requirements (such as Maximum Pool and Alien Front Online). A steadily growing number of folks playing the Dreamcast online are using the DreamPi as their primary solution.
Unless you already own a Raspberry Pi and are handy with a bit of soldering, you should consider purchasing a DreamPi kit from DreamcastLive.net.
If you are interested in saving money by doing it yourself, there are resources at Kazade's blog.
Kazade outlines and provides links to the finer points of burning the DreamPi image to an SD card, finding a compatible model USB modem, and making a line voltage inducer. These tasks are outside of the scope of this guide. I strongly recommend to just buy one and support Dreamcast Live!
Note: PAL consoles require a different version of the Line Voltage Inducer to operate correctly. See Dreamcast Live's notes on the purchase page for more information. This guide is assuming you have a NTSC console, but aside from this one difference, everything else should work the same.
Also, in this guide when "The DreamPi" is mentioned, it is referring to the entire kit including the Raspberry Pi, DreamPi Software, and USB Modem.
Required Materials
- Sega Dreamcast (This guide uses a NTSC console)
- Windows PC (Linux or Mac is possible, but not covered here)
- CD-Rom Burner
- Blank CD-R Discs
- DreamPi Kit: Raspberry Pi, DreamPi software, USB Modem, Modded Modem or Line Voltage Inducer, Rj-11 Phone Cord
- Wired Ethernet or WiFi connection for DreamPi (Wired Ethernet connection is ideal)
- Cat 5E/6 patch Cable to connect Raspberry Pi to your router (if you are using a wired Ethernet connection)
Configuring The Dreamcast For DreamPi
Accessing Dial-Up Settings
In order to change dial-up settings, you must use software that is not built into the Dreamcast either by using an official disc or by burning a disc. Custom software such as the 'Sylverant PSO Patcher v2.0' may also be required for online play on certain games, and anyone using a Dreamcast who doesn't have an alternate solution for running custom software should seek to get the means to burn Dreamcast discs.
(Option 1) Using XDP Web Browser
- Navigate to DreamcastLive.net and scroll down to their Games / Software section and download the "XDP Web Browser".
- Extract the zip file and burn "XDP Limited Edition R4.cdi" to a disc, or if you are using an ODE, load it onto the ODE storage.
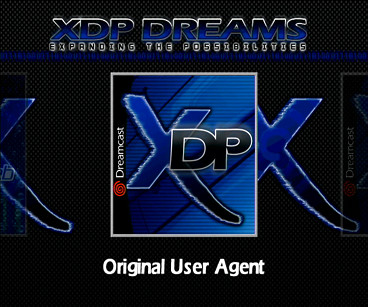
- Boot up the XDP Web Browser. If all goes well, you should see the XDP Dreams startup screen below.
- If XDP Web Browser does not launch when using a disc, you might have a tired laser or a bad burn. Older and more worn out units can struggle reading burned discs. Before you give up, power cycle the console a couple times to see if you can coax it to read. Try a couple more burns, and make sure you are burning at the lowest speed possible.
(Option 2) Using an Official Disc
If burning discs is not an option, you can use a disc from a handful of the Dreamcast library that had built-in configuration tools to set dial-up settings. You will be able to enter the needed information from the following games/software.[1]
- DreamPassport (Japan)
- Dreamkey 3.0 (Europe)
- PlanetWeb Browser ver 1.x/2.x/3.0 (North America)
- XDP Browser Pack
- 4x4 Evolution (NTSC-U/C)
- NBA 2K1 (NTSC-U/C)
- NFL 2K1 (NTSC-U/C)
- POD Speedzone (NTSC-U/C)
- Quake 3 Arena (NTSC-U/C)
- Unreal Tournament (NTSC-U/C)
Note that each game handles dial-up settings differently, so you may need to look up how to configure based on your game.
Modifying Dial-Up Settings with XDP Web Browser
- With XDP Web Browser booted, use the left/right arrows to select "Custom Planetweb 2.6X" and press Start to launch the software.
- When prompted, push Start to open the web browser.
- Press Start again to open the selection window, and use the d-pad to navigate to the bottom-right to options.
- With options highlighted, press A to open the options screen.
- We need to enter the Internet Connection screen. From here, we need to fill out the following information:
- Your Real Name: (leave blank)
- ISP User Login: dream
- Password: dreamcast
- Dial Up Number: (blank area code), 111-1111
- DNS1: 0.0.0.0
- DNS2. 0.0.0.0
- Press OK.
- On the next screen, make sure that the following settings are correct (it should be default):
- Area code you are dialing from: (blank)
- Long distance call prefix: (blank)
- Call waiting prefix: (blank)
- Outside dial prefix: (blank)
- Modem Init: AT&F
- Dial: Tone
- Dial area code: Odd
- Blind dial: Off or On
- Now Press OK to continue. On the next page, make sure the settings are:
- Use Proxy: No
- Proxy server name: (blank)
- Proxy port: (blank)
- Press OK again, and finally press Save to save your settings. We should now be ready to connect our Dreamcast to our DreamPi and test our connection! But first we need to hook everything up.

