N64:Rumble Pak Power Mod: Difference between revisions
Joshman196 (talk | contribs) m (4-5 inches is definitely too long for the wire) |
|||
| Line 13: | Line 13: | ||
</gallery> | </gallery> | ||
# Start by opening up your Rumble Pak with the 3.8mm gamebit screwdriver. | # Start by opening up your Rumble Pak with the 3.8mm gamebit screwdriver. | ||
# Cut a length of 26 AWG wire around | # Cut a length of 26 AWG wire around 1.5-2 inches long. | ||
# Strip a small amount of the insulation around the ends of the wire with either a wire stripper or carefully with wire cutters by putting small amounts of pressure on the wire cutters in a circle around the wire. You can also burn the insulation off with the soldering iron. | # Strip a small amount of the insulation around the ends of the wire with either a wire stripper or carefully with wire cutters by putting small amounts of pressure on the wire cutters in a circle around the wire. You can also burn the insulation off with the soldering iron. | ||
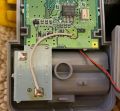
# Solder one end of the wire to the positive metal terminal on the Rumble Pak board, labelled with a plus sign within a circle. Solder the other end to the via (the hole) just under the "en" of the Nintendo logo that is printed on the board. | # Solder one end of the wire to the positive metal terminal on the Rumble Pak board, labelled with a plus sign within a circle. Solder the other end to the via (the hole) just under the "en" of the Nintendo logo that is printed on the board. | ||
Revision as of 21:04, 7 August 2023
Normally, the N64 Rumble Pak requires two AAA batteries to operate, but it is possible to mod a Rumble Pak to run its power from the N64 itself instead of needing AAA batteries. In fact, Nintendo themselves used this exact method on their kiosk machines. It is extremely important to know that you should not run more than two power-modded Rumble Paks at the same time as this may damage the console. The 3.3v line from the N64 does not have enough current to power more than two modded Rumble Paks. Any third and/or fourth Rumble Paks must be stock and use AAA batteries to prevent console damage. This has only been tested on official Rumble Paks, do not try this on third party Rumble Paks.
Required Materials and Tools
- 3.8mm Gamebit Screwdriver
- Soldering Iron
- Leaded Solder
- 26 AWG Wire
- (Optional) Wire Strippers or Wire Cutters
Installation Procedure
- Start by opening up your Rumble Pak with the 3.8mm gamebit screwdriver.
- Cut a length of 26 AWG wire around 1.5-2 inches long.
- Strip a small amount of the insulation around the ends of the wire with either a wire stripper or carefully with wire cutters by putting small amounts of pressure on the wire cutters in a circle around the wire. You can also burn the insulation off with the soldering iron.
- Solder one end of the wire to the positive metal terminal on the Rumble Pak board, labelled with a plus sign within a circle. Solder the other end to the via (the hole) just under the "en" of the Nintendo logo that is printed on the board.
- Reassemble the Rumble Pak. That's it!.
Again, keep in mind that you should never have more than two modded Rumble Paks connected to your N64 at the same time. This will cause problems.
