CRT:C-13011: Difference between revisions
Jump to navigation
Jump to search
No edit summary |
m (Text replacement - "\|service_bulletins \= \n" to "") |
||
| Line 25: | Line 25: | ||
|operation_manual = [[:Media:JVC C-13010 C-13011 C-20010 AV-20020 AV-20021 AV-27015 AV-27020 Operation Manual.pdf|C-13011 Manual]] | |operation_manual = [[:Media:JVC C-13010 C-13011 C-20010 AV-20020 AV-20021 AV-27015 AV-27020 Operation Manual.pdf|C-13011 Manual]] | ||
|service_manual = | |service_manual = | ||
|brochure = [https://web.archive.org/web/20221117053206/http://support.jvc.com/consumer/product.jsp?modelId=MODL020005 Site Link] | |brochure = [https://web.archive.org/web/20221117053206/http://support.jvc.com/consumer/product.jsp?modelId=MODL020005 Site Link] | ||
}} | }} | ||
Latest revision as of 04:29, 1 November 2023
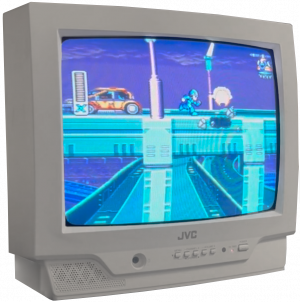
C-13011
| Information | ||
|---|---|---|
| Manufacturer | JVC | |
| Type | Consumer | |
| Size | 13" | |
| Regions | NTSC | |
| 240p/480i | Yes | |
| 480p | No | |
| 720p | No | |
| 1080i | No | |
| Vsync | 60hz | |
| Widescreen | No | |
| RF | 1x VHF/UHF | |
| Composite | 1x RCA | |
| S-Video | None | |
| Component | None | |
| Dimensions | Width: 364mm
Depth: 374mm Height: 334mm | |
| Weight | 19.8lbs, 9kg | |
| Links | ||
| Operation Manual | C-13011 Manual | |
| Brochure | Site Link | |
RGB Mux Mod
This set can be RGB mux modded, allowing RGB inputs without breaking the OSD. Note that it's recommended to connect sync directly to the composite video port (either internally or externally) rather than tapping into to the sync portion of the circuit, so plan ahead as to whether you want a dedicated jack for sync or not. Avoid using the composite port for input while using the mod. If you install an extra jack for external sync (rather than using the composite jack), you CANNOT have something plugged into the composite jack at the same time as the sync jack.
| Many service menu settings will have no effect on the RGB image. |
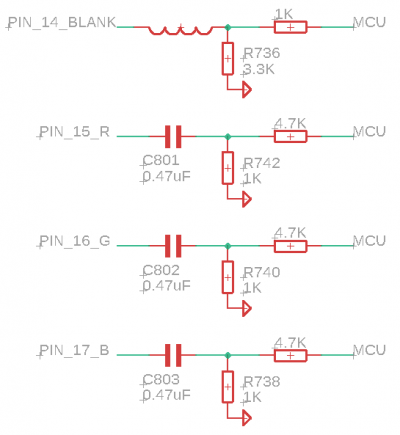
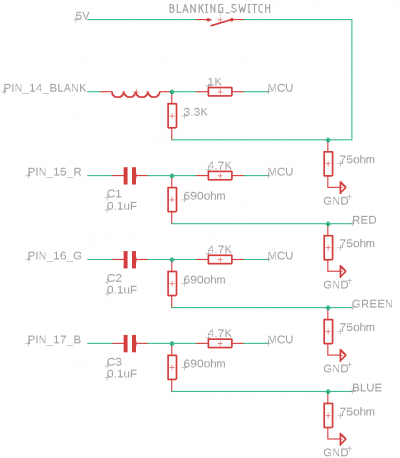
Before and After Diagrams
Jungle IC (Toshiba TA1242N) on left side of each diagram.
Required Items
- 26-30 AWG wire.
- 3x 0.1uF (100pF) ceramic or non-polarized electrolytic capacitors
- 3x 690 ohm resistors (750 ohm will work too)
- 3x 75 ohm resistors
- 1x 3.3k resistor
- A SPST or SPDT toggle switch to mount on the case (to act as a blanking switch)
- A SCART jack or BNC/RCA jacks for the Red/Green/Blue input.
- If using SCART, you may wish to simply the process and get a RGB mux PCB.
Instructions
- Discharge the CRT.
- Mount the SCART or BNC/RCA jacks on the case.
- Drill a hole for the toggle switch, but do not mount it yet.
- Replace the following with the 0.1uF capacitors
- C801
- C802
- C803
- Solder wires from each of the BNC/RCA grounding rings to a common wire, and solder that wire to a ground point on the board.
- If using SCART, connect all grounds (and metal SCART shell ground) together on the port itself.
- Solder a 75 ohm resistor from the BNC/RCA jack center to the jack's ground ring for each.
- Solder a long length of wire to the center of the BNC/RCA jack (or SCART pin). Ensure the wire is long enough to reach the resistor pads of the resistors you removed earlier and with enough extra length so that you can maneuver the case around comfortably.
- Solder a 690 ohm resistor on the end of the red, green, and blue wires.
- Remove:
- R736
- R748
- R740
- R742
- Use a multimeter to check which pad of R748, R740, and R742 is ground. Solder the other end of the 690 ohm resistor to the pad that is NOT ground.
- Solder a 3.3k ohm resistor to one side of the toggle switch. Solder a wire to the other side of the resistor and connect it to the pad of R736 that is NOT ground.
- Solder a wire to the other pin of the switch and connect it to the large point labelled
5Vto the right of the area of the board in the image above. - Mount the switch to the case.
- If using a dedicated jack for sync, connect the center pin directly to the center pin of the RCA composite port on the bottom of the motherboard.


