GameCube:SD Mod (DOL-101): Difference between revisions
Jump to navigation
Jump to search
(This is a how to on soldering a MicroSD adapter to a dol101) |
No edit summary |
||
| Line 16: | Line 16: | ||
DOL101_SD.jpg | DOL101_SD.jpg | ||
</gallery> | </gallery> | ||
3. You will need to solder 7 Wires to the vias in the picture. | |||
<gallery> | <gallery> | ||
DOL101_Vias.png | DOL101_Vias.png | ||
</gallery> | </gallery> | ||
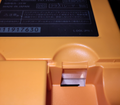
4. Once you get that done you will need to run cables through this port on the bottom of the GameCube shell | |||
<gallery> | <gallery> | ||
Dol101_SD2SP_port.png | Dol101_SD2SP_port.png | ||
</gallery> | </gallery> | ||
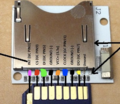
5. Once the cables are run you will need to solder the wires to the pins on the MicroSD adapter | |||
<gallery> | <gallery> | ||
Dol101_MicroSD_card.png | Dol101_MicroSD_card.png | ||
</gallery> | </gallery> | ||
6. Once that has been done solder a 22uF 25V Capacitor to 3.3 and Ground on the MicroSD adapter | |||
# Now you can boot Homebrew through a MicroSD Card instead of a Memory Card Port. | # Now you can boot Homebrew through a MicroSD Card instead of a Memory Card Port. | ||
Revision as of 23:19, 10 January 2024
This tutorial goes over how to add a MicroSD adapter to the DOL101 gamecube. This will allow you to boot homebrew without taking up a 2nd Memory Card slot.
Requirements
The following materials are required for this mod:
- Intermediate Soldering Skills
- Soldering iron, solder, and flux
- 26AWG or Smaller Gauge Wire
- DOL-101 Gamecube
- MicroSD Adapter
Adding the MicroSD Adapter
- Gamecube Teardown
- Once the Motherboard has been removed flip it over and look for this part of the Motherboard in the picture below.
3. You will need to solder 7 Wires to the vias in the picture.
4. Once you get that done you will need to run cables through this port on the bottom of the GameCube shell
5. Once the cables are run you will need to solder the wires to the pins on the MicroSD adapter
6. Once that has been done solder a 22uF 25V Capacitor to 3.3 and Ground on the MicroSD adapter
- Now you can boot Homebrew through a MicroSD Card instead of a Memory Card Port.


