Neo Geo:Power Supply Wiring
Jump to navigation
Jump to search
Generally, superguns have a 6 pin JST connector used for power. Therefore, you will need an external power supply to power it.
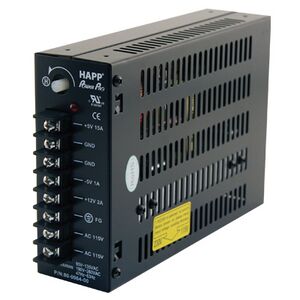
This guide will use the Suzohapp 80-0064-00 as an example. Despite having the same part number, you may have one with different labels on the terminals, which will be denoted in parenthesis in the wire lableling.
| The screws are electrified. Do not touch any of the screws while unit is plugged in. You may wish to use a third party case (listed below) to prevent accidental shocks if it is not being put in an arcade cabinet. |
AC Power
- Decide on what type of power cable you'd like to use. The power supply itself does not have a power switch, so you may want to buy a power cable with a switch on it, but you can use any three-wire wall plug and chop off the end.
- Strip the end of the cable so that each wire is approximately 2 inches long and the end of each wire has about 1/4" exposed — about the length of the metal beneath the screws on the power supply. Use your fingers to lightly twist the end of each wire if they are stranded so that the strands stay together.
- Unscrew the bottom three screw terminals on the power supply most of the way, insert the corresponding wire, then screw the screw down very tight:
- Ground (FG) — green or bare copper wire
- AC 115V (AC/L) — black or red wire (may be white wire with black or red tape)
- AC 115V (AC/N) — white or gray wire
- Tug on each wire to ensure they are screwed in tight.
- Plug in power supply and verify the power light comes on.
Console Power
- Your supergun should have came with a power cable with open wires on one end. Strip the end of each wire has about 1/4" exposed — about the length of the metal beneath the screws on the power supply. Use your fingers to lightly twist the end of each wire if they are stranded so that the strands stay together.
- With the power supply unplugged, unscrew the needed screws most of the way, insert the corresponding wire, then screw the screw down very tight. The wires needed depend on the supergun and version you are using (for instance, the Shogun may or may not have a blue wire), but the colors should match the below (check your supergun manual to verify). Two wires can share the same terminal, if needed.
- Red — +5V
- Yellow — +12V
- Black — GND
- Blue — -5V
- Plug in the cable and verify the supergun powers on.
- Using a multimeter, probe a GND screw and the +12V screw. It may be a higher or lower value, such as 11.7V or 12.6V. If this is the case, slowly turn the knob on the power supply until it reaches exactly 12V (counterclockwise to increase voltage, clockwise to decrease voltage).
