Xbox 360:Replacing LEDs
Replacing LEDs (also know as an ROL mod) is an way to customize your Xbox 360. It is quite an difficult mod and requires some soldering skills and being able to work with small SMD LEDs.
Requirements
The requirements are as follows:
- A soldering iron (about 10$), solder (about 4$) and a optional copper soldering braid (useful for desoldering without being destructive, 3$)
- A pair of tweezers (Not required but would really recommend, really hard to execute the mod without them. About 3$)
- Some 0603 SMD LEDs (~0.30$ per LED, usually come in packs of multiple). These LEDs are the ones we are going to replace the default ones with.
- Some flux.
- Some soldering knowledge. You are going to be handling small SMD components.
- Some Isopropyl Alcohol and some cotton swabs to clean up the points you soldered to
Desoldering the stock LEDs
First of all to execute this step, you must get your RF Board out of your console, after you did that, you want to remove the white cover covering the LEDs and then you will see the LEDs you will need to replace.
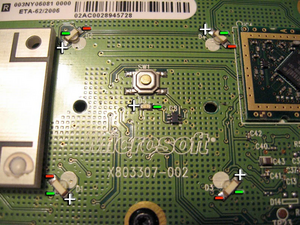
Now, you need to desolder the five LED's, first heat up your soldering iron and apply some flux to the points where the LEDs are soldered. Then we need to desolder the LEDs. I like rubbing the led with the soldering iron and then using a pair of tweezers to pull the LED out, even though this might destroy the led we won't use it anymore since we are replacing it. Also, if you have an copper soldering braid, you can use that, just melt the solder on the board and then go with the soldering braid over the solder points.
Soldering the new LEDs
Now, to solder the new LEDs we must first get our LED's and find out which terminals are positive and which are Negative, we can do this using a multimeter set into resistance mode by connecting the wires from the multimeter to the terminals of the LED.
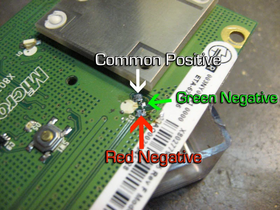
As we can see we have the common positive, this is where the positive time of the LED should go, then we can notice the red and the green negative pad, the green negative pad will be enabled when the console is behaving normally (this is where we want to connect the led to) and the red negative pad is going to be enabled when something is wrong with the console
Now that we know which terminals of our LED is the positive and which is the negative we must first understand how the LEDs normally are connected in the Xbox 360.
So we want the LEDs to be connected with:
- The positive side connected to Common Positive
- The negative side connected to Green Negative
Now after finishing soldering you finally finished your ROL mod! Congratulations! Now you just need to clean the points you soldered to with some Isopropyl Alcohol and some cotton swabs.
Tips
- Test your ROL mod using 360LED application.

