Xbox:Clock Capacitor
Xbox:Clock Capacitor/en
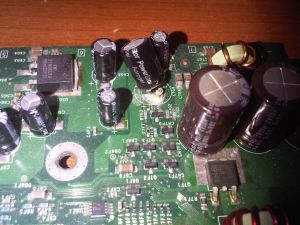
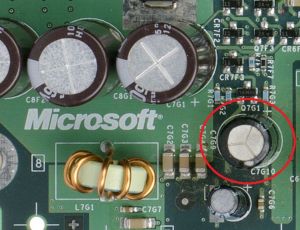
The clock capacitor is a small supercap which allows the Xbox to keep track of time for up to about three hours after losing mains power. The black caps found within 1.0-1.4 models (plus their debug counterparts) are of low quality and prone to leaking a strongly basic (alkaline) fluid. While such leakages may not cause any immediate harm, given years they will eventually eat through an Xbox's motherboard and cause permanent damage to nearby traces, potentially rendering the system unusable (although generally still repairable). In some extreme cases, they can even catch fire - although this is extremely rare.
This guide will assist you in removing the clock capacitor and cleaning up any spilled fluid.
- All Xbox models make use of capacitors that're prone to failure - clock caps are only notable in that they're the most likely to cause damage to other nearby components. Other likely troublemakers are the large caps located near the CPU, which are often found to be leaking from their tops, and will potentially cause video or power on issues: if need be, refer to the Xbox:Capacitor Lists per Revision for information about replacements. The only way to know the state of a given motherboard is to open the console up and look.
- Even if your motherboard is pristine, your clock cap is best removed as a pre-emptive measure. Pre-1.6 consoles run just fine without it.
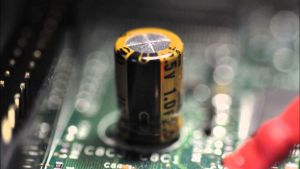
- Some 1.4, and all 1.6 systems, shipped with gold colored supercaps which are less prone to leakage: when failing, they tend to just bulge from their tops instead. 1.6 consoles notably become unable to power on at all unless a clock cap is in place or bypassed. If the clock capacitor is dead or removed on a 1.6 console, it will show an error code of 16. You can check your motherboard revision on this page.
- It is possible, although unnecessary, to replace the clock capacitor of a pre-1.6 console with another 1F 2.5V capacitor. Given that even a new cap only runs for a few hours (and serves no purpose at all if the system is left connected to mains power), and that most homebrew dashboards support internet time syncing anyway (eg UnleashX, XBMC), this is generally considered to be a waste of time. Connecting to Insignia will also sync the time. Certainly don't replace a black capacitor with the exact same model, as it will be prone to leak again! Also be sure to line up the white stripe on the new capacitor with the filled in part of the circle printed on the motherboard where the capacitor goes; installing it backwards could potentially cause a fire or other catastrophic failure!
- If you are running an old custom BIOS or softmod (essentially from before 2004), you may need to update your softmod or modchip BIOS to a clock loop patched version before proceeding, or else you will get stuck in a clock loop. If your system can already boot normally even after being left unplugged for at least six hours (double the time it usually takes to discharge), it's not affected and your clock cap is safe to remove.
Removing the Capacitor
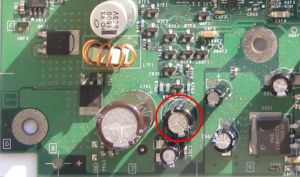
- Identify the clock capacitor. In 1.0-1.4 systems, it sits near the front left of the motherboard behind the first player controller port, underneath the CD/DVD drive. On a small amount of 1.4 motherboards, it may be a gold colored capacitor, identical to the one on 1.6/1.6b motherboards. It's still recommended to remove gold caps from 1.4 motherboards as they're unnecessary, but 1.6/1.6b systems require a few extra steps in order to disable the clock capactior.
- Remove the capacitor by wiggling it until it is loose, and then gently pulling it away using pliers or by hand. Alternatively, if you do intend to install a replacement, the legs may be desoldered from the underside of the motherboard to make way for the new cap - a video demonstration can be found on MrMario2011’s channel.
- Check for any fluid leakage. This may be difficult to make out by eye - a high concentration of dust near the cap is a strong indication that a leak has occurred at some point in the past. Follow the below steps to clean it.
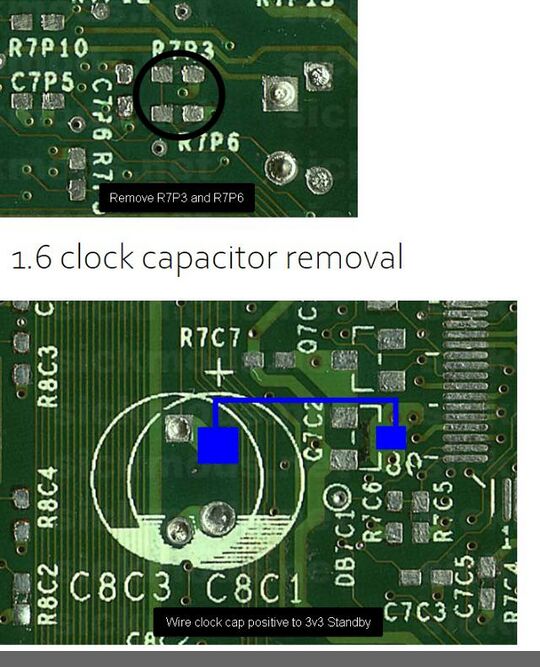
- (Only for 1.6 consoles) Unlike earlier Xbox models, 1.6/1.6b models cannot power on without a working clock cap. Any capacitor can be used as a replacement, but if you wish to match the capacity of the original then choose a 2.5V 1F capacitor. An LED or diode can also be used in place of a clock capacitor for a 1.6 console. With a recent discovery by Redherring32, the clock capacitor on these models can also be bypassed with the removal of two resistors while wiring the postive terminal to 3.3v. The two resistors can also be rotated 90 or 180 degrees on one end so the bypass can be easily reversed if desired.
Cleaning up Fluid
Dip a Q-tip in isopropyl alcohol (IPA, rubbing alcohol) and rub any area where it looks like there may potentially be fluid. The IPA will neutralize the capacitor's alkaline fluid and prevent the affected area from corroding further. If there are large amounts of corrosion or fluid, you can use a toothbrush to gently scrub the area. Be sure to check the underside of your motherboard, and allow it to dry completely before powering on.
Repairing a Damaged Trace
If the clock capacitor fluid had eaten through a circuit trace, you can attempt to repair it with a sharp knife (such as an X-ACTO knife) and a circuit trace pen or small piece of wire. A window defogger repair kit also is a cheap alternative to a circuit trace pen.
- Use the knife to scrape off the surface above the damaged area of the trace, including a little bit extra on either side to expose a bit of undamaged copper. Cut out the damaged area. You may need to do the same to the other side if it will not come out.
- Clean the area using isopropyl alcohol and a Q-tip. Make sure to clean the undamaged copper areas well to make sure they aren’t covered in silicon dust.
- If using a circuit trace pen, fill the gap between the undamaged copper areas and cover some of the undamaged copper on both ends. Allow it to dry as directed in its instructions.
- If using wire, make sure that it is close to the same width as the trace, then cut it to the size of the missing trace or slightly smaller, place it in the hole, and smooth some solder over each end, connecting the undamaged copper to your new wire. It may help to apply flux to the wire and copper first, and hold the new wire in place with a small piece of electrical tape.
- (optional) Apply epoxy, hot glue, or electrical tape over the new trace to protect it from the elements.
Background and Technical Information
The clock capacitor is a 2.5V 1F supercapacitor - that is, a capacitor that can hold a large amount of charge and act as a replacement for a battery in some situations. It uses aerogel for an electrode (which is different from a dielectric, as supercapacitors are constructed differently).
Bunnie Huang did some analysis of the clock capacitor system at one point, which can be read in full here. Bunnie speculates that the rationale behind choosing a 2.5V clock capacitor instead of a more standard 3V coin cell battery was because the clock component was located on the MCPX, and the fabrication process made a 3V power source impossible, resulting in a barely workable compromise. Bunnie also suggests that the current draw required by the MCPX is high and thus drains the capacitor quickly, within about 3 hours after being unplugged. He concludes:
So in the end, the answer is: MSFT cut cost by not putting a long-life
real time clock part on the XBOX, and instead integrated it into the
MCPX; because of this, the current draw was high and they were forced
to use a supercap which charges while powered on, because if they
didn't by the time the box was shipped to the customer, the battery
would be mostly dead.
Bunnie also determined that the clock will turn off and stop drawing current if the capacitor is drained or disconnected. Having lost its reference point for keeping time, there would be no purpose in turning it back on until the console next boots.
