Xbox:Condensateur d'Horloge
Xbox:Clock Capacitor/fr
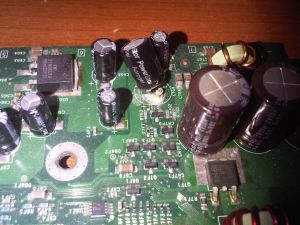
Le condensateur d’horloge est un petit composant passif permettant à la Xbox d’effectuer le suivi du temps pendant environ trois heures après la perte du courant. Les capacités présentes dans les modèles de 1.0 à 1.4 (ainsi que leurs variantes de debug) sont de mauvaise qualité et tendent à perdre un liquide au pH basique (de l’alkaline). Bien que ce type de fuite ne cause pas de dommages immédiats, à l’échelle de plusieurs années le liquide peut grignoter la carte-mère de la Xbox et causer des dommages permanents aux traces avoisinantes, jusqu’à rendre le système inutilisable (bien que généralement réparable). Dans certains cas extrêmes, les capacités peuvent même prendre feu - bien qu’il s’agisse de cas extrêmement rares.
Ce guide propose une assistance pour le retrait du condensateur d'horloge et le nettoyage de tout fluide qui aurait pu en couler.
- Tous les modèles de Xbox utilisent des condensateurs potentiellement faillibles - les passifs d'horloge ont ceci de notable qu'ils ont le potentiel de fuite le plus important sur les autres composants. D'autres sources de problèmes potentielles sont les grands passifs localisés près du CPU, qui fuient souvent par le haut, et peuvent potentiellement poser des problèmes de vidéo ou d'allumage: en cas de besoin, il est possible de se référer aux Listes de Condensateurs par Révision pour avoir des informations sur les remplacements possibles. Le seul moyen de connaître l'état d'une carte-mère est d'ouvrir la console et de procéder à une inspection visuelle.
- Même si la carte-mère est comme neuve, il est recommandé de retirer pré-emptivement la capacité d'horloge. Les consoles pré-1.6 fonctionnent tout à fait convenablement sans.
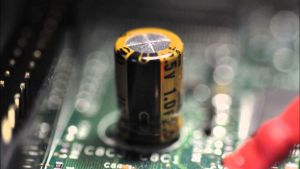
- Certaines 1.4, et tous les systèmes 1.6, sont livrés avec des super-condensateurs de couleur or, moins susceptibles de fuir : en cas de faute, ils tendent simplement à gonfler vers le haut. Les consoles 1.6 deviennent notamment impossibles à démarrer à moins que le condensateur d'horloge ne soit posé ou contourné. Si le condensateur d'horloge est détruit ou retiré sur une console 1.6, un code d'erreur 16 sera affiché. La révision de carte-mère peut être vérifiée sur cette page.
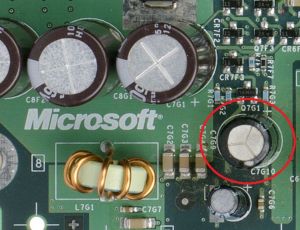
- Il est possible, bien que non requis, de remplacer le condensateur d'horloge d'une console pré-1.6 par un autre condensateur 2.5 1F. Sachant qu'une nouvelle capacité ne fait effet que pendant quelques heures (et n'ait aucun intérêt pour un système resté alimenté), et que la plupart des dashboards artisanaux supportent de toute façon la synchronisation du temps sur le réseau (comme UnleashX et XBMC), ceci est généralement considéré comme une perte de temps. Il est important de ne pas remplacer un condensateur noir par un modèle identique, sous peine qu'il ne fuie à nouveau ! Il est également important de s'assurer d'aligner la ligne blanche sur le nouveau condensateur avec la partie remplie du cercle imprimé sur la carte-mère à l'emplacement du condensateur; une installation dans le sens inverse peut provoquer un incendie ou une autre panne catastrophique !
- En cas de fonctionnement sur un ancien BIOS custom ou modification logicielle (globalement avant 2004), il est recommandé de mettre à jour la modification système ou le BIOS vers une version patchée contre les boucles d'horloge, sous peine de rester bloqué dans une boucle d'horloge. Si le système peut démarrer normalement même après avoir été débranché six heures ou plus (le double du temps requis pour une décharge complète), il n'est pas touché par le problème et le condensateur peut être retiré en toute sécurité.
Removing the Capacitor
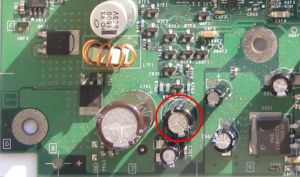
- Identify the clock capacitor. In 1.0-1.4 systems, it sits near the front left of the motherboard behind the first player controller port, underneath the CD/DVD drive. On a small amount of 1.4 motherboards, it may be a gold colored capacitor, identical to the one on 1.6/1.6b motherboards. It's still recommended to remove gold caps from 1.4 motherboards as they're unnecessary, but 1.6/1.6b systems require a few extra steps in order to disable the clock capactior.
- Remove the capacitor by wiggling it until it is loose, and then gently pulling it away using pliers or by hand. Alternatively, if you do intend to install a replacement, the legs may be desoldered from the underside of the motherboard to make way for the new cap - a video demonstration can be found on MrMario2011’s channel.
- Check for any fluid leakage. This may be difficult to make out by eye - a high concentration of dust near the cap is a strong indication that a leak has occurred at some point in the past. Follow the below steps to clean it.
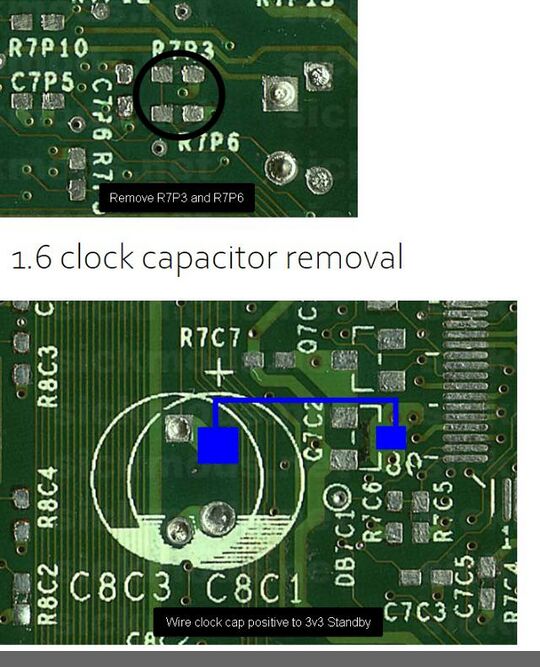
- (Only for 1.6 consoles) Unlike earlier Xbox models, 1.6/1.6b models cannot power on without a working clock cap. Any capacitor can be used as a replacement, but if you wish to match the capacity of the original then choose a 2.5V 1F capacitor. An LED or diode can also be used in place of a clock capacitor for a 1.6 console. With a recent discovery by Redherring32, the clock capacitor on these models can also be bypassed with the removal of two resistors while wiring the postive terminal to 3.3v. The two resistors can also be rotated 90 or 180 degrees on one end so the bypass can be easily reversed if desired.
Cleaning up Fluid
Dip a Q-tip in isopropyl alcohol (IPA, rubbing alcohol) and rub any area where it looks like there may potentially be fluid. The IPA will neutralize the capacitor's alkaline fluid and prevent the affected area from corroding further. If there are large amounts of corrosion or fluid, you can use a toothbrush to gently scrub the area. Be sure to check the underside of your motherboard, and allow it to dry completely before powering on.
Repairing a Damaged Trace
If the clock capacitor fluid had eaten through a circuit trace, you can attempt to repair it with a sharp knife (such as an X-ACTO knife) and a circuit trace pen or small piece of wire. A window defogger repair kit also is a cheap alternative to a circuit trace pen.
- Use the knife to scrape off the surface above the damaged area of the trace, including a little bit extra on either side to expose a bit of undamaged copper. Cut out the damaged area. You may need to do the same to the other side if it will not come out.
- Clean the area using isopropyl alcohol and a Q-tip. Make sure to clean the undamaged copper areas well to make sure they aren’t covered in silicon dust.
- If using a circuit trace pen, fill the gap between the undamaged copper areas and cover some of the undamaged copper on both ends. Allow it to dry as directed in its instructions.
- If using wire, make sure that it is close to the same width as the trace, then cut it to the size of the missing trace or slightly smaller, place it in the hole, and smooth some solder over each end, connecting the undamaged copper to your new wire. It may help to apply flux to the wire and copper first, and hold the new wire in place with a small piece of electrical tape.
- (optional) Apply epoxy, hot glue, or electrical tape over the new trace to protect it from the elements.
Background and Technical Information
The clock capacitor is a 2.5V 1F supercapacitor - that is, a capacitor that can hold a large amount of charge and act as a replacement for a battery in some situations. It uses aerogel for an electrode (which is different from a dielectric, as supercapacitors are constructed differently).
Bunnie Huang did some analysis of the clock capacitor system at one point, which can be read in full here. Bunnie speculates that the rationale behind choosing a 2.5V clock capacitor instead of a more standard 3V coin cell battery was because the clock component was located on the MCPX, and the fabrication process made a 3V power source impossible, resulting in a barely workable compromise. Bunnie also suggests that the current draw required by the MCPX is high and thus drains the capacitor quickly, within about 3 hours after being unplugged. He concludes:
So in the end, the answer is: MSFT cut cost by not putting a long-life
real time clock part on the XBOX, and instead integrated it into the
MCPX; because of this, the current draw was high and they were forced
to use a supercap which charges while powered on, because if they
didn't by the time the box was shipped to the customer, the battery
would be mostly dead.
Bunnie a également déterminé que l'horloge s'éteint et ne consomme plus d'énergie lorsque le condensateur fuit ou est déconnecté. Une fois la valeur de temps de référence perdue, il n'y a aucun intérêt à la rallumer avant le prochain démarrage.
