3DO:240p Mod: Difference between revisions
No edit summary |
No edit summary |
||
| Line 1: | Line 1: | ||
[[ | 3DO Game consoles normally output 480i, but with an easy mod, you can enable 240p output on any 3DO console with a VP536 chip. <br> [[File:3DO240pUpscaledVS480i.jpg|thumb]] | ||
3DO 240p | In February 2015, Assemblergames member [http://assemblergames.com/l/members/airs.78435/ Airs] discovered that you can enable 240p output on any 3DO console with a VP536, by wiring a switch to two pins on the chip. In most cases, you have to boot the 3DO in it's normal 480i mode and then after the game has loaded, toggle the switch to enable 240p. | ||
== Checking Compatibility == | |||
Only 3DO consoles with the VP536 chip are compatible with this mod. For other consoles, you can install a mod such as the [[3DO:3DORGB]] which also adds 240p support. You need to open your console to find out for sure which chip you have, most FZ-10 models have the VP536 while most FZ-1 front-loaders have the BT9101 chip. Goldstar 3DO's are also compatible. <br> [[File:3DO_VideoChips.jpg]] | |||
== Required Materials == | |||
* Basic soldering skills | |||
* Philips head screwdriver (medium and small) | |||
* Soldering iron and solder | |||
* Wire and wire cutters | |||
* On-off toggle switch | |||
== Installation == | |||
# Start by disassembling the console. If you're using an FZ-10, simply remove the 7 screws from the bottom plastic and lift the cover off. Then remove the 5 screws from the metal shield, remove the plastic light pipes (they're not held in by anything) and peel the tape from the CDROM drive. You should be able to lift the metal shield off without removing any other components: <br> 3DOFZ-10RemovePlasticCover.jpg]] [[File:3DOFZ-10RemoveMetalCover.jpg]] | |||
# Locate the VP536 chip: <br> [[File:3DOFZ-10VPChipLocation.jpg]] | |||
# Solder two separate wires to pins 52 and 55 of the VP536 chip: <br> [[File:3DO_VP536_240pModPins.jpg]] | |||
# Connect those wires to a basic on/off switch. If you want to avoid cutting the console's plastic, run your wires through the RF module holes and mounted my switch externally. It's recommended to make the switch easily aaccessible, so you can toggle it while the console is on. <br> [[File:3DOw240pSwitchsAirs.jpg]] | |||
== Technical Information == | |||
The 3DO's frame buffer is 320x240, meaning the actual resolution of the games is 240p. Then, 480i interpolation is activated inside the VP536 display generator as the signal is passed through it. On the VP536 chip, setting CTRLB1 high (pin 52) disables this interpolation. Here's a screenshot of a table from [https://cdn.retrorgb.com/assets/3DO/VP536A-VP536B_NTSC-PAL_DIGITAL_VIDEO_ENCODER.pdf the datasheet]: | |||
[[File:3DOForce240ponVP536Chip.jpg]] | [[File:3DOForce240ponVP536Chip.jpg]] | ||
According to [http://www.google.com/patents/US5502462 patent documentation] and the link above, it's possible control interpolation via software, via two lines of code: | |||
int32 DisableHAVG( Item screenItem ) | |||
int32 DisableVAVG( Item screenItem ) | |||
Assemblergames thread on this topic: [http://assemblergames.com/threads/3do-240p-output-vp536a-encoder.55470/ http://assemblergames.com/threads/3do-240p-output-vp536a-encoder.55470/] | |||
== Troubleshooting == | |||
** | * If the switch is in the "on" position when powering on the console, or before loading the game, there's a chance you won't get any video on the screen all. Powering the console off and back on (with the switch off) will fix the problem. | ||
* It's common for 240p mode to lock into an incorrect line placement, resulting in a blurry image. Good news though! The fix is simply to toggle the switch back to 480i, then to 240p again. Unfortunately, it sometimes takes 2 or 3 tries to get it right, but it's literally just a flick of a switch, while the console is already running. Below (and the above pic) are picture examples provided by Assemblergames member [http://assemblergames.com/l/members/abdominalpillaging.46562/ abdominalpillaging], who has more 3DO / 240p captures [https://www.youtube.com/channel/UC1vatA4_Q6IyPYGXHG1lkEg on his YouTube page]. | |||
{| class="wikitable" | |||
|- | |||
! 480i !! 240p (correct) !! 240p (incorrect) | |||
|- | |||
| [[File:3DO480i-small.jpg]] || [[File:3DO240pCorrect-small.jpg]] || [[File:3DO240pIncorrect-small.jpg]] | |||
|} | |||
<youtube>https://www.youtube.com/embed/BUmOzoLNdUI</youtube> | |||
Revision as of 18:49, 3 July 2022
3DO Game consoles normally output 480i, but with an easy mod, you can enable 240p output on any 3DO console with a VP536 chip.

In February 2015, Assemblergames member Airs discovered that you can enable 240p output on any 3DO console with a VP536, by wiring a switch to two pins on the chip. In most cases, you have to boot the 3DO in it's normal 480i mode and then after the game has loaded, toggle the switch to enable 240p.
Checking Compatibility
Only 3DO consoles with the VP536 chip are compatible with this mod. For other consoles, you can install a mod such as the 3DO:3DORGB which also adds 240p support. You need to open your console to find out for sure which chip you have, most FZ-10 models have the VP536 while most FZ-1 front-loaders have the BT9101 chip. Goldstar 3DO's are also compatible.

Required Materials
- Basic soldering skills
- Philips head screwdriver (medium and small)
- Soldering iron and solder
- Wire and wire cutters
- On-off toggle switch
Installation
- Start by disassembling the console. If you're using an FZ-10, simply remove the 7 screws from the bottom plastic and lift the cover off. Then remove the 5 screws from the metal shield, remove the plastic light pipes (they're not held in by anything) and peel the tape from the CDROM drive. You should be able to lift the metal shield off without removing any other components:
3DOFZ-10RemovePlasticCover.jpg]]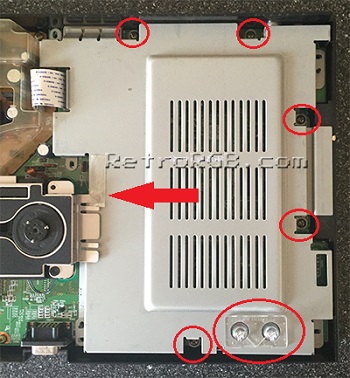
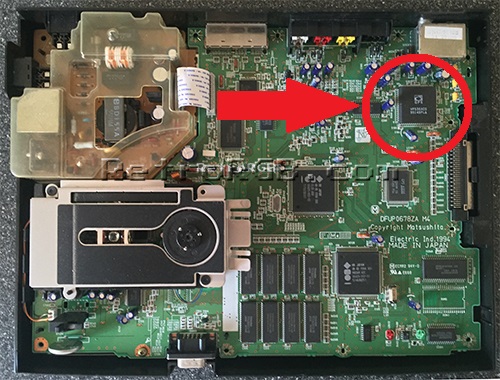
- Locate the VP536 chip:
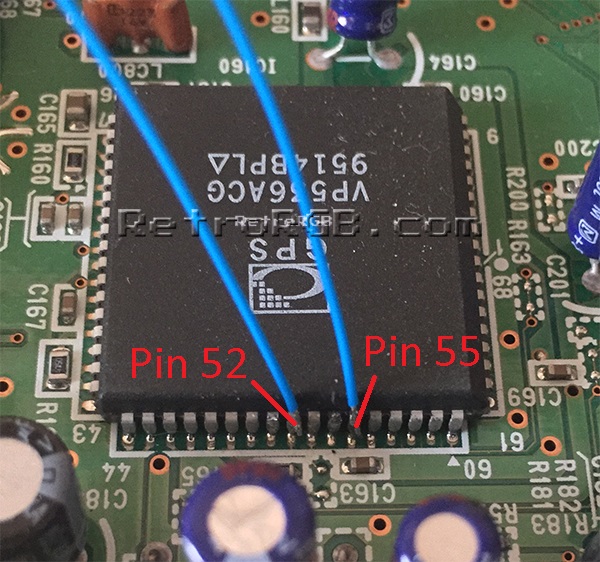
- Solder two separate wires to pins 52 and 55 of the VP536 chip:
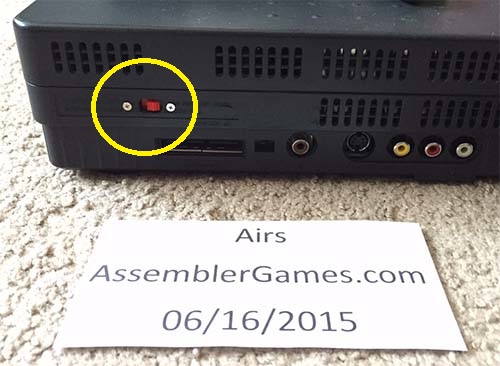
- Connect those wires to a basic on/off switch. If you want to avoid cutting the console's plastic, run your wires through the RF module holes and mounted my switch externally. It's recommended to make the switch easily aaccessible, so you can toggle it while the console is on.


Technical Information
The 3DO's frame buffer is 320x240, meaning the actual resolution of the games is 240p. Then, 480i interpolation is activated inside the VP536 display generator as the signal is passed through it. On the VP536 chip, setting CTRLB1 high (pin 52) disables this interpolation. Here's a screenshot of a table from the datasheet:

According to patent documentation and the link above, it's possible control interpolation via software, via two lines of code:
int32 DisableHAVG( Item screenItem )
int32 DisableVAVG( Item screenItem )
Assemblergames thread on this topic: http://assemblergames.com/threads/3do-240p-output-vp536a-encoder.55470/
Troubleshooting
- If the switch is in the "on" position when powering on the console, or before loading the game, there's a chance you won't get any video on the screen all. Powering the console off and back on (with the switch off) will fix the problem.
- It's common for 240p mode to lock into an incorrect line placement, resulting in a blurry image. Good news though! The fix is simply to toggle the switch back to 480i, then to 240p again. Unfortunately, it sometimes takes 2 or 3 tries to get it right, but it's literally just a flick of a switch, while the console is already running. Below (and the above pic) are picture examples provided by Assemblergames member abdominalpillaging, who has more 3DO / 240p captures on his YouTube page.
| 480i | 240p (correct) | 240p (incorrect) |
|---|---|---|
 |
 |

|
Provided ID could not be validated.