CRT:ADDS 4000: Difference between revisions
Jump to navigation
Jump to search
(Created page with "{{Infobox/CRT |model = ADDS 4000 |image = ADDS_4000.png |manufacturer = ADDS |type = Terminal |size = 14" |dimensions = Width: 318mm Depth: 330mm Height: 340mm |weight = 29 lbs |tvl = |dot_pitch = |firmware = |earliest = |latest = |regions = |240p/480i = No |480p = No |720p = No |1080i = No |vsync = 60hz/71hz/82hz/100hz |widescreen = No |composite = |s-video = |component = |sdi = |hd-sdi = |chassis = |remote = |controller = |standard_boards = |optional_boards =...") |
No edit summary |
||
| Line 70: | Line 70: | ||
| VT510, VT520, VT525, Dorio 10 || ADDS Viewpoint; DEC VT-100, VT220, VT320, Dorio 10; Wyse WY-50/50+ , WY-55, WY-60/160, WY-120/150; TeleVideo TVI 910+ , TVI 925/950; SCO Console | | VT510, VT520, VT525, Dorio 10 || ADDS Viewpoint; DEC VT-100, VT220, VT320, Dorio 10; Wyse WY-50/50+ , WY-55, WY-60/160, WY-120/150; TeleVideo TVI 910+ , TVI 925/950; SCO Console | ||
|} | |} | ||
== Connecting to Linux Machine == | |||
The easiest way to connect the terminal to a Linux machine — such as a Raspberry Pi — is to obtain a [https://www.amazon.com/dp/B00066HL50 DB-25 male to DB-9 female null modem cable] ("null modem" meaning cross wired to be used without a modem) and a [https://www.amazon.com/gp/product/B07XKTQPS3/ref=ppx_yo_dt_b_search_asin_title?ie=UTF8&psc=1 DB-9 male to USB adapter cable]. | |||
Connect the cables to each other, one end to the terminal, and the other to a USB port on your Linux host device. | |||
=== Terminal Setup === | |||
# Press `Ctrl + Scroll Lock` (may be "PrLne" or "PrMsg" on your keyboard) to access Setup menu. | |||
# Press F1 to enter Quick menu (if not already selected). Set the following: | |||
Host/Printer=EIA/None (enables EIA port to be connected to Linux host) | |||
# Press F2 to enter General menu. Set the following: | |||
Emulation=VT100 | |||
(and optional settings to turn down the bell noise and set a screen saver to protect the CRT) | |||
# Press F3 to enter Display menu. Set the following: | |||
Display Cursor=On | |||
Page Length=24 | |||
Screen Length=26 | |||
Columns=80 | |||
# Press F4 to enter Keyboard menu. Set the following: | |||
Key Mode=ASCII | |||
# Press F6 to enter Ports menu. Set the following: | |||
EIA Baud Rate=115200 (if not available, note the value you choose) | |||
EIA Xmt=Xon-Xoff | |||
EIA Data Format=8/1/N | |||
EIA Recv=Xany-Xoff(XPC) | |||
EIA Parity Check=Off | |||
EIA Xmt Pace=Baud | |||
# Press F7 to enter Host menu. Set the following: | |||
Comm Mode=Full Duplex | |||
# Press F9 to enter Emulation menu. Set the following: | |||
ANSI-ID=VT100 (this will identify the terminal as a VT100 terminal to Linux) | |||
Status Line=Off (recommended to prevent burn-in with line/text at top of screen) | |||
# Press F13 (may be "Print" or "Print Screen" on your keyboard) to enter Exec menu. | |||
* Press Enter on "Save Terminal" and wait for "DONE" message. | |||
* Press Enter on "Save Session" and wait for "DONE" message. | |||
# Press F14 (may be "Hold", "Break", or "Pause" on your keyboard) and Y to save and exit. | |||
=== Linux Setup === | |||
# Enable the terminal console to be accessible by serial. | |||
#* On a Raspberry Pi, this can be set by running `sudo raspi-config` and enabling the "Serial Port" option under Interface Options; or by running `sudo vi /boot/config.txt` and adding an `[all]` section at the bottom followed by `enable_uart=1`. | |||
# Enable the USB serial port and set the baud rate to match the one you had set in the previous section. | |||
#* On a Raspberry Pi, you can do this by entering the commands: | |||
#** `sudo stty -F /dev/ttyUSB0 115200` | |||
#** `sudo systemctl enable [email protected]` | |||
#** `sudo systemctl start [email protected]` | |||
# If a login prompt isn't shown on the physical terminal, reboot the physical terminal followed by the Linux machine and it should prompt you for a login on the physical terminal. | |||
== References == | |||
Revision as of 01:26, 19 June 2022
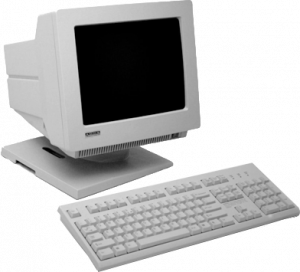
ADDS 4000

| Information | ||
|---|---|---|
| Manufacturer | ADDS | |
| Type | Terminal | |
| Size | 14" | |
| 240p/480i | No | |
| 480p | No | |
| 720p | No | |
| 1080i | No | |
| Vsync | 60hz/71hz/82hz/100hz | |
| Widescreen | No | |
| Dimensions | Width: 318mm
Depth: 330mm Height: 340mm | |
| Weight | 29 lbs | |
| Links | ||
| Operation Manual | FV310 Manual | |
| Service Manual | BA-5D Chassis Manual | |
| Brochure | FV310 Brochure | |
Text only terminal with a monochrome screen that comes in page-white, amber, or green colors. Compatible with PC101/102/106/107 or ANSI VT-220 keyboards via RJ11 connector on the left side.
Terminal Emulators
The ADDS 4000 series is capable of emulating various terminals depending on model listed below[1].
| Model | Emulators Available |
|---|---|
| ADDS 4000/110 | ADDS Viewpoint A1, A2, 3A, 3A+; Lear Siegler ADM 3A |
| ADDS 4000/150 | ADDS Viewpoint and Regent 40; Wyse WY-50, WY-75, TeleVideo TVI-910, TVI-920,TVI-925; Hazeltine HZ-1500; DEC VT52, VT100; PCTerm |
| ADDS 60 | ADDS Viewpoint, AT 386 (Unix console), DEC VT100, VT220, VT320, Wyse WY-50/50+ WY-60, TeleVideo TVI 925, PC Term, SCO Console, BBS ANSI, Wordperfect Graphics |
| ADDS 4000 | ADDS Viewpoint and Regent 40; Wyse WY-50, WY-75, TeleVideo TVI-910, TVI-920,TVI-925; Hazeltine HZ-1500; DEC VT52, VT100; PCTerm, SCO Console |
| ADDS 4000/160 | ADDS Viewpoint, ADDS Viewpoint 60, DEC VT100, VT220, VT320, VT420 PC TERM, Wyse WY-50/50+, WY-60 TeleVideo TVI 925, PC Term (925 PC) |
| ADDS 4000/260 | ADDS Viewpoint, DEC VT100, VT220, VT320, Wyse WY-50/50+, WY-60 TeleVideo TVI 925, PC Term (925 PC), SCO console, AT 386 (UNIX console), WordPerfect graphics |
| ADDS 4000/260LF | ADDS Viewpoint, AT 386 (Unix console) DEC VT100, VT220, VT320, Wyse WY-50/50+, WY-60, TeleVideo TVI 925, PC Term, SCO Console, WordPerfect graphics |
| ADDS 4000/260LFC | Same as 4000/260LF plus WY-325, WY-350 |
| ADDS C1099A | HP 700/96 (factory default); Wyse WY-60, WY-50/50+, DEC VT320, VT220, VT100; ADDS Viewpoint, PCTerm (925 PC); TeleVideo TVI-925; SCO console, AT 386 (UNIX console) |
| ADDS 3153 | IBM 3151, Wyse WY-60, WY-50/50+, DEC VT320, VT220, VT100; ADDS Viewpoint, PCTerm (925 PC); TeleVideo TVI-925; SCO console, AT 386 (UNIX console) |
| ADDS 3153 LF | Same as ADDS 3153 |
| VT510, VT520, VT525, Dorio 10 | ADDS Viewpoint; DEC VT-100, VT220, VT320, Dorio 10; Wyse WY-50/50+ , WY-55, WY-60/160, WY-120/150; TeleVideo TVI 910+ , TVI 925/950; SCO Console |
Connecting to Linux Machine
The easiest way to connect the terminal to a Linux machine — such as a Raspberry Pi — is to obtain a DB-25 male to DB-9 female null modem cable ("null modem" meaning cross wired to be used without a modem) and a DB-9 male to USB adapter cable.
Connect the cables to each other, one end to the terminal, and the other to a USB port on your Linux host device.
Terminal Setup
- Press
Ctrl + Scroll Lock(may be "PrLne" or "PrMsg" on your keyboard) to access Setup menu. - Press F1 to enter Quick menu (if not already selected). Set the following:
Host/Printer=EIA/None (enables EIA port to be connected to Linux host)
- Press F2 to enter General menu. Set the following:
Emulation=VT100
(and optional settings to turn down the bell noise and set a screen saver to protect the CRT)
- Press F3 to enter Display menu. Set the following:
Display Cursor=On
Page Length=24
Screen Length=26
Columns=80
- Press F4 to enter Keyboard menu. Set the following:
Key Mode=ASCII
- Press F6 to enter Ports menu. Set the following:
EIA Baud Rate=115200 (if not available, note the value you choose)
EIA Xmt=Xon-Xoff
EIA Data Format=8/1/N
EIA Recv=Xany-Xoff(XPC)
EIA Parity Check=Off
EIA Xmt Pace=Baud
- Press F7 to enter Host menu. Set the following:
Comm Mode=Full Duplex
- Press F9 to enter Emulation menu. Set the following:
ANSI-ID=VT100 (this will identify the terminal as a VT100 terminal to Linux)
Status Line=Off (recommended to prevent burn-in with line/text at top of screen)
- Press F13 (may be "Print" or "Print Screen" on your keyboard) to enter Exec menu.
* Press Enter on "Save Terminal" and wait for "DONE" message.
* Press Enter on "Save Session" and wait for "DONE" message.
- Press F14 (may be "Hold", "Break", or "Pause" on your keyboard) and Y to save and exit.
Linux Setup
- Enable the terminal console to be accessible by serial.
- On a Raspberry Pi, this can be set by running
sudo raspi-configand enabling the "Serial Port" option under Interface Options; or by runningsudo vi /boot/config.txtand adding an[all]section at the bottom followed byenable_uart=1.
- On a Raspberry Pi, this can be set by running
- Enable the USB serial port and set the baud rate to match the one you had set in the previous section.
- On a Raspberry Pi, you can do this by entering the commands:
sudo stty -F /dev/ttyUSB0 115200sudo systemctl enable [email protected]sudo systemctl start [email protected]
- On a Raspberry Pi, you can do this by entering the commands:
- If a login prompt isn't shown on the physical terminal, reboot the physical terminal followed by the Linux machine and it should prompt you for a login on the physical terminal.