Dreamcast:Flycast Emulator: Difference between revisions
(Heavy WIP) |
|||
| (7 intermediate revisions by the same user not shown) | |||
| Line 1: | Line 1: | ||
Flycast is an emulator for PC and Android capable of emulating Dreamcast games. This page will walk you through setting up the emulator. | |||
== Flycast Online Warnings == | |||
Flycast Online Warnings: | |||
* Do not use save states while in online play! It can break things. | |||
* Do not use "Fast Forward" functions while online! It can break things. | |||
* Do not pause/bring up the quick menu while in online play! It can break things. | |||
With Flycast for Android configured, you should now be able to launch into the game! | |||
== Setting Up Flycast (PC) == | |||
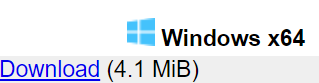
# Download a nightly build of Flycast [https://flyinghead.github.io/flycast-builds/ here]. The links at the top of the page are the latest builds. Grab the Windows x64 download. <br> [[File:15.png]] | |||
# Extract the .zip file to the folder of your choosing. Preferably, use a simple directory name such as `C:\flycast` (which will be the example directory in this guide). The zip should contain one .exe file that is the Flycast emulator program. | |||
# Acquire a Dreamcast BIOS file and ensure it is named `dc_boot.bin` and place it in `C:\flycast`. A download for one can not be linked here, as it is copyrighted content, but you can dump your own from | |||
=== Flycast Controller Configuration === | === Flycast Controller Configuration === | ||
Before we first boot the emulator, we need to decide how we want to configure our controls. | |||
Flycast works with any controller Windows can connect to, and most controllers (such as a PlayStation 4 controller or Xbox One controller) do not require any specific configuration. This guide will assume you are using a controller with your PC and walk you through how to configure the game pad / keyboard combo that will work the best. | |||
# With your controller of choice plugged in, launch the Flycast .exe from inside the `C:/flycast` directory. By default, Flycast will launch in a window as shown below. <br> [[File:19.png]] | |||
# Use your mouse to click on the "Settings" option in the top-right of the window. Select the "Controls" tab and match the following settings (important settings highlighted yellow). Your controller may show up as something other than Xbox 360 Controller. <br> [[File:20.png]] | |||
#* Essentially, you are setting Flycast to not use the default keyboard control assignments and forcing keyboard inputs to simulate a keyboard plugged into Port B, the same as you would with a real Dreamcast. This is particularly handy for Phantasy Star Online to access all the features available on the Dreamcast, such as keyboard in-game chat and navigating the menus with keyboard commands. | |||
[[File:19.png]] | |||
[[File:20.png]] | |||
As an aside, some of the more esoteric commands you can enter in PSO with the keyboard are detailed [https://www.ign.com/articles/2002/12/05/phantasy-star-online-keyboardlobby-animation-faq-379417 here]. | As an aside, some of the more esoteric commands you can enter in PSO with the keyboard are detailed [https://www.ign.com/articles/2002/12/05/phantasy-star-online-keyboardlobby-animation-faq-379417 here]. | ||
=== Remapping The Menu Button === | === Remapping The Menu Button === | ||
By default, Flycast's controller button mappings should be ideal for most games | By default, Flycast's controller button mappings should be ideal for most games. However, you may want to prevent accidental access to the Quick Menu as '''''pausing or using save states makes the game client out of sync with the server, and can crash the game or possibly corrupt your character data'''''. You can accomplish this by navigating to the Settings/Controls window and clicking the "Map" button to the right of the SDL Controller (whatever your gamepad is labeled). | ||
: [[File:22.png]] | |||
Scroll down a bit and find where the "Menu" button is located. By default, it is going to be mapped to your "Select" button on most controllers. It is not possible to delete a controller input mapping, so you will need to move the button bind to an uncommon button, such as "Left Trigger". | |||
Scroll down a bit and find where the "Menu" button is located. By default, it is going to be mapped to your "Select" button on | |||
Press "Map" next to "Left Trigger", and press the "Select" button on your gamepad before the countdown runs out. | Press "Map" next to "Left Trigger", and press the "Select" button on your gamepad before the countdown runs out. | ||
[[File:23.png]] | : [[File:23.png]] | ||
In the above example, you can see | In the above example, you can see the controller mapping (6) has moved from the "Menu" to "Left Trigger" assignment. This will prevent accidentally pausing the game if you press the select button, and also prevents the quick menu from accessing the save state functions of Flycast. You can simply reverse this change for offline play or for playing other games on Flycast. | ||
=== Controller Drift in Flycast === | === Controller Drift in Flycast === | ||
While it is not currently available in the menu, Flycast has a dead zone feature that can be used to combat controller drift if you are experiencing issues with characters "moving on their own". | While it is not currently available in the menu, Flycast has a dead zone feature that can be used to combat controller drift if you are experiencing issues with characters "moving on their own". | ||
ONLY after you have made an | ONLY after you have made an alteration to the controller configuration, Flycast will create a remap file and folder in its main directory, for example `C:/flycast/Mappings/SDL_Xbox 360 Controller.txt`. | ||
From here, you can add a line to the config to change the default dead zone to whatever you prefer, in the following example we are increasing the | From here, you can add a line to the config to change the default dead zone to whatever you prefer, in the following example we are increasing the default 10% deadzone to 15%: | ||
[emulator] | [emulator] | ||
| Line 104: | Line 54: | ||
=== Additional Flycast Configuration and Optional Settings === | === Additional Flycast Configuration and Optional Settings === | ||
Going back into the options menu, | Going back into the options menu, there is a few more more settings to configure. | ||
We want to change the language settings to English. | We want to change the language settings to English. | ||
In the Settings / General Tab: | In the Settings / General Tab: | ||
Language = English | Language = English | ||
Most Dreamcast games | Most Dreamcast games support a higher resolution VGA mode. | ||
In the Settings / General Tab: | In the Settings / General Tab: | ||
Cable = VGA | Cable = VGA | ||
Widescreen [optional]: | Widescreen [optional]: | ||
Widescreen mode will fill the entire 16:9 display when in full-screen mode. This is a emulator trick as the original game was presented in a 4:3 aspect ratio. While there might be a couple graphical pop-ins and inconsistencies | Widescreen mode will fill the entire 16:9 display when in full-screen mode. This is a emulator trick as the original game was presented in a 4:3 aspect ratio. While there might be a couple graphical pop-ins and inconsistencies (especially when not in full screen mode), it's worth trying out. To enable: | ||
In the Settings / Video Tab: | In the Settings / Video Tab: | ||
| Line 123: | Line 71: | ||
Upscaled Graphics [optional]: | Upscaled Graphics [optional]: | ||
If you have a modestly capable graphics card and PC, you can also change the Scaling (SSAA) from the default 1.0 to something higher. | If you have a modestly capable graphics card and PC, you can also change the Scaling (SSAA) from the default 1.0 to something higher. It's recommended to start at 2.0 and seeing if the game still plays smoothly. To do so, set: | ||
In the Settings / Video Tab: | In the Settings / Video Tab: | ||
Scaling (SSAA) = 2.0 | Scaling (SSAA) = 2.0 | ||
====Broadband (BBA) Mode | ====Broadband (BBA) Mode (optional)==== | ||
All Dreamcast shipped with a 56k modem that every online game supported. However, a handful of games supported the Broadband Adapter (BBA) accessory. The BBA replaced the 56k modem and used Ethernet networking to deliver much higher internet speeds | All Dreamcast shipped with a 56k modem that every online game supported. However, a handful of games supported the Broadband Adapter (BBA) accessory. The BBA replaced the 56k modem and used Ethernet networking to deliver much higher internet speeds. To enable BBA Mode: | ||
In the Settings - Advanced - Networking Tab: | In the Settings - Advanced - Networking Tab: | ||
Check the "Broadband Adapter Emulation" Box. | Check the "Broadband Adapter Emulation" Box. | ||
=== Final Notes About Flycast (PC) === | === Final Notes About Flycast (PC) === | ||
| Line 152: | Line 89: | ||
== Setting Up Flycast (Android) == | == Setting Up Flycast (Android) == | ||
Flycast also has a fully functional Android version | Flycast also has a fully functional Android version. To set this up, you will need to install the Flycast emulator apk and a file management app (in this example, ZArchiver is used). You will also need to source the Dreamcast BIOS file '''''"dc_boot.bin"''''' (which you can dump from a Dreamcast). | ||
To set this up, | |||
=== Downloading Flycast for Android === | === Downloading Flycast for Android === | ||
On your Android device, navigate to [https://flyinghead.github.io/flycast-builds/ the Flycast GitHub page] and download the latest nightly build. | |||
: [[File:Flycast1.png]] | |||
[[File: | |||
[[File: | <br> Look for the latest build of the Android release. Long-press the Android release download link. | ||
: [[File:Flycast2.png]] | |||
<br> Once the long-press menu pops up, we need to select "Download link". | |||
: [[File:Flycast3.png]] | |||
[[File: | <br> Because the nightly builds of Flycast aren't coming from a "trusted" source (such as the app store), your android device will try to protect you from running malicious software. However, we trust Flycast and want to run it. Choose "Keep" to continue. | ||
: [[File:Flycast4.png]] | |||
<br> Once again your device is warning you. We can choose "OK" to keep Flycast. | |||
: [[File:Flycast5.png]] | |||
<br> Once downloaded, you should see this prompt at the bottom of your device. Press the "Open" link to launch the Flycast APK. | |||
: [[File:Flycast6.png]] | |||
[[File: | <br> Once the Flycast APK launches, it will prompt you to install the software on your device. Choose "Install" to continue. | ||
: [[File:Flycast7.png]] | |||
Don't | <br> Don't open the program just yet, click "Done" to continue. | ||
: [[File:Flycast8.png]] | |||
If Flycast was installed correctly, we should have a new shortcut on our device's home screen. | |||
=== Downloading "dc_boot.bin" (Android) === | === Downloading "dc_boot.bin" (Android) === | ||
You will need to source a Dreamcast BIOS file named as '''''"dc_boot.bin"'''''. While we cannot provide direct links to this file, you can dump your own dc_boot.bin from a Dreamcast. | |||
=== Flycast File Management with ZArchiver (Android) === | === Flycast File Management with ZArchiver (Android) === | ||
At this point, you will need to use a file manager to move files around on your device. In this example, '''ZArchiver''' will be used. | |||
When Zarchiver first launches, it will prompt you for permissions to access your files and folders. Tap "ALLOW" to continue and press "OK" to dismiss the popup tips. | |||
: [[File:Zarch2.png]] | |||
You will need to create a folder for our BIOS and Flycast Config Files. For this example, a folder named "Flycast" is created in the `/storage/emulated/` directory by pressing the large green plus icon followed by the folder icon on top. | |||
[[File: | : [[File:Zarch6.png]] | ||
Navigate to the "Download" folder (if that's where your Dreamcast BIOS is located) and move them to the "Flycast" folder you created. If it is a zip file, open the zip file and extract it to the download folder. | |||
: [[File:Zarch8.png]] | |||
[[File: | : [[File:Zarch9.png]] | ||
Long press `dc_boot.bin` and select Copy. | |||
[[File: | : [[File:Zarch11.png]] | ||
Navigate back to the "Flycast" folder that you created earlier and tap the clipboard icon in the top-right of the screen to paste `dc_boot.bin`. | |||
== Configuring Flycast (Android) == | === Configuring Flycast (Android) === | ||
Navigate back to your Android device's home screen and launch Flycast. | |||
[[File:Flycast10.png]] | : [[File:Flycast10.png]] | ||
When Flycast launches, it needs you to set the working directory for the app. This is the location it will place any configuration data, as well as where it will look for any | When Flycast launches, it needs you to set the working directory for the app. This is the location it will place any configuration data, as well as where it will look for any BIOS files. From within Flycast, navigate to the "flycast" folder you created and select "Select Current Directory". | ||
If you set up your "Flycast" folder correctly, and correctly pointed the app to the folder, Flycast will detect and list your Dreamcast BIOS as shown below. | |||
: [[File:Flycast11.png]] | |||
Before we launch the game, we need to take a moment to configure some items in the "Settings" window. Tap "Settings" in the top-right corner of the screen and make the following changes. | |||
Language settings: | |||
In the Settings / General Tab: | In the Settings / General Tab: | ||
Language = English | Language = English | ||
Most Dreamcast games | Most Dreamcast games support a higher resolution VGA mode. | ||
In the Settings / General Tab: | In the Settings / General Tab: | ||
| Line 345: | Line 169: | ||
Widescreen [optional]: | Widescreen [optional]: | ||
Widescreen mode will fill the entire 16:9 display when in full-screen mode. This is a emulator trick as the original game was presented in a 4:3 aspect ratio. While there might be a couple graphical pop-ins and inconsistencies, | Widescreen mode will fill the entire 16:9 display when in full-screen mode. This is a emulator trick as the original game was presented in a 4:3 aspect ratio. While there might be a couple graphical pop-ins and inconsistencies (especially when not in full screen mode), it's worth trying out. To enable: | ||
In the Settings / Video Tab: | In the Settings / Video Tab: | ||
| Line 351: | Line 175: | ||
Upscaled Graphics [optional]: | Upscaled Graphics [optional]: | ||
If | If you have a modestly capable graphics card and PC, you can also change the Scaling (SSAA) from the default 1.0 to something higher. It's recommended to start at 2.0 and seeing if the game still plays smoothly. To do so, set: | ||
In the Settings / Video Tab: | In the Settings / Video Tab: | ||
| Line 357: | Line 181: | ||
Broadband (BBA) Mode [optional]: | Broadband (BBA) Mode [optional]: | ||
All Dreamcast shipped with a 56k modem that every online game supported. However, a handful of games supported the Broadband Adapter (BBA) accessory. The BBA replaced the 56k modem and used Ethernet networking to deliver much higher internet speeds | All Dreamcast shipped with a 56k modem that every online game supported. However, a handful of games supported the Broadband Adapter (BBA) accessory. The BBA replaced the 56k modem and used Ethernet networking to deliver much higher internet speeds. To enable BBA Mode: | ||
In the Settings - Advanced - Networking Tab: | In the Settings - Advanced - Networking Tab: | ||
Check the "Broadband Adapter Emulation" Box. | Check the "Broadband Adapter Emulation" Box. | ||
When you are finished changing settings, press "Done" at the top left of the screen. | When you are finished changing settings, press "Done" at the top left of the screen. | ||
| Line 367: | Line 190: | ||
=== Flycast Controls (Android)=== | === Flycast Controls (Android)=== | ||
====Touch Controls==== | ====Touch Controls==== | ||
[[File:Flycast12.png]] | : [[File:Flycast12.png]] | ||
The above picture demonstrates the default touch controls for Flycast on Android. The four face buttons and triggers are available on the right side of the device's screen, and the analog and d-pad are on the left. Note that currently, Flycast on Android does not have any keyboard implementation, so communication and entering text info, such as your SNAK, must be done using the controller bindings. | The above picture demonstrates the default touch controls for Flycast on Android. The four face buttons and triggers are available on the right side of the device's screen, and the analog and d-pad are on the left. Note that currently, Flycast on Android does not have any keyboard implementation, so communication and entering text info, such as your SNAK, must be done using the controller bindings. | ||
====Bluetooth Controller==== | ====Bluetooth Controller==== | ||
Any controller with Bluetooth support should work. | |||
To enable your Bluetooth controller, make sure your controller is on and paired with your Android device. Once paired and enabled, go to your "Settings / Controls / Physical Devices" tab in Flycast and make sure your device is detected and assigned to "Port A" (example using 8BitDO SN30, highlighted): | |||
: [[File:Flycast13.png]] | |||
In most cases, the button and joypad assignment should be automatic, but if you need to make any changes, the "Map" selection next to your device (either Bluetooth controller or Virtual Gamepad controls) will allow you to make adjustments and reassignments. When finished, press "Done" at the top of the screen. | |||
Latest revision as of 03:36, 16 May 2022
Flycast is an emulator for PC and Android capable of emulating Dreamcast games. This page will walk you through setting up the emulator.
Flycast Online Warnings
Flycast Online Warnings:
- Do not use save states while in online play! It can break things.
- Do not use "Fast Forward" functions while online! It can break things.
- Do not pause/bring up the quick menu while in online play! It can break things.
With Flycast for Android configured, you should now be able to launch into the game!
Setting Up Flycast (PC)
- Download a nightly build of Flycast here. The links at the top of the page are the latest builds. Grab the Windows x64 download.
- Extract the .zip file to the folder of your choosing. Preferably, use a simple directory name such as
C:\flycast(which will be the example directory in this guide). The zip should contain one .exe file that is the Flycast emulator program. - Acquire a Dreamcast BIOS file and ensure it is named
dc_boot.binand place it inC:\flycast. A download for one can not be linked here, as it is copyrighted content, but you can dump your own from

Flycast Controller Configuration
Before we first boot the emulator, we need to decide how we want to configure our controls.
Flycast works with any controller Windows can connect to, and most controllers (such as a PlayStation 4 controller or Xbox One controller) do not require any specific configuration. This guide will assume you are using a controller with your PC and walk you through how to configure the game pad / keyboard combo that will work the best.
- With your controller of choice plugged in, launch the Flycast .exe from inside the
C:/flycastdirectory. By default, Flycast will launch in a window as shown below.

- Use your mouse to click on the "Settings" option in the top-right of the window. Select the "Controls" tab and match the following settings (important settings highlighted yellow). Your controller may show up as something other than Xbox 360 Controller.
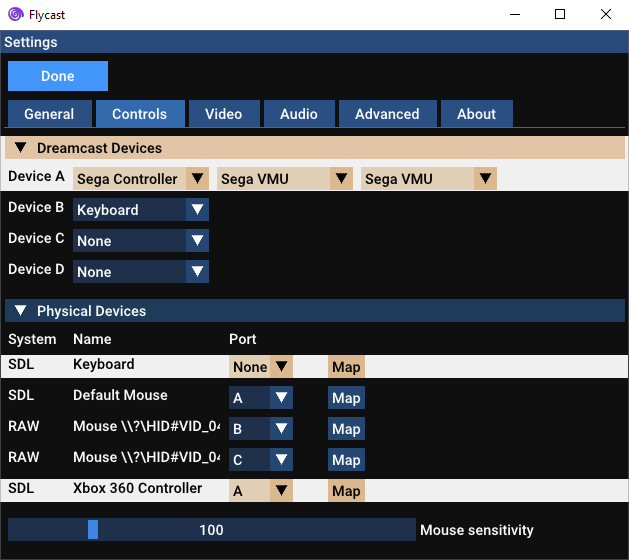
- Essentially, you are setting Flycast to not use the default keyboard control assignments and forcing keyboard inputs to simulate a keyboard plugged into Port B, the same as you would with a real Dreamcast. This is particularly handy for Phantasy Star Online to access all the features available on the Dreamcast, such as keyboard in-game chat and navigating the menus with keyboard commands.


As an aside, some of the more esoteric commands you can enter in PSO with the keyboard are detailed here.
Remapping The Menu Button
By default, Flycast's controller button mappings should be ideal for most games. However, you may want to prevent accidental access to the Quick Menu as pausing or using save states makes the game client out of sync with the server, and can crash the game or possibly corrupt your character data. You can accomplish this by navigating to the Settings/Controls window and clicking the "Map" button to the right of the SDL Controller (whatever your gamepad is labeled).

Scroll down a bit and find where the "Menu" button is located. By default, it is going to be mapped to your "Select" button on most controllers. It is not possible to delete a controller input mapping, so you will need to move the button bind to an uncommon button, such as "Left Trigger".
Press "Map" next to "Left Trigger", and press the "Select" button on your gamepad before the countdown runs out.

In the above example, you can see the controller mapping (6) has moved from the "Menu" to "Left Trigger" assignment. This will prevent accidentally pausing the game if you press the select button, and also prevents the quick menu from accessing the save state functions of Flycast. You can simply reverse this change for offline play or for playing other games on Flycast.
Controller Drift in Flycast
While it is not currently available in the menu, Flycast has a dead zone feature that can be used to combat controller drift if you are experiencing issues with characters "moving on their own".
ONLY after you have made an alteration to the controller configuration, Flycast will create a remap file and folder in its main directory, for example C:/flycast/Mappings/SDL_Xbox 360 Controller.txt.
From here, you can add a line to the config to change the default dead zone to whatever you prefer, in the following example we are increasing the default 10% deadzone to 15%:
[emulator]
dead_zone = 15
If you are experiencing controller drift, experiment with this value until you find the lowest setting that corrects the issue.
Additional Flycast Configuration and Optional Settings
Going back into the options menu, there is a few more more settings to configure.
We want to change the language settings to English.
In the Settings / General Tab:
Language = English
Most Dreamcast games support a higher resolution VGA mode.
In the Settings / General Tab:
Cable = VGA
Widescreen [optional]: Widescreen mode will fill the entire 16:9 display when in full-screen mode. This is a emulator trick as the original game was presented in a 4:3 aspect ratio. While there might be a couple graphical pop-ins and inconsistencies (especially when not in full screen mode), it's worth trying out. To enable:
In the Settings / Video Tab:
Check the "Widescreen" Box.
Upscaled Graphics [optional]: If you have a modestly capable graphics card and PC, you can also change the Scaling (SSAA) from the default 1.0 to something higher. It's recommended to start at 2.0 and seeing if the game still plays smoothly. To do so, set:
In the Settings / Video Tab:
Scaling (SSAA) = 2.0
Broadband (BBA) Mode (optional)
All Dreamcast shipped with a 56k modem that every online game supported. However, a handful of games supported the Broadband Adapter (BBA) accessory. The BBA replaced the 56k modem and used Ethernet networking to deliver much higher internet speeds. To enable BBA Mode:
In the Settings - Advanced - Networking Tab:
Check the "Broadband Adapter Emulation" Box.
Final Notes About Flycast (PC)
Alt-Enter: In Flycast, you can press Alt-Enter to enter and exit full screen mode. The widescreen hacks will not be enabled until you have entered full screen.
Closing The Game: When in windowed mode, it is simple to close the Flycast with the X in the top-right corner. As mentioned above, you can toggle to windowed mode with Alt-Enter.
Setting Up Flycast (Android)
Flycast also has a fully functional Android version. To set this up, you will need to install the Flycast emulator apk and a file management app (in this example, ZArchiver is used). You will also need to source the Dreamcast BIOS file "dc_boot.bin" (which you can dump from a Dreamcast).
Downloading Flycast for Android
On your Android device, navigate to the Flycast GitHub page and download the latest nightly build.

Look for the latest build of the Android release. Long-press the Android release download link.

Once the long-press menu pops up, we need to select "Download link".

Because the nightly builds of Flycast aren't coming from a "trusted" source (such as the app store), your android device will try to protect you from running malicious software. However, we trust Flycast and want to run it. Choose "Keep" to continue.

Once again your device is warning you. We can choose "OK" to keep Flycast.

Once downloaded, you should see this prompt at the bottom of your device. Press the "Open" link to launch the Flycast APK.

Once the Flycast APK launches, it will prompt you to install the software on your device. Choose "Install" to continue.

Don't open the program just yet, click "Done" to continue.

If Flycast was installed correctly, we should have a new shortcut on our device's home screen.
Downloading "dc_boot.bin" (Android)
You will need to source a Dreamcast BIOS file named as "dc_boot.bin". While we cannot provide direct links to this file, you can dump your own dc_boot.bin from a Dreamcast.
Flycast File Management with ZArchiver (Android)
At this point, you will need to use a file manager to move files around on your device. In this example, ZArchiver will be used.
When Zarchiver first launches, it will prompt you for permissions to access your files and folders. Tap "ALLOW" to continue and press "OK" to dismiss the popup tips.

You will need to create a folder for our BIOS and Flycast Config Files. For this example, a folder named "Flycast" is created in the /storage/emulated/ directory by pressing the large green plus icon followed by the folder icon on top.

Navigate to the "Download" folder (if that's where your Dreamcast BIOS is located) and move them to the "Flycast" folder you created. If it is a zip file, open the zip file and extract it to the download folder.


Long press dc_boot.bin and select Copy.

Navigate back to the "Flycast" folder that you created earlier and tap the clipboard icon in the top-right of the screen to paste dc_boot.bin.
Configuring Flycast (Android)
Navigate back to your Android device's home screen and launch Flycast.

When Flycast launches, it needs you to set the working directory for the app. This is the location it will place any configuration data, as well as where it will look for any BIOS files. From within Flycast, navigate to the "flycast" folder you created and select "Select Current Directory".
If you set up your "Flycast" folder correctly, and correctly pointed the app to the folder, Flycast will detect and list your Dreamcast BIOS as shown below.

Before we launch the game, we need to take a moment to configure some items in the "Settings" window. Tap "Settings" in the top-right corner of the screen and make the following changes.
Language settings:
In the Settings / General Tab:
Language = English
Most Dreamcast games support a higher resolution VGA mode.
In the Settings / General Tab:
Cable = VGA
Widescreen [optional]: Widescreen mode will fill the entire 16:9 display when in full-screen mode. This is a emulator trick as the original game was presented in a 4:3 aspect ratio. While there might be a couple graphical pop-ins and inconsistencies (especially when not in full screen mode), it's worth trying out. To enable:
In the Settings / Video Tab:
Check the "Widescreen" Box.
Upscaled Graphics [optional]: If you have a modestly capable graphics card and PC, you can also change the Scaling (SSAA) from the default 1.0 to something higher. It's recommended to start at 2.0 and seeing if the game still plays smoothly. To do so, set:
In the Settings / Video Tab:
Scaling (SSAA) = 2.0
Broadband (BBA) Mode [optional]: All Dreamcast shipped with a 56k modem that every online game supported. However, a handful of games supported the Broadband Adapter (BBA) accessory. The BBA replaced the 56k modem and used Ethernet networking to deliver much higher internet speeds. To enable BBA Mode:
In the Settings - Advanced - Networking Tab:
Check the "Broadband Adapter Emulation" Box.
When you are finished changing settings, press "Done" at the top left of the screen.
Flycast Controls (Android)
Touch Controls

The above picture demonstrates the default touch controls for Flycast on Android. The four face buttons and triggers are available on the right side of the device's screen, and the analog and d-pad are on the left. Note that currently, Flycast on Android does not have any keyboard implementation, so communication and entering text info, such as your SNAK, must be done using the controller bindings.
Bluetooth Controller
Any controller with Bluetooth support should work.
To enable your Bluetooth controller, make sure your controller is on and paired with your Android device. Once paired and enabled, go to your "Settings / Controls / Physical Devices" tab in Flycast and make sure your device is detected and assigned to "Port A" (example using 8BitDO SN30, highlighted):

In most cases, the button and joypad assignment should be automatic, but if you need to make any changes, the "Map" selection next to your device (either Bluetooth controller or Virtual Gamepad controls) will allow you to make adjustments and reassignments. When finished, press "Done" at the top of the screen.