Dreamcast:Phantasy Star Online Connection Guide

Phantasy Star Online is a MMO that was released in the year 2000 and still has a small and dedicated group of players. Thanks to the Sylverant Server, players from both the Dreamcast and PC can still connect and play together in 202X. This guide focuses on getting online with the original Sega Dreamcast and DreamPi, as well as using the Flycast Emulator on Windows PC and Android devices. This page will cover the US-NTSC Dreamcast version of the games, though most of the information should apply to the PAL and Japanese versions as well.
A TL;DR at the bottom of this tutorial will be provided for those looking for a quick and dirty list of requirements to get online, but please read the whole guide as there are many details you may not want to miss out on.
This guide was originally hosted here. Special Thanks to Turing, XeroTheHero and the many folks of the PSO Community that made this guide possible.

Understanding SNAKs ( Serial Number / Access Key)
Both Dreamcast and Flycast solutions require a copy of Phantasy Star Online V2 with the unique "SNAK" code inside the jewel case. What is a SNAK? SNAK is a shorthand for Serial Number / Access Key. It is a unique pair of numbers that came with every Dreamcast copy of PSO. The SNAK was printed on a sticker located inside the jewel case underneath the disc. When you are searching for a secondhand copy of PSO, make sure the SNAK sticker is in place!

A SNAK is required for online and offline play!
If you want to play and do not have a SNAK with your disc, you can use the following "Shared Keys":
PSOV2 NTSC Serial Number: 4E62F237
PSOV2 NTSC Access Key: oWur4WJg
PSOV2 PAL Serial Number: E4367CA4
PSOV2 PAL Access Key: 5YWXZG3D
Note that you need to match your copy of PSO's region with the corresponding region of SNAK. These keys were borrowed from a list of "Shared SNAKs" found here.
Do not attempt to register this or any "Shared" SNAKs on Sylverant! (more information on this later in the guide).
Registered SNAKs
Shared SNAKs have limitations. With a shared key, you do not have access to server special events, and do not have a protected Guild Card. A guild card is the server's unique ID of your copy of the game. If you don't have one already, grab a copy of the game at your local retro game store and register your SNAK!
With a Sylverant-registered SNAK, your guild card number will follow you no matter what Dreamcast you play on (if you use the same SNAK to log in). A registered account will also have server-side automatic character backups, which saves your progress in case something happens to your VMU data. Also, registering makes it possible to see messages sent to your Guild Card while offline via the Sylverant Website.
Sylverant Server
Sylverant Server is replacement for the original, now-defunct SEGA Phantasy Star Online server. They are talented and hard working folks that made it possible to keep online Dreamcast gaming alive! You can read more about Sylverant here.
Thanks to Sylverant, PC and Dreamcast PSOV2 users can play together online. Sylverant also supports connections with the GameCube version of PSO (not yet documented here). All supported versions can meet and chat in the lobby, although due to version incompatibilities GameCube players cannot form teams and play with PC and DC players.
Registering Your SNAK on Sylverant
It is not required, but creating a Sylverant Account and logging your SNAK is a good idea to protect your access to the server, as well as getting the perks outlined in the Registered SNAKs section above.
To register your SNAK, head to the Sylverant Account Management page and create an account if you don't already have one.

Click on the "New User?" link and follow the instructions on the "Create New Account" page to register and link to an email address. Once you have an account, go back to the Account Management page and login.

Once logged in, click the "Manage your Guildcards" link.

At the top of the page, you will find the "Register a new Dreamcast Serial Number and Access Key" link. Click the link and enter your SNAK information.
Note: This guide is assuming you have not been online on Sylverant with this SNAK before. If you have, follow the instructions after clicking "Associate an existing Dreamcast guildcard with your account".

It's worth repeating the rules:
DO NOT attempt to register any "shared serials" with this system. Doing so is against the rules of the server and may result in a permanent ban from the server when you are caught. By registering a serial number access key pair here, you are certifying that you actually own the corresponding copy of the game, and you agree that you will provide proof of ownership if it is requested by the administration of the server.
Now that you're registered in the server, we can boot up the game and get prepped for online play!
Registering your SNAK on Dreamcast/PSO
Now we can enter our SNAK inside the PSOV2 game itself. This process is the same no matter if you are on real or emulated hardware, but I'll get to some Flycast specifics later in the guide.
When you enter your SNAK into your PSO game, it registers an "unchangeable" serial number (the SN part of "SNAK") into your Dreamcast's flash memory. Through this association, Sega was trying to create an ecosystem of "one Dreamcast, one SNAK". This registration also means that when you create a character, that character can only play on the same Dreamcast it was created on.
You can, however, register the same SNAK on multiple Dreamcasts (using different characters), they just cannot be playing online at the same time.
Resetting an "Unchangeable" Dreamcast SNAK Serial Number
What if you have a second-hand Dreamcast that has a missing copy of PSO (that is, a Dreamcast that has a PSO serial number registered but you don't have the access key), or you have entered a "shared" key by mistake, or simply want to change what SNAK you are using on your Dreamcast?
Thankfully, there is a Flash Eraser tool that removes the "permanently" associated serial number on your Dreamcast so that you can enter a new one.
You can download the Flash Eraser tool here.
To use it, burn the .CDI, boot it up, and follow the on screen prompts. When you are done, it will blank any information stored in your Dreamcast's flash memory so you can start fresh with your PSO Serial Number registration.
To erase your flash memory in Flycast, simply delete the "dc_nvmem.bin" file located in your "c:/flycast/data directory" (or the /data directory of wherever you have Flycast installed).
Entering Your SNAK on PSO
This section also assumes you have never logged in before, and are making a new character. You will need a practically empty VMU to store your character to.

Press start and select "New Game". Then, the following screen will come up:

The game telling us an important piece of information here. When you register your SNAK, it is going to be linked to your Dreamcast and any characters created on that Dreamcast. Any characters that are created under a SNAK are permanently linked to that SNAK, and can only be played on the SNAK-registered Dreamcast they were created under. Push A to continue.

Now we can enter our Serial Number. Fill out the information and press "enter" to continue.

Now enter your Access Key and press "enter" to continue.

We have one more chance to review and double check our information. If correct, select "Yes". PSO will save the information to our Dreamcast's flash storage, and then bring us to a VMU selection screen.

Select a VMU slot you wish to create your new character on, and press A to continue. The opening sequence movie will now play. You can skip the movie with "Start" if you wish.

We are now at the character select screen. If this is your first time, take a look at Pso Palace's rundown of the races and classes here. Remember, you can always delete your character and start over if you don't like their play style. Pick a race and class, customize how you like, and give them a name.

We can now select between Online and Offline modes. PSO works seamlessly as a single-player / multiplayer experience, allowing you to gain levels and items offline and bring them into the online server, and vice-versa. If this is your first time, you might want to play a few hours offline to familiarize yourself with the game and controls before going on quests with other players.
Playing Online (Original Hardware)

Please see the guide here to get your Dreamcast online with a DreamPi. It is not the only way to connect a Dreamcast to the web, but it is likely the simplest, cheapest, and most feature rich. Regardless how you choose to get online, you will have to make some considerations to connect to the Sylverant Server.
Connecting To Sylverant
To connect to the Sylverant server, it is required to redirect the original PSO software to the current Sylverant server address.
Before you connect to the Sylverant Server, you should explore their website here and take a look specifically at their Server Rules and Privacy Policy.
There are two common methods to connect to Sylverant with the original Dreamcast:
BlueCrab's PSO Loader 2.0
Option 1 is to use a BlueCrab's PSO Loader 2.0. This is a custom boot disc that will redirect your original PSOV2 disc to the Sylverant server.
To use it, you need to burn a copy and load it on your Dreamcast. For information on how to burn Dreamcast CD-R's, check out the guide here.
BlueCrab's PSO Loader 2.0 can be downloaded here.
Note that BlueCrab's Loader also bypasses the Dreamcast's region lock, allowing you to boot mismatched PSOV2 and Dreamcast combinations (PAL disc on NTSC hardware, NTSC disc on PAL hardware, etc.) Be aware that you will still need a SNAK that matches the reigon of the to the disc you are using. You can find more about SNAKs here.

After loading the boot disc, you will be prompted to swap over to your original PSO disc. When the game loads and you go to connect online, the game will connect to the Sylverant Server.
This process must be completed again if your Dreamcast restarts or you power down.
Ives' Pack
Option 2 is to boot directly into a modded version of PSOV2 known as Phantasy Star Online Ver.2 Aleron Ives Edition 4.0, or "Ives' Pack" for short. This modded version of PSOV2 has enhancements and bug fixes - including online maps that were inaccessible on the original discs, faster loading times, and higher quality music ripped from the Xbox version of PSO.
Ives' Pack is also auto-booting (meaning you can burn it to a CD-R and launch it from your Dreamcast without a boot disc), and will connect to Sylverant automatically. This is perhaps the best "Vanilla" version of PSOV2 to play. This is the recommended version to play if you want to use the Flycast Emulator.
Read more about the Ives' Pack here. A direct link to the Ives' Pack cannot be provided.
Ives' Pack Version Differences
The "PSO_DC_Ives_Pack_v2" download contains 3 separate versions of Phantasy Star Online:
IVES_PSOV1_US.CDI - This is a copy of Phantasy Star Online V1 that has been patched to connect to Sylverant. It is included for completeness, but is not an ideal way to play PSO Online. Most online players are using V2, and some modes of play are not available to V1 users.
More details about Ives' PSOV1 Pack can be found here.
Refer to the PSOV2 Dreamcast Instruction Manual for more details on the differences between PSO V1 and V2.
IVES_PSOV2_US_R2.CDI - This is the "Vanilla" version of the Ives' Pack. It contains the features outlined in Connecting To Sylverant, and is a good way to enjoy PSOV2 online.
More details about the "Vanilla" Ives' Pack can be found here.
IVES_PSOV2_US_R2_EP.CDI - This version is Ives' Enhancement Pack, or EP for short. On top of the improvements featured in the "Vanilla" Ives' Pack, it has tweaked game play elements, including increased frequency/better quality item drops, altered stats and requirements for items, and re-balanced maximum stats for the player classes. The Ives' EP Pack also contains a new Ultimate mode difficulty, dubbed "Ludicrous" Mode.
More details about the Ives' Enhancement Pack can be found here.
Ives' EP is a good way to start playing PSO V2, with a couple considerations.
Because the Ultimate Difficulty has been cranked to 11 as "Ludicrous" mode, it is not intended for players who have not already completed Ultimate on a "Vanilla" playthrough of the game.
If you want the perks of the increased drop rates and re-balancing found in the EP Pack, consider playing with the EP disc through the Normal, Hard, Very Hard difficulties, then swapping to a "Vanilla" Ives' V2 disc for an Ultimate Difficulty run. Be aware any stats that were "artificially" boosted in your EP run will be brought back to the "Vanilla V2" limits when you switch over. When you are sufficiently leveled up in "Vanilla" Ultimate, you can migrate back over to EP for an added challenge in "Ludicrous" mode.
PAL with Ives' Pack
"Ives' Pack" .CDI releases are region-free and will boot on any Dreamcast that can play burnt discs. However, because the Ives' Pack .CDI's are built on top of a NTSC / US version of the game, there are extra considerations that need to be understood when using your PAL copy of Phantasy Star Online V2 and SNAK to play running an Ives' Pack .CDI.
SNAKs are locked to region. If you are playing on a PAL Dreamcast, you must have a PAL copy of the game and SNAK to initially create a character and get online. Thankfully, characters created with SNAKs are not region locked and can be "moved" to other regions software (with the odd exception of Japanese PSO V1 characters).
To get a PAL Dreamcast and SNAK to boot to an Ives' Disc, you must:
- Register your SNAK on Sylverant (not required but recommended).
- Get on Sylverant. PAL versions of PSOV2 will Connect to Sylverant automatically when using a DreamPi.
- Create a character with your region's Dreamcast and PSOV2 disc and SNAK.
- Go online to Sylverant Server at least one time.
Going online at least once will bypass the serial number and access code check with your saved character, allowing you to swap over to an Ives' Pack disc and connect online without being halted.
The only limitation to this process is that you will have to repeat the steps for every new character you create, as your PAL SNAK will not be accepted to create new characters from the Ives' Pack discs.
If you are on a PAL Dreamcast and do not have a PAL copy of PSOV2 and your own SNAK, you can still play online with an Ives' Pack copy of the game and a "NTSC Shared SNAK".
Ship Select in Sylverant

When you connect to Sylverant, you will be prompted with a choice of ships to join. The ships are effectively different servers run from different sections of the Dreamcast / PSO community. Here is a quick breakdown of the current servers:
Iselia is run by BlueCrab of Sylverant. It is a "Vanilla" server, replicating the setup of the original Sega servers. Gamecube people tend to play here.
Altmira is run by Aleron Ives of Sylverant. It features quests and mods not found in the original Sega servers. This tends to be the ship that most Dreamcast users meet up at.
Vega is a server run by Dreamcast-talk.com.
Palmacosta is a server specifically for Brazilians and Portuguese players. More information on Palmacosta can be found here.
Sil Dragon Bug

On the the subject of choosing a version of PSO to play, there is a known issue when "Vanilla" players and "EP" players are playing together. The bug only occurs under these conditions:
- If an "EP" player is hosting the party, and you have "Vanilla" players in your party.
- You are playing in "Ultimate" Difficulty (which is unlocked at player level 80).
- You are fighting the Sil Dragon at the end of Forest.
If one of the "Vanilla" players attack the dragon, the dragon's HP will reset to full health, effectively making him unbeatable. Fortunately, there is an easy workaround for this - you can have the "Vanilla" players hit the dragon once, then sit the rest of the battle out while the "EP" players finish him off. Doing so will allow the dragon to be defeated and still reward the "Vanilla" players a share of experience points.
Make sure to ask other players in your party what version of PSO they are playing so you can respond accordingly to this bug!
Additional PSOV2 Patches
On top of the features found in the Ives' Pack releases, Dreamcast users have additional patches available to to use with PSOV2.
.CDI Patches
These are patches that modify the game data itself by patching a .CDI before you burn it, load onto your ODE, or boot into it from an emulator. These patches are only compatible with Ives' "Vanilla" V2 or Enhancement Pack .CDI's.
Once patched, the modifications to your .CDI cannot be undone. Make sure you save backup copies of any .CDI files you modify!
The following .CDI Patches are available:
Gamecube Name Detection Patch: This patch will cause PSO DC to display the names of PSO Gamecube users in white.
Sparkle Patch: This patch repalces the Shifta, Deband, Jellen, and Zalure ring effects with Ver.1-style sparkles. This patch is only available as a .CDI patch.
Widescreen Patch: This patch allows you to play the game in 16:9 anamorphic widescreen.

Patch Downloads and more detailed descriptions can be found on PSO Palace here.
How To Apply .CDI Patches:
For Windows users, download desired patch or patches from PSO Palace here. The patches will download as a zip file, which will include patches for each version of PSO the patch is compatible with. Unzip your patch(es). The files will decompress to .exe executable file.
Run your .exe of choice. Running the .exe will open a window, example seen below:


In the resulting patcher application, ensure that your Target File is the .cdi image of PSO you wish to run the patch against, and the ‘Make a backup when possible’ box is checked.
Select ‘Start’ when ready. The program will proceed with applying the patch. Congratulations, you’ve just patched your copy of Phantasy Star Online! Repeat the process for additional patches you’d like to apply.
| macOS and Linux Users: Because these patches were created as Windows .exe’s, they will not run natively on other operating systems. Fortunately there are common methods of running Windows programs on macOS and Linux. It is outside the scope of this tutorial to get into the details of these options, but here are some links to articles that you can explore to get started. |
macOS:
- Use a Boot Camp Partition or use a Wine Shell.
Linux:
- Dual-Boot Windows or use a Wine Shell.
Once you have a method to launch the .EXE's, follow the generic Windows tutorial.
Sylverant "Downloadable" Patches
These are patches that you can activate when you first log into the Sylverant server. Unlike the .CDI patches which permanently modify the game data on your CD, server-side "Downloadable" patches only persist for as long as the console remains powered on. If you power off, you will be required to download your desired patches again.
To activate a Sylverant "Downloadable" Patch, Boot up PSO and log onto Sylverant server.

From the initial menu, choose "Patches".

Select any desired patches from the menu. Once selected, they will download and apply to your current PSO session. The following patches can currently be applied:
PSOGC Names: Similar the .CDI patch, this will cause the game to display the names of PSO GameCube users in cyan.
Battle Music Patch: The Battle Music server-side patch enables two music tracks otherwise only found in battle mode to be played during the custom Aleron Ives' Prospective Horizons quest.
Widescreen Patch (Warning!): Please note that application of the server-side Widescreen patch is NOT advised. While the patch is available as a menu option, it does not function as intended and should be avoided. For proper application of the Widescreen patch, please use the .CDI Patch.
Guild Cards
Guild Cards are effectively PSO's in-game e-mail address. By sharing your Guild Card # to other users, you can add each other to your "Card List" and use PSO's "Simple Mail" system to send and receive messages. Players do not have to be in-game to receive messages, and will be prompted when they sign in to check their "Simple Mail" if they have any unread messages.
When you register your SNAK on Sylverant, the Sylverant website will show you your unique Guild Card Number. Every character you create with your registered SNAK will be linked to your unique GC#.
While it is unlikely that using Shared SNAKs will result in duplicate Guild Cards, Sylverant Server cannot guarantee and protect a unique guild card number to "Shared SNAK" users.
Accessing Your Guild Card
In an online game, press "Start" to open the start menu. Move down and select the "Chat" selection menu.

From the "Chat" menu, scroll down and select "Guild Card".

From the "Guild Card" menu, select "MY Card".

In the middle window, your character's name, guild card number (in this example, "24683"), language, and Section ID.

Sylverant In-Game Server Commands
Sylverant Server has built-in features that you can take advantage of in-game by typing commands in with your keyboard. The format for these commands is similar to many "console" style command input systems. The general syntax is as follows:
/[server command] [command variable(if applicable)] **press enter to send command**
For a full list of server commands and a description of their functions, please visit the Sylverant Server page for server commands here.
(This section needs to be expanded! -Old Kid)
Optical Drive Emulators
PSO has full compatibility with all of the optical drive emulators and PSO online play. Refer to your specific device's instructions for loading the image and booting into BlueCrab's PSO Loader 2.0 (then into a PSOV2 image) or for an all-in-one solution use a .CDI from Ives' Pack.
Phantasy Star Online using Flycast (PC)
Flycast, the Sega Dreamcast emulator, includes support for online play. All of the same considerations we have covered using a real Dreamcast apply, including needing a unique SNAK, registering on Sylverant, and entering your SNAK on PSO. A bonus of setting up Flycast is that there's no reason you cannot use one SNAK for both your real Dreamcast AND your emulated one, so long as they are are not online at the same time.
Ensure your Flycast installation is setup similar to the below image, with your Ives' Pack CDI file accessible.

To get the most out of PSOV2 with Flycast, a controller is strongly recommended. Not only will this make playing PSO more enjoyable, but it will free up our PC's keyboard for in-game chat and navigating menus.
As an aside, some of the more esoteric commands you can enter in PSO with the keyboard are detailed here.
Broadband (BBA) Mode [optional]
Using the broadband adapter will require an additional configuration step beyond the standard BBA configuration in Flycast. The Ives's Pack has a BBA configuration screen from the PSO V2 main menu, accessible by selecting "WEBSITE".

From here, we can ignore the actual configuration. We just need something saved to the emulated Dreamcast's flash memory for PSO and Flycast to connect. Select "Save To Flash".

When Prompted "Are you sure you want to save all settings to flash?", Select "Yes". Now, we can select "Exit" and proceed as normal in the main game.
Launching "Ives' Pack" PSOV2 From Flycast
We will also need an "Ives' Pack" .CDI image for our Flycast online setup.
Refer to the above Connecting To Sylverant section of this guide for information on the "Ives' Packs".
When done, your c:\flycast folder should look something like this:
Flycast Online Warnings:
1 - Do not use save states while in online play! It can break things.
2 - Do not pause/bring up the quick menu while in online play! It can break things.
3 - To save progress in PSO, you must exit the game back to the main menu!
As you may have observed already, Flycast doesn't automatically detect the IVES_PSOV2_US_R2_EP.cdi inside its built-in file explorer to launch. We can tell Flycast to launch it a couple of different ways:
Normal Way
Flycast needs to be pointed to a directory to populate the internal file launcher. Navigate to the Options Menu. In the Settings / General Tab, find the "Content Location" field.

Click "Add" and navigate to your c:/flycast folder. The folder should now be listed. When you back out, the IVES_PSOV2_US_R2_EP.cdi should be listed. From here, you can select the entry to boot into the game.
Lazy Way
To launch the IVES_PSOV2_US_R2_EP.cdi, simply navigate your file explorer to the c:/flycast directory and drag-and-drop the Ives's .cdi onto the flycast .exe file. The emulator should launch, starting the game.
Fancy Way
- Start by simplifying the file name of the Flycast emulator .exe. The long file name is meant as a version marker, but for our purposes we should rename it to something simpler. Right click on the executable and select "Rename". I've renamed mine for this example "flycast". The full file with extension would be "flycast.exe".
- With the emulator renamed, let's make a link that opens Ives's PSOV2 Pack automatically.
From your c:/flycast directory, right-click the recently renamed "flycast.exe" file and select "Create Shortcut". Windows will place a shortcut in the same directory.
- Now right-click the link we just created and select "Rename" to give the shortcut a more specific name for our task. "PSOV2 For Flycast Launcher" is one option, but rename it anything you prefer.
- Finally, right-click the link one last time and select "Properties".
- At the end of the "Target" field, enter a space (one push of the spacebar) and type or copy and paste the name of the Ives's .CDI. Unless it was renamed, the pack is titled "IVES_PSOV2_US_R2_EP.cdi". If you have followed the tutorial example of "c:/flycast", and your Ives's Pack is named "IVES_PSOV2_US_R2_EP.cdi", you can simply copy and paste the following into your "Target" field.
C:\flycast\flycast.exe IVES_PSOV2_US_R2_EP.cdi

We should now have a handy shortcut that we can copy to our desktop or wherever we like to boot into PSO with a double-click!
When you first boot into the "Ives' Pack" PSOV2 from your Flycast emulator, scroll up and refer to the Enter Your SNAK on PSO section for details and help getting started.
Final Notes About Flycast (PC)
Alt-Enter: In Flycast, you can press Alt-Enter to enter and exit full screen mode. The widescreen hacks will not be enabled until you have entered full screen.
Closing The Game: When in windowed mode, it is simple to close the Flycast with the X in the top-right corner. As mentioned above, you can toggle to windowed mode with Alt-Enter.
Remember to back out to the main menu to save your PSO progress!
Phantasy Star Online using Flycast (Android)
Flycast also has a fully functional Android version port as well that we can use to play PSOV2 Online. See the Flycast Emulator page for how to setup Flycast and its BIOS. Once setup, you will also need to setup Ives' Pack with the following directions.
Locate a download for the "Ives' Pack" .CDI file of PSOV2. A direct link to the file cannot be provided. The file we are specifically looking for is "PSO_DC_Ives_Pack_v2" which will download the full Ives' Pack files. You can either download it straight to your phone and use a file manager to move it, or you can download it on your PC and move it to your phone.
Flycast File Management with ZArchiver (Android)
Once you have your Ives Pack and Dreamcast BIOS downloaded, you will need to move files to the correct directories. You can either use your file manager of choice or download and launch ZArchiver.
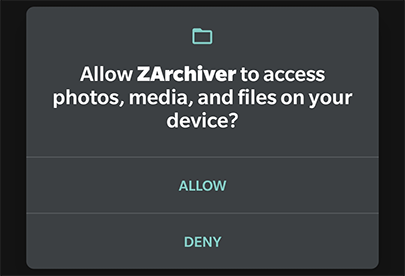
- When Zarchiver first launches, it may prompt you for permissions to access your files and folders. Tap "ALLOW" to continue.
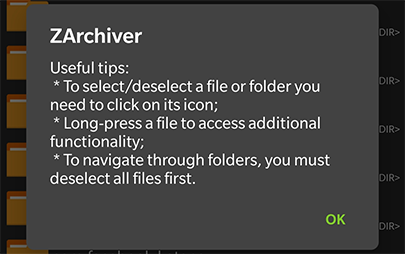
- ZArchiver pops up a window explaining how to make selections by tapping the folder icon, and how to open a wider selection menu by long-pressing a file name. ZArchiver also is informing you that you must not have any folders or files selected to change folders. We'll be using that information shortly! Press "OK" to bypass the popup.
- As part of setting up Flycast for Android, you should have a
/storage/emulated/Flycastfolder which holds yourdc_boot.binBIOS file. - Navigate to your "Download" folder or wherever you may have copied your "PSO_DC_IVES_PACK_V2" folder to. Inside of the folder you will see three separate .7z files. We now need to decide which version(s) of the Ives' Pack PSOV2 we want to play. For more information, read about the version differences here. This example will use use "IVES_PSOV2_US_R2_EP.7z".
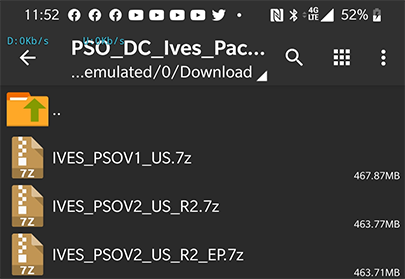
- Extract "IVES_PSOV2_US_R2_EP.7z" into a folder. Tap "IVES_PSOV2_US_R2_EP.7z" and select "Extract to ./<Archive name>/". This will create a folder named after the archive containing the extracted file we need. The extracting might take a moment. Once extracted, tap the "IVES_PSOV2_US_R2_EP" folder to open.
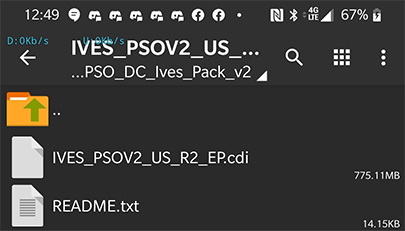
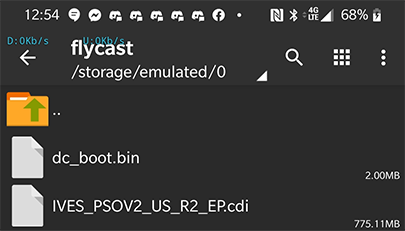
- Long-press the "IVES_PSOV2_US_R2_EP.cdi" file and select copy. Navigate back to our "Flycast" folder, and press the clipboard icon in the top-right of the screen to paste the file into the "Flycast" folder. When done, the folder should look like this:


We now have the two required files on our device for Flycast to run PSOV2! We now need to run Flycast for Android and configure our settings.
Configuring Flycast (Android)
If you haven't already, configure your Flycast app. PSO will work with VGA mode, widescreen, upscaled graphics (may cause a performance hit), and BBA mode. Note that enabling BBA mode requires additional configuration inside PSOV2. For more information about this, please reference the section in the Flycast PC guide concerning the BBA mode here.
If you set up your "Flycast" folder correctly, and correctly pointed the app to the folder, Flycast will detect and list your Dreamcast BIOS, as well as the "IVES_PSOV2_US_R2_EP.cdi" game file.

Flycast Online Android Tips
Flycast Online Warnings:
1 - Do not use save states while in online play! It can break things.
2 - Do not use "Fast Forward" functions while online! It can break things.
3 - Do not pause/bring up the quick menu while in online play! It can break things.
4 - To save progress in PSO, you must exit the game back to the main menu!
TL;DR: Getting Online Quick Guide
Dreamcast
- Get a copy of PSOV2 with a SNAK sticker intact, or use a SHARED KEY.
- Register your SNAK on Sylverant, it protects your investment and opts you in to server special events. (Skip this step if using a SHARED KEY).
- Get your Dreamcast Online (preferably with DreamPi).
- Get PSOV2 on Sylverant Server with Original Game + Boot Disc or with Ives' Pack.
- Launch the game on your Dreamcast, Enter Your SNAK on PSO and get online!
Flycast Emulator on Windows PC
- Get a copy of PSOV2 with a SNAK sticker intact, or use a SHARED KEY.
- Register your SNAK on Sylverant, it protects your investment and opts you in to server special events. (Skip this step if using a SHARED KEY).
- Download Flycast for Windows.
- Download Dreamcast BIOS Files (more info here).
- Download Ives' PSOV2 Pack.
- Configure Flycast for Gamepad / Keyboard combo controls.
- A little bit more Flycast Configuration and set up booting to Ives's Pack.
- Launch Flycast for PC, Enter Your SNAK on PSO and play online!
Flycast Emulator on Android
- Get a copy of PSOV2 with a SNAK sticker intact, or use a SHARED KEY.
- Register your SNAK on Sylverant, it protects your investment and opts you in to server special events. (Skip this step if using a SHARED KEY).
- Download Flycast for Android.
- Download a file manager such as ZArchiver from the Play Store.
- Locate and download the Ives' Pac.
- Locate and download the Dreamcast BIOS file "dc_boot.bin" or dump one from a Dreamcast.
- Create "flycast" directory and place BIOS and Ives Pack .CDI inside using ZArchiver.
- Configure Flycast for Android.
- Resign to using touch controls or set up Bluetooth Controller.
- Launch Flycast for Android, Enter Your SNAK on PSO and get online!
Final Thoughts
| Thanks to everyone on the Discord and forums for helping sort all this information out. Now that this is in wiki form, I hope it grows and gets a little more polish to be even more comprehensive! — Old Kid |
Feel free to reach out to the original author — Old Kid — on their user talk page or by clicking the "Email this user" button in the sidebar when on their profile page.