RetroBlaster: Difference between revisions
| Line 124: | Line 124: | ||
===GBA Adapter Tab Interface=== | ===GBA Adapter Tab Interface=== | ||
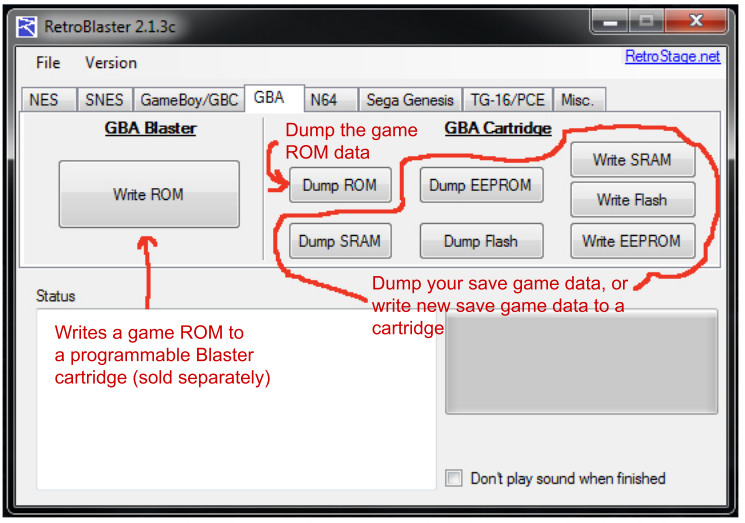
[[File:Retroblaster-software-GBA.png|frame|none]] | |||
====GBA ROM Header Information==== | ====GBA ROM Header Information==== | ||
GBA is a bit more complex than GB/GBC, in that there are 3 different save types that games used. GBA games also don't have that sort of data available to the RetroBlaster automatically, so to figure out what game uses what save, and how big the game is, go to this website: http://offlinelistgba.free.fr/ | |||
We'll cover more on finding GBA ROM and save info on the next page. | |||
**IMPORTANT* When interfacing with GBA games, make sure to first set the voltage switch on the RetroBlaster to 3V! Otherwise you'll be putting too much voltage into the game, which can damage it if left too long. | |||
To write a game to a GBA Blaster cartridge (sold separately), insert the Blaster into the GB/GBC/GBA adapter, and then click Write ROM.This will prompt you to select the game to write. If the game doesn’t boot up in the console, make sure it works in an emulator, and that it’s a valid GBA ROM file! | |||
For dumping a GBA game ROM, you'll need the ROM size first. Look on the next page for how to get that information. | |||
For dumping or writing the save files, you'll need the save type that the game uses first (See next page). Once you have the save type, simply click on the button corresponding to that save type, for writing or dumping. | |||
** At the time of writing this, only SRAM dumping/writing is supported, EEPROM and FLASH save support coming soon! ** | |||
===N64 Adapter Tab Interface=== | ===N64 Adapter Tab Interface=== | ||
Revision as of 03:29, 30 October 2022
The RetroBlaster is a ROM dumper / programmer from RetroStage. It is designed to dump roms from various cartridge console games, and to program ROMs to proprietary re-writable carts known as SNES Blaster, N64 Blaster, etc.
RetroBlaster User Guide
With permission from RetroStage, the RetroBlaster User Guide is reproduced here in wiki format.
Get to Know the Hardware
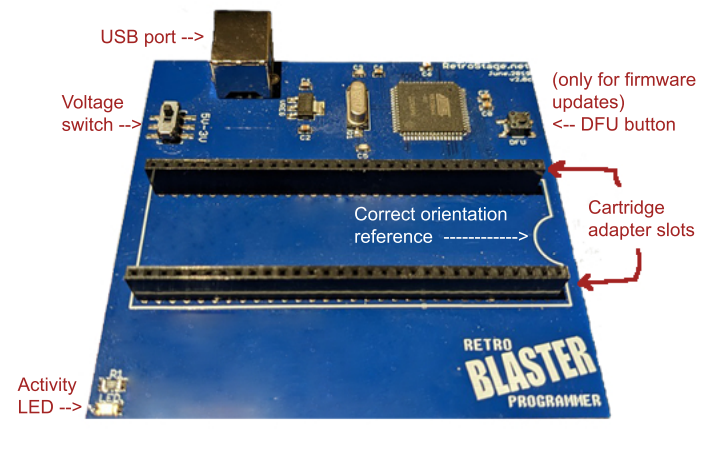
USB PORT: Plug the USB cable into this port.
VOLTAGE SWITCH: set to 3v for N64 or GBA, 5V for everything else.
ACTIVITY LED: will flash while RetroBlaster is working on something.
DFU BUTTON: Push when you want to do an firmware update.
--see ‘How-To-Update’ section--
ADAPTER SLOTS: Each cartridge adapter goes into these slots.
--Make sure the white indent on the adapter is on the same side as RetroBlaster--
How To Set Up
1) Insert the included USB cable into the USB port on the RetroBlaster.
2) Plug the RetroBlaster into an available USB port on your computer. Try not to run it through a USB hub or splitter, as these may degrade performance or cause the RetroBlaster to behave erratically.
3) There is a voltage switch on the RetroBlaster that needs to be set depending on what type of game cartridge you're using.
**VERY IMPORTANT**
Set to *3V* for N64 or GBA, and *5V* for everything else!
4) To remove/change out a cartridge adapter, the easiest way is to use a pen or Sharpie to gently lift under each side of the adapter until it comes free. Yanking on the adapter on either side can cause the pins on the adapter to bend, which will make it difficult to use for further insertions.
For a good video reference on the best method, check out our YouTube video below!
5) Download the newest RetroBlaster software, if you haven't already. The newest version is available on the RetroStage GitHub page.
Link: https://github.com/retrostage/RetroBlaster
6) ** VERY IMPORTANT** Games, when inserted into their corresponding adapter, will have their cartridge label facing towards the Activity LED. GB/GBC/GBA, TG-16, and other handheld console games will usually have their label facing towards the ceiling, because of how they sit in their adapters, unless otherwise noted.
If your game’s label is facing the USB port, then you have it in backwards!
7) Once the download is complete, open the RetroBlaster software.
Get to Know The Software
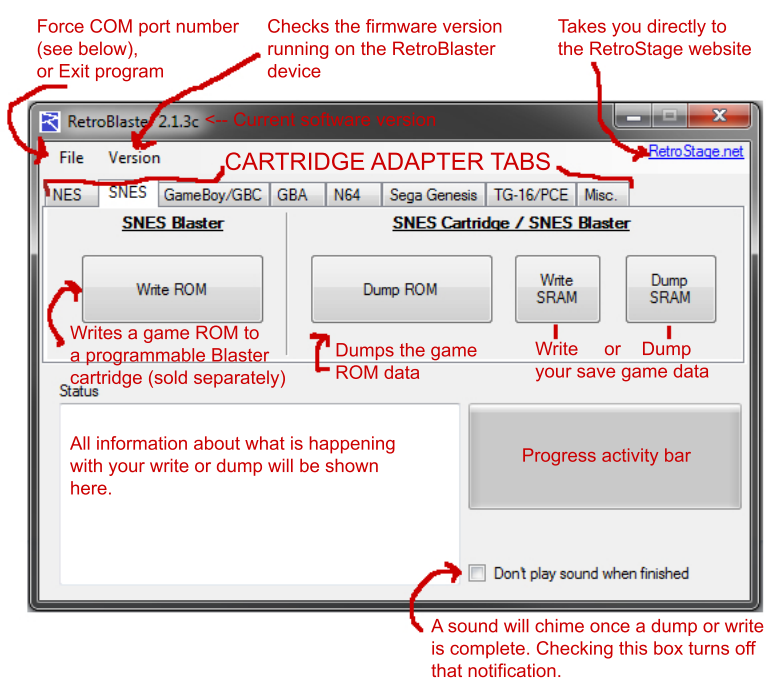
Force COM - this is to manually set the COM port that the RetroBlaster is using. This may be needed for specific cases where another USB device is plugged into the computer that is interfering with the RetroBlaster identification process, or when the computer is in an unsupported language. The COM port can be found be looking in your Device Manager, under Ports.
Exit - exit the program.
NES Adapter Tab Interface
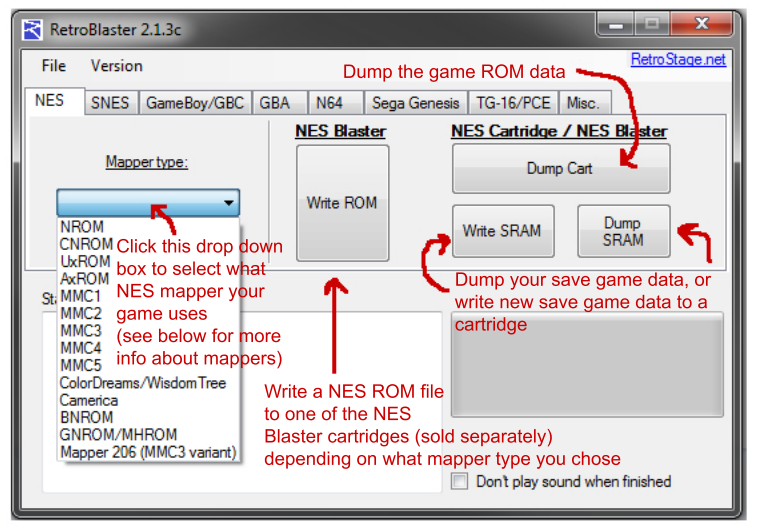
Mapper Type: Here is where you select what mapper your game uses. This part may seem confusing, but there is a very helpful website that makes this easy (more about finding mappers on Page 5).
Write ROM: Once you Click this it will prompt you to select a ROM file, and once selected, it will begin writing. Once the write is complete, your Blaster cartridge should be ready to play in an NES console!
Note - This will write the game to a NES Blaster cartridge (sold separately). This will NOT allow writing new game data to normal NES games.
Dump Cart: This dumps the game data (PRG and CHR data) from the NES cart and puts it into a ROM file that you can play in an emulator or other flash cart device. It asks you the PRG, CHR and WRAM sizes (if applicable). More info on this on Page 5.
Write SRAM: This will write a save game file (SRAM) to a NES cartridge. It will prompt you to select the save file, and then attempt to write it to the cartridge. Ensure you’ve selected the right mapper first.
Dump SRAM: This will dump the save game data. Depending on the mapper you chose, it may ask how much save data to dump. More info for that on Page 5.
NES Mapper Database Info
In order to find out what mapper your game uses, there is a fantastic website resource for that!
Link: https://nescartdb.com
The NES Cart Database has all retail NES and Famicom games, and all the hardware information that you need to properly dump your NES games.
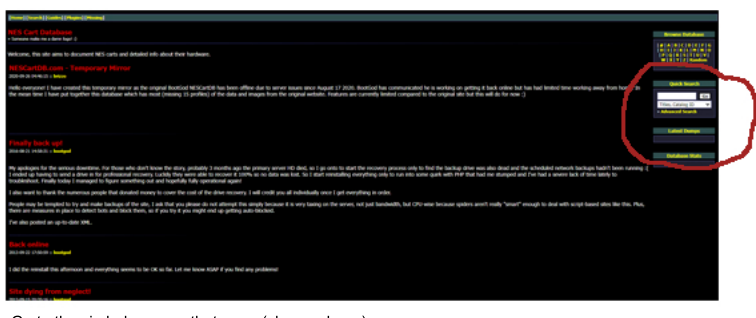
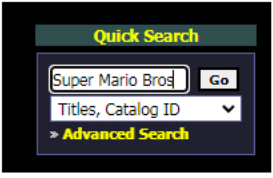
Go to the circled area on that page (shown above), and enter the name of the game, like so:
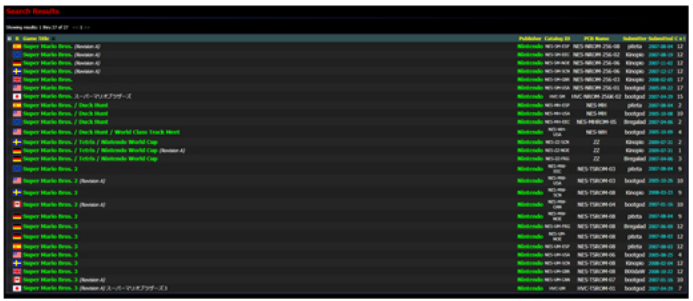
Then you'll see a large list of titles that are close to what searched for. In our example, we want to click on Super Mario Bros 3. (with the USA flag, as our copy is a USA release of the game).
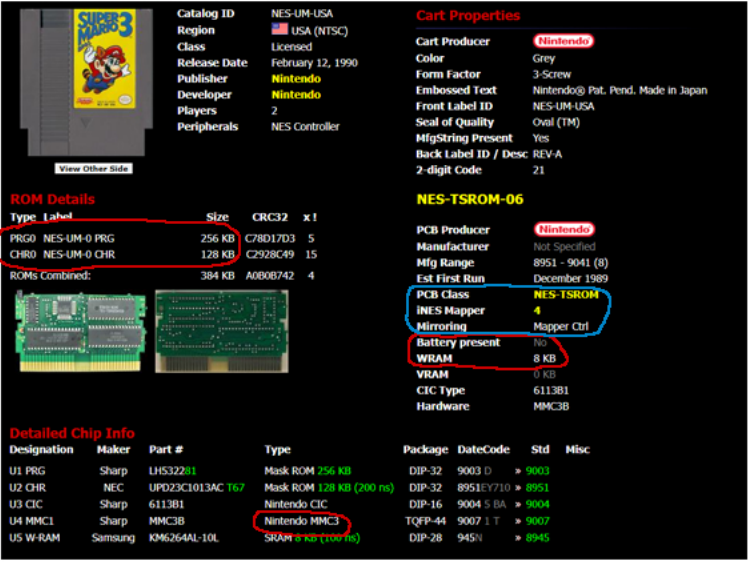
Now we'll see a page like this. We've circled the important parts:
Where it says PRG0 and CHR0, that refers to the game data. We need to remember that PRG is 256KB and CHR is 128KB. Those values will be asked by the RetroBlaster software so it can dump the right data.
Near the bottom we circled “Nintendo MMC3’. This is the mapper the game uses, which we'll select from the Mapper type list in the RetroBlaster software.
Some games, like ones that use the ANROM mapper, will instead show their mapper in the PCB Class row, circled in blue. For ANROM, it would say NES-ANROM, or similar.
Lastly is WRAM. It says 8KB, so we need to tell the RetroBlaster that Yes, the game uses “SRAM for battery-backed saving”. SMB3 doesn’t actually have a save feature, but it still uses SRAM as extra RAM for the console. MMC3 games only ever have 8KB of SRAM max, so the RetroBlaster will just ask if it’s present or not.
That’s it! We have all the information we need to dump this game. Some other mappers will have “Horizontal” or “Vertical” in the “Mirroring” column (circled in blue). For those, the RetroBlaster will ask if it’s Horizontal or Vertical mirroring - just enter H or V, respectively.
SNES Adapter Tab Interface
Most SNES games have some internal information that the RetroBlaster can use to automatically detect what size the game is, and all other important info. If that info isn’t found, the RetroBlaster will throw an error, as it usually means the game isn’t being read properly. Make sure the game cartridge connector has been cleaned, and try again.
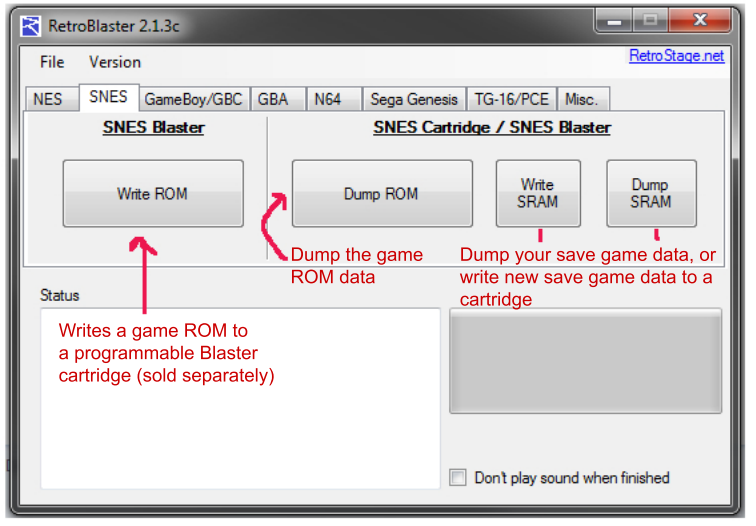
To write a game to a SNES Blaster cartridge (sold separately), insert the SNES Blaster (with the battery side facing toward the USB port) and then click Write ROM. This will prompt you to select the game to write. Any game that doesn't use an enhancement chip can be written to the SNES Blaster. A complete list of incompatible games is found here:
https://en.wikipedia.org/wiki/List_of_Super_NES_enhancement_chips
For dumping a SNES cartridge, make sure the voltage switch is set to 5V and pop your game in with the cartridge label facing towards the Activity LED on the RetroBlaster. Click the Dump ROM button, enter the name that you’d like the ROM file to have, and the RetroBlaster will do the rest! The dumped file should work in any emulator or flash cart device.
For dumping SRAM, as above, make sure the game is inserted into the SNES adapter and click Dump SRAM. Name the file, and the RetroBlaster will dump the save data to a file. This file should work in any emulator or flash cart device.
For writing a save file to a SNES cart, make sure the game is inserted (as above) and click the Write SRAM button. It will prompt you to select the save file you’d like to use. If the save file you’re attempting to write doesn’t match the expected SRAM size of the game, the RetroBlaster will give you an error. Double check that you’re writing a proper save file!
GB/GBC Adapter Tab Interface
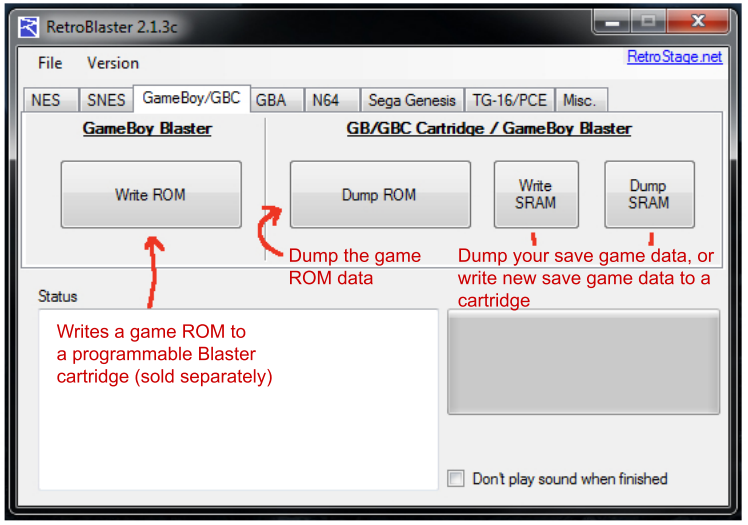
Most GB/GBC games have some internal information that the RetroBlaster can use to automatically detect what size the game is, and all other important info. If that info isn’t found, the RetroBlaster may throw an error or dump the wrong file size. This usually means the game isn’t being read properly. Make sure the game cartridge connector has been cleaned, and try again.
To write a game to a GB/GBC Blaster cartridge (Sold separately), insert the Blaster into the GB/GBC adapter, and then click Write ROM. This will prompt you to select the game to write. If the game doesn’t boot up in the console, make sure it works in an emulator, and that it’s a valid GB/GBC ROM file!
For dumping a GB/GBC cartridge, make sure the voltage switch is set to 5V and pop your game into the GB/GBC adapter. Click the Dump ROM button, enter the name that you'd like the ROM file to have, and the RetroBlaster will do the rest! The dumped file should work in any emulator or flash cart device. The file extension will default to “.gb”, but you can select “.gbc” from the “Save as type:” drop down box in the save prompt window, if dumping a GameBoy Color game.
For dumping SRAM, as above, make sure the game is inserted into the GB/GBC adapter and click Dump SRAM. Name the file, and the RetroBlaster will dump the save data to a file. This file should work in any emulator or flash cart device.
For writing a save file to a GB/GBC cart, make sure the game is inserted (as above) and click the Write SRAM button. It will prompt you to select the save file you'd like to use. If the save file you’re attempting to write doesn’t match the expected SRAM size of the game, the RetroBlaster will give you an error. Double check that you’re writing a proper save file!
GBA Adapter Tab Interface
GBA ROM Header Information
GBA is a bit more complex than GB/GBC, in that there are 3 different save types that games used. GBA games also don't have that sort of data available to the RetroBlaster automatically, so to figure out what game uses what save, and how big the game is, go to this website: http://offlinelistgba.free.fr/
We'll cover more on finding GBA ROM and save info on the next page.
- IMPORTANT* When interfacing with GBA games, make sure to first set the voltage switch on the RetroBlaster to 3V! Otherwise you'll be putting too much voltage into the game, which can damage it if left too long.
To write a game to a GBA Blaster cartridge (sold separately), insert the Blaster into the GB/GBC/GBA adapter, and then click Write ROM.This will prompt you to select the game to write. If the game doesn’t boot up in the console, make sure it works in an emulator, and that it’s a valid GBA ROM file!
For dumping a GBA game ROM, you'll need the ROM size first. Look on the next page for how to get that information.
For dumping or writing the save files, you'll need the save type that the game uses first (See next page). Once you have the save type, simply click on the button corresponding to that save type, for writing or dumping.
- At the time of writing this, only SRAM dumping/writing is supported, EEPROM and FLASH save support coming soon! **
N64 Adapter Tab Interface
N64 Adapter Tab Interface
Sega Genesis Adapter Tab Interface
TG-16/PCE Adapter Tab Interface
MISC/ Tab Interface
Updating Firmware
Firmware Help Tips
FAQ
Q: RETROBLASTER SOFTWARE CAN’T FIND THE DEVICE ON WINDOWS 7 (OR XP)
A: You need to run the “serial_install.exe” program found in the “drivers” folder with your RetroBlaster software. Right click the program and select “Run as administrator’, then follow the prompts. This installs the USB COM driver that the RetroBlaster requires. Windows versions newer than that have driver support natively.
Q: HOW DO I USE THIS ON MY MAC / LINUX MACHINE?
A: You can't, currently. At the time of writing this, only Windows is supported. A Python port is planned in the future, but no ETA on that right now.
Q: MY GAME DUMP DOESN’T WORK / IS GLITCHY
A: Make sure you selected the right file size (if applicable), and that you’ve cleaned the cartridge connectors of your game. A great method to clean them is a Q-tip and some isopropyl alcohol. Put some alcohol on the Q-tip, and rub it along both sides of the game’s connector. Let it dry for a minute, and then try again.
Q: MY BLASTER CARTRIDGE GIVES AN ERROR “Flash ROM type not found!”
A: You might have the voltage set wrong (8V for GBA or N64, otherwise 5V), or your Blaster cartridge is inserted backwards! If you're not sure, unplug the USB, take a picture of how you have it set up and email [email protected] - or ask on the RetroStage Discord server.
Q: WHICH WAY DO I INSERT A GAME?
A: lf the game is in a cartridge shell, the label side will ALWAYS face the Activity LED. If it’s a handheld console game like GameBoy or uses HuCards (TG-16), the label will face upward.
Q: WHICH WAY DO | INSERT A SNES or N64 BLASTER CARTRIDGE?
A: If it’s installed in a cartridge, then the label side of the cartridge faces the Activity LED. If it’s not in a cartridge shell, then the components on the Blaster will face towards the USB port. SNES and N64 (and Famicom) are the only cartridges that have the circuit board sit “backwards” when in a console.
Q: MY N64 GAME WROTE FINE, BUT WON’T BOOT
A: Make sure the game you wrote is from the same region as your N64. Writing a PAL game to your Blaster will make it not work in an NTSC machine, and vice versa.
Q: WHY DOES THE USB DISCONNECT AND RECONNECT WHEN A GAME IS INSERTED?
A: If this happens, it’s because the USB port toggled on/off when extra power was requested. This is most common to happen when using a Blaster cartridge, and does not indicate a problem.
Q: ATMEL FLIP SAYS THE FIRMWARE FILE IS CORRUPT
A: You didn’t download the firmware file properly. Go back to the Firmware update pages and follow the file download instructions exactly.
Q: RETROBLASTER SOFTWARE CRASHES
A: You need to install Microsoft .NET 4.0 or higher. .NET 4.0 is included in the “drivers” folder of the RetroBlaster software.
FOR ALL OTHER TECH SUPPORT INQUIRIES, CONTACT [email protected] OR CHECK OUT THE RETROSTAGE DISCORD SERVER (link to join is on our Twitter profile page).
