SNES:SNES Jr DIY S-RGB Mod: Difference between revisions

From ConsoleMods Wiki
Jump to navigation Jump to search
No edit summary
 
(7 intermediate revisions by 3 users not shown)
Line 1: Line 1:
[[Category:RetroRGB Migration]]
This guide shows you how to enable RGB output on a SNES Mini / Jr using its built-in RGB amp.
**SNES Mini RGB Mod - Onboard S-RGB Amp**


This guide shows you how to enable RGB output on a SNES Mini / Jr using its built-in RGB amp. If you'd like this mod performed for you, you can hire the following services:
== Materials Required ==


**  
* The 4.5mm tool that opens the SNES
Modding Services:**
* Philips head screwdriver
* Soldering iron, solder, and flux
* 26-30 AWG wire
* Three 75 Ohm resistors, the lowest tolerance possible
* Three 1.2k resistors, the lowest tolerance possible


: [http://store.retrofixes.com Retrofixes SNES Mini RGB Mod - USA]
== Installation ==
:
The mod is pretty easy, however soldering to the S-RGB chip can be challenging.
: [http://voultar.com Voultar's SNES Mini RGB Mod - USA]


# Disassemble the console and remove the heatsink. Locate the S-RGB chip: <br> [[File:SNESMiniRGBModPage02.jpg]]
**Parts required:**
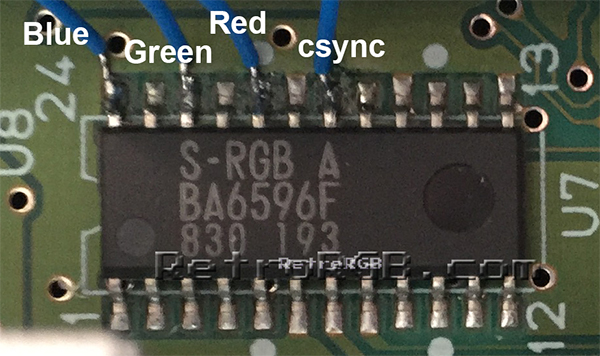
# Solder four wires to the pins on the “S-RGB A” chip shown below. Use a soldering tip that's extremely thin, as well as very thin solder. Make sure to tin each pin and each wire before trying to solder them together: <br> [[File:SNESMiniRGBModPage03.jpg]]
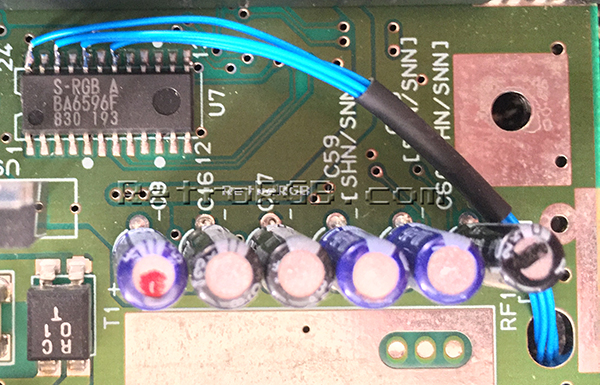
# It's recommended to use heatshrink tubing to keep the wires together and also protect them from touching any other components. Run the cables through the hole pictured below on the right: <br> [[File:SNESMiniRGBModPage04-1.jpg]]
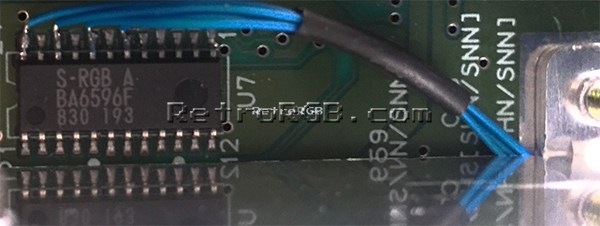
# Carefully replace the heatsink. Run the wires under the heatsink, since there's enough room. The wires will touch the heatsink but won't be crushed <br> [[File:SNESMiniRGBModPage04.jpg]]
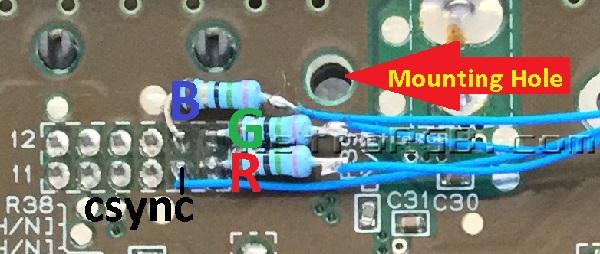
# Cut the wires to size, add the 75 Ohm resistors to the RGB lines, then solder them to the corresponding pins on the multi-out. <br> [[File:SNESMiniRGBModPage04-2.jpg]]


: You'll need a few tools for this mod (more info on the tools can be found in [tools.html the tools section]):
== Brightness Fix ==
: \- Soldering skills! 
: \- [snescsync.html SNES RGB cable].
: \- The [http://rover.ebay.com/rover/1/711-53200-19255-0/1?icep_ff3=9&pub=5575041517&toolid=10001&campid=5337251560&customid=&icep_uq=4.5MM+Game+Tool&icep_sellerId=&icep_ex_kw=&icep_sortBy=12&icep_catId=&icep_minPrice=&icep_maxPrice=&ipn=psmain&icep_vectorid=229466&kwid=902099&mtid=824&kw=lg 4.5mm tool] that opens the SNES
: \- Philips head screwdriver
: \- Soldering iron / solder
: \- Thin gauge wire
: \- Flux (or a flux pen) will make installation easier, but is not necessary.
: \- Three 75 Ohm resistors, the lowest tolerance possible ([http://www.digikey.com/product-detail/en/MRS25000C7509FRP00/PPC75.0ZCT-ND/595092 also available from Digikey]):
: [http://www.mouser.com/ProductDetail/Vishay/MRS25000C7509FRP00 http://www.mouser.com/ProductDetail/Vishay/MRS25000C7509FRP00]
: \- Three 1.2k resistors, the lowest tolerance possible (not available from Digikey):
: [http://www.mouser.com/ProductDetail/KOA-Speer/MF1-4DCT52R1201F http://www.mouser.com/ProductDetail/KOA-Speer/MF1-4DCT52R1201F]


**RGB Mod:
It's recommended to add resistors to the RGB inputs that adjust the brightness. The mod will work without these resistors, but it's recommended you add them otherwise the picture will be too bright and cause ringing.
**The mod is pretty easy, however soldering to the S-RGB chip can be extremely challenging.  I usually recommend people use a [snesminirgb.html pre-made amp] for ease of installation, however if you're willing to solder to the small points this will work perfectly:
{{Note|Super Famicom Jr owners: Check brightness levels before doing this fix. Only some units need them.}}


: \- Remove the 4 screws holding the plastic cover on using the 4.5mm tool. Then remove the 7 screws holding the motherboard in place (so, basically, just unbolt everything). Finally, unbolt the three screws holding the heatsink and find the S-RGB chip:
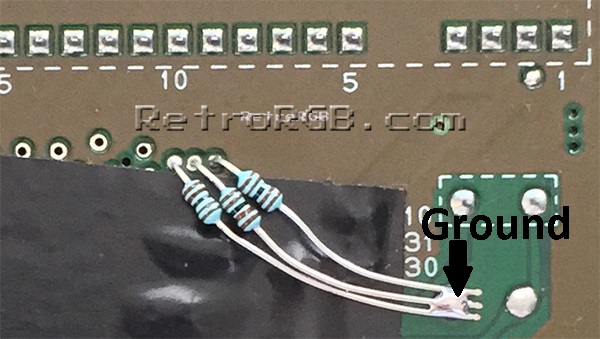
# Solder three 1.2k resistors between the three holes located directly under pin 10 of the cartridge port and a ground point. The picture below shows non-conductive tape covering the components under the resistor, however using heatshrink tubing is a better solution overall. <br> [[File:SNESMiniRGBModPage06.jpg]]
: [[File:SNESMiniRGBModPage02.jpg]]
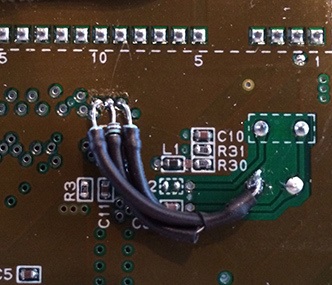
# Flip the motherboard over and trim the extra length of the leads off of the resistors, as they can short to something if not trimmed. <br> [[File:SNESMiniRGBShrinkTube.jpg]]
:
: \- Solder four wires to the pins on the “S-RGB A” chip shown below. A few tips: These are extremely small pins and very difficult for people who aren't experienced at soldering to work on. Use a soldering tip that's extremely thin, as well as very thin solder. Make sure to "tin" each pin and each wire before trying to solder them together:
: **[[File:SNESMiniRGBModPage03.jpg]]**
:
: \- I like to use heatshrink tubing to keep the wires together and also protect them from touching any other components. Then, run the cables through the hole pictured below on the right:
: [[File:SNESMiniRGBModPage04-1.jpg]]
:
: \- Then, carefully replace the heatsink. I usually run the wires under the heatsink, since there's enough room; They touch, but aren't being crushed:
: [[File:SNESMiniRGBModPage04.jpg]]
:
: \- Cut the wires to size, add the 75 Ohm resistors to the RGB lines, then solder them to the corresponding pins on the multi-out.
: I've seen much cleaner installations then this one, where people have the resistors about midway through the board, with a bit of wire on each side, covered in heatshrink tubing.  I'm showing this method, as it's easier to show the mounting points, however you might find soldering the resistors directly to the multi-out harder then just wire.  As long as the connection is solid (no cold solder joints), no components are touching and the mounting hole is clear, it shouldn't matter.  Please _make sure_ the mounting hole is clear, otherwise the resistor or wire could get crushed when you mount it back in the case (click for full-sized picture):
: [[[File:SNESMiniRGBModPage04-2.jpg)](/images/SNESMini3WireRGB.jpg]]
:
: \- Next you need to add resistors to the RGB inputs that adjust the brightness.  The mod will work without these resistors, but I strongly recommend you add them (and it's really easy).  Simply solder three 1.2k resistors between the three holes located directly under pin 10 of the cartridge port and a ground point (flux is a big help for this).  The picture below shows non-conductive tape covering the components under the resistor, however using heatshrink tubing is a better solution overall.  AFTER YOU'RE DONE SOLDERING, FLIP THE MOTHERBOARD OVER AND _MAKE SURE_ TO TRIM THE EXTRA LENGTH!!!!  It's very common to have these touch something on the other side, so make sure you check the length!   Click the picture below for a full-sized example:
: [[[File:SNESMiniRGBModPage06.jpg)](/images/SNESMini3WireRGBMod.jpg]]
 
**Results:**
 
: That’s it! A pretty easy mod and the picture quality is amazing!!! Check out the difference from an average SNES 1 to a SNES Mini (there are many more pictures on the [snesversioncompare.html SNES Version Compare page]):
: [[File:SNS-CPU-GPM-02vsSNESMini.png]]
 
When you're done, feel free to go back to the [snes.html main SNES page].  If you'd like info on mods for other systems, head to the [/systems.html Getting RGB From Each System page] or check out [/ the main page] for more retro-awesomeness.

Latest revision as of 19:57, 31 July 2022

This guide shows you how to enable RGB output on a SNES Mini / Jr using its built-in RGB amp.

Materials Required

  • The 4.5mm tool that opens the SNES
  • Philips head screwdriver
  • Soldering iron, solder, and flux
  • 26-30 AWG wire
  • Three 75 Ohm resistors, the lowest tolerance possible
  • Three 1.2k resistors, the lowest tolerance possible

Installation

The mod is pretty easy, however soldering to the S-RGB chip can be challenging.

  1. Disassemble the console and remove the heatsink. Locate the S-RGB chip:
    SNESMiniRGBModPage02.jpg
  2. Solder four wires to the pins on the “S-RGB A” chip shown below. Use a soldering tip that's extremely thin, as well as very thin solder. Make sure to tin each pin and each wire before trying to solder them together:
    SNESMiniRGBModPage03.jpg
  3. It's recommended to use heatshrink tubing to keep the wires together and also protect them from touching any other components. Run the cables through the hole pictured below on the right:
    SNESMiniRGBModPage04-1.jpg
  4. Carefully replace the heatsink. Run the wires under the heatsink, since there's enough room. The wires will touch the heatsink but won't be crushed
    SNESMiniRGBModPage04.jpg
  5. Cut the wires to size, add the 75 Ohm resistors to the RGB lines, then solder them to the corresponding pins on the multi-out.
    SNESMiniRGBModPage04-2.jpg

Brightness Fix

It's recommended to add resistors to the RGB inputs that adjust the brightness. The mod will work without these resistors, but it's recommended you add them otherwise the picture will be too bright and cause ringing.

Exclamation-circle-fill.svgSuper Famicom Jr owners: Check brightness levels before doing this fix. Only some units need them.


  1. Solder three 1.2k resistors between the three holes located directly under pin 10 of the cartridge port and a ground point. The picture below shows non-conductive tape covering the components under the resistor, however using heatshrink tubing is a better solution overall.
    SNESMiniRGBModPage06.jpg
  2. Flip the motherboard over and trim the extra length of the leads off of the resistors, as they can short to something if not trimmed.
    SNESMiniRGBShrinkTube.jpg