Vita:USB-C Mod: Difference between revisions
Jump to navigation
Jump to search
m (WIP) |
No edit summary |
||
| (3 intermediate revisions by 2 users not shown) | |||
| Line 1: | Line 1: | ||
The | [[File:Vita USB-C Mod 1.jpg|thumb|Completed USB-C mod]] | ||
The OLED PlayStation Vitas use a proprietary connector for their power cable. If you ever lose the original charger or break this port, you have the option to replace it with a USB-C port. A Slim PCH-2000 PS Vita can also have its old micro USB port swapped for USB-C for convience with modern chargers. This page was created mostly from [https://www.reddit.com/r/vita/comments/10ow79c/finally_did_the_ps_vita_2000_usbc_mod/ this guide by /u/purekimwater]. | |||
== Installation == | == Installation == | ||
| Line 5: | Line 6: | ||
=== PCH-1000 === | === PCH-1000 === | ||
The 1000 models have USB-C replacement boards, such as the ones available from [https://oxyllmods.square.site/product/vitac-usb-c-for-the-ps-vita-1000-rev0-3/29?cs=true&cst=custom OxyllMods]. | The 1000 models have USB-C replacement boards, such as the ones available from [https://oxyllmods.square.site/product/vitac-usb-c-for-the-ps-vita-1000-rev0-3/29?cs=true&cst=custom OxyllMods] or this [https://oshpark.com/shared_projects/QsVKu0on open source one by Mahko]. A video of this installation can be found [https://www.youtube.com/watch?v=TfXELQKGHlQ on Oxyll Mods' channel] or another on [https://www.youtube.com/watch?v=9OP-wdgezkw StezStix Fix's channel]. | ||
# Desolder the old power jack. | # Desolder the old power jack. | ||
# | # Align the USB-C board in place, butting the USB-C port itself up against the motherboard, and solder the large mounting pads. | ||
# | #* If you do not mount the board on the motherboard itself, you will need to run a wire from a ground point on the motherboard to the "G" pad. | ||
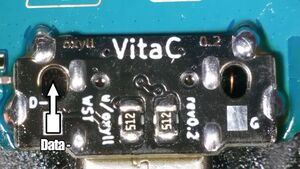
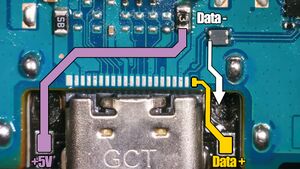
# Solder wires to the `Data-`, `Data+`, and `5V` pads on both the motherboard and PCB. The `Data-` wire will travel from the bottom of the PCB to the top side through the hole in the board. <br> [[File:Vita 1000 USB-C Pinout Bottom.jpg|300px]] [[File:Vita 1000 USB-C Pinout Top.jpg|300px]] | |||
# Dremel or cut the shell plastic to fit the USB-C port. Optionally, use a USB-C bezel, such as the ones [[File:VitaC bezel.zip|created by oxyll are available]]. | |||
=== PCH-2000 === | === PCH-2000 === | ||
You can purchase a generic USB-C breakout board such as [https://www.amazon.com/dp/B0883FK15Q/ this one], [https://www.amazon.com/dp/B096M2HQLK/?th=1 this one], or [https://www.aliexpress.us/item/3256802838232443.html this one]. Ensure that you purchase one with two resistors on the board. | You can purchase a generic USB-C breakout board such as [https://www.amazon.com/dp/B0883FK15Q/ this one], [https://www.amazon.com/dp/B096M2HQLK/?th=1 this one], or [https://www.aliexpress.us/item/3256802838232443.html this one]. Ensure that you purchase one with two resistors on the board. | ||
# Disassemble your console and desolder the old power jack. | # Disassemble your console and desolder the old power jack. | ||
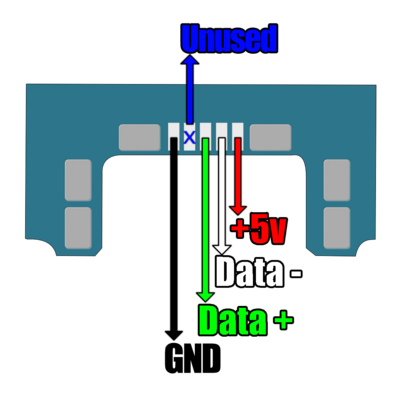
# Solder wires to the | # Solder wires to the `Data-`, `Data+`, `5V`, and `Gnd` pads on the motherboard and PCB. <br> [[File:Vita PCH-2000 Power Pinout.png|400px]] | ||
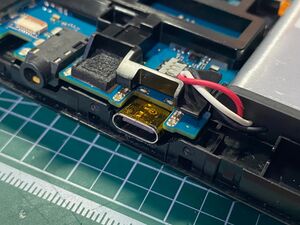
# Use 3M double sided foam tape to mount the port in place. <br> [[File:Vita USB-C Mod 3.jpg|300px]] | |||
# Use 3M double sided foam tape to mount the port in place. | |||
[[File:Vita USB-C Mod 3.jpg|300px]] | |||
Latest revision as of 00:48, 15 March 2024

The OLED PlayStation Vitas use a proprietary connector for their power cable. If you ever lose the original charger or break this port, you have the option to replace it with a USB-C port. A Slim PCH-2000 PS Vita can also have its old micro USB port swapped for USB-C for convience with modern chargers. This page was created mostly from this guide by /u/purekimwater.
Installation
PCH-1000
The 1000 models have USB-C replacement boards, such as the ones available from OxyllMods or this open source one by Mahko. A video of this installation can be found on Oxyll Mods' channel or another on StezStix Fix's channel.
- Desolder the old power jack.
- Align the USB-C board in place, butting the USB-C port itself up against the motherboard, and solder the large mounting pads.
- If you do not mount the board on the motherboard itself, you will need to run a wire from a ground point on the motherboard to the "G" pad.
- Solder wires to the
Data-,Data+, and5Vpads on both the motherboard and PCB. TheData-wire will travel from the bottom of the PCB to the top side through the hole in the board.
- Dremel or cut the shell plastic to fit the USB-C port. Optionally, use a USB-C bezel, such as the ones File:VitaC bezel.zip.


PCH-2000
You can purchase a generic USB-C breakout board such as this one, this one, or this one. Ensure that you purchase one with two resistors on the board.
- Disassemble your console and desolder the old power jack.
- Solder wires to the
Data-,Data+,5V, andGndpads on the motherboard and PCB.
- Use 3M double sided foam tape to mount the port in place.