Xbox:RAM Upgrade: Difference between revisions
mNo edit summary |
m (→Choosing RAM) |
||
| (15 intermediate revisions by 4 users not shown) | |||
| Line 2: | Line 2: | ||
{{Warning|This process is dangerous and can cause permanent damage to your Xbox motherboard if you do not have advanced soldering skills. Proceed with caution.}} | {{Warning|This process is dangerous and can cause permanent damage to your Xbox motherboard if you do not have advanced soldering skills. Proceed with caution.}} | ||
On version 1.0-1.5 Xboxes, there are empty spots that RAM chips can be soldered onto. With the right software, you can take advantage of this extra RAM to play three of the Sega Chihiro (Xbox-based arcade board) games, run emulators with better compatibility and performance, and tweak some games via XBE patches to run with better performance. | On version 1.0-1.5 Xboxes, there are empty spots that RAM chips can be soldered onto. With the right software, you can take advantage of this extra RAM to play three of the Sega Chihiro (Xbox-based arcade board) games, run emulators with better compatibility and performance, and tweak some games via XBE patches to run with better performance. A 1.6/1.6b Xbox does not have extra RAM sockets, but Prehistoricman recently discovered that you can add extra RAM on top of existing modules and use a wire for chip select to allow for RAM upgrades. | ||
This guide is for the "drag soldering" method of installing RAM chips. While some recommend a method with a heat gun, it is easier to mess up your installation or accidentally overheat nearby capacitors with a heat gun. | This guide is for the "drag soldering" method of installing RAM chips. While some recommend a method with a heat gun, it is easier to mess up your installation or accidentally overheat nearby capacitors with a heat gun. | ||
| Line 8: | Line 8: | ||
* Note that kernels 3944, 4034, 4817, and 5838 will not boot with the stock BIOS if the RAM has been upgraded. You will need to use a custom BIOS that [[Xbox:BIOS Features|supports 128MB of RAM]] on the TSOP or modchip. | * Note that kernels 3944, 4034, 4817, and 5838 will not boot with the stock BIOS if the RAM has been upgraded. You will need to use a custom BIOS that [[Xbox:BIOS Features|supports 128MB of RAM]] on the TSOP or modchip. | ||
==Required Items== | == Required Items == | ||
You will need: | You will need: | ||
* '''Great confidence in your soldering skill''' - this is not a job for the inexperienced | * '''Great confidence in your soldering skill''' - this is not a job for the inexperienced. | ||
* A soldering iron, preferably a hoof or chisel tip | * XBlast OS installed to your console's TSOP or modchip (needs to be modified per instructions below for 1.6 Xbox). | ||
* Non-corrosive and non-conductive flux, preferably liquid like Kester 959T | * A soldering iron, preferably a hoof or chisel tip. | ||
* Solder, preferably leaded | * Non-corrosive and non-conductive flux, preferably liquid like Kester 959T. | ||
* Desoldering wick or solder braid, preferably with rosin/flux | * Solder, preferably leaded 60/40 rosin core. | ||
* Isopropyl alcohol (IPA), preferably 90%+ | * Desoldering wick or solder braid, preferably with rosin/flux. | ||
* Cotton swabs | * Isopropyl alcohol (IPA), preferably 90%+. | ||
* ( | * Cotton swabs. | ||
* 28-30 AWG wire (for 1.6/b only). | |||
* (optional but highly recommended) A multimeter | * (optional but highly recommended) A multimeter for checking continuity. | ||
* (optional but highly recommended) A soft bristle toothbrush | * (optional but highly recommended) A soft bristle toothbrush. | ||
* (optional but highly recommended) A microscope or stationary magnifying glass and good lighting | * (optional but highly recommended) A microscope or stationary magnifying glass and good lighting. | ||
* (optional) Electrical tape. | |||
* (optional) A brass wool tip cleaner. | |||
==Choosing RAM== | == Choosing RAM == | ||
Any | Any of the below Samsung RAM chips can be mixed and matched on a non-1.6b Xbox motherboard; you will need 4 chips in total. | ||
* Samsung K4D263238F-UC50 - Newer and less power draw than D variant, lead free | * Samsung K4D263238F-UC50 - Newer and less power draw than D variant, lead free. | ||
* Samsung K4D263238F-QC50 - Newer and less power draw than D variant | * Samsung K4D263238F-QC50 - Newer and less power draw than D variant. | ||
* Samsung K4D263238D-QC50 - Newer and less power draw than M variant | * Samsung K4D263238D-QC50 - Newer and less power draw than M variant. | ||
* Samsung K4D263238M-QC50 - Base version of RAM | * Samsung K4D263238M-QC50 - Base version of RAM for 1.0-1.4. | ||
* | * Any variant of the above with -QC40 or -UC40 - Can be clocked slightly faster. | ||
* Hynix HY5DU283222AQ-5 - Base version of RAM for 1.6b. | |||
Hynix and Samsung RAM can also be mixed togeather, as the Xbox will automically adjust the RAM timings to match the slightly slower ones on the Hynix modules. | |||
Online marketplaces such as AliExpress sell knock-off "Samsung" RAM, which are apparently resurfaced Hynix chips. Reportedly, these can work, but have a higher chance of being dead on arrival. | |||
Fake chips can be easily identified by the double-dot indicator at the bottom-left corner. | |||
# Disassemble your Xbox down to the motherboard. Observe the empty pads and check if they are pre-filled with solder. Earlier motherboards (1.0/1.1) generally have the pads pre-filled so you will not need to add any solder, but it is much harder to align the pins if they are pre-filled, so | {| class="wikitable" | ||
|- | |||
|[[File:samsung_ram_fake_comparison.jpg|thumb|Fake comparison]] | |||
|} | |||
== 1.0-1.4 Xbox == | |||
=== Installing RAM === | |||
# Disassemble your Xbox down to the motherboard. Observe the empty pads and check if they are pre-filled with solder. Earlier motherboards (1.0/1.1) generally have the pads pre-filled so you will not need to add any solder, but it is much harder to align the RAM chip pins on the pads if they are pre-filled, so if you have difficulty aligning the chips you can remove the solder with desoldering braid, taking care to line the braid up along the pins to avoid ripping nearby pads. As a tip, you may also find it easier to start with the two RAM chips on the bottom of the motherboard, as there are less components in the way. | |||
# Swab the empty pads and the area within and around them with alcohol to get rid of any dust contaminants. | # Swab the empty pads and the area within and around them with alcohol to get rid of any dust contaminants. | ||
# Place the first RAM chip onto the board. Ensure that the orientation is correct by checking that the slightly indented circle on the top of the RAM chip is on the corner closest to the white circle printed on the motherboard. | # Place the first RAM chip onto the board. Ensure that the orientation is correct by checking that the slightly indented circle on the top of the RAM chip is on the corner closest to the white circle printed on the motherboard. | ||
# Line up the pins of the RAM to their pads, checking each side to make sure you are not overlapping pins and pads incorrectly. It's recommended to put a small piece of electrical tape hanging off of one side of the chip, and your finger on top of the chip so that when it is perfectly aligned, you can drop the tape down to hold it in place and make small adjustments if needed. Once it is in place, tack down one corner pin. You can make very small adjustments, taking care not to bend the pin too much, and tack down the opposite corner pin. | # Line up the pins of the RAM to their pads, checking each side to make sure you are not overlapping pins and pads incorrectly. It's recommended to put a small piece of electrical tape hanging off of one side of the chip, and your finger on top of the chip so that when it is perfectly aligned, you can drop the tape down to hold it in place and make small adjustments if needed. Once it is in place, tack down one corner pin with solder. You can make very small adjustments, taking care not to bend the pin too much, and tack down the opposite corner pin. | ||
# Choose a side of the RAM chip and squirt flux all over them. It's no worry if you flood the board with flux, as you are using non-corrosive / non-conductive flux. If your pads were not pre-filled with solder, add some solder to your tip. Drag your solder iron slowly across the pins from one end to the other. As you drag, you should see each pin / pad get covered with solder. You will likely create a few bridges, so go over it again to see if they will work themselves out. If not, remove the bridge using desoldering braid, taking care to line the braid along the pin to avoid ripping up nearby pads. Go over the pins a final time by holding the iron momentarily against the corner formed by the pin and pad to heat both simultaneously, without dragging the iron between each pin. Repeat this for each side of the chip and thoroughly check for bridges between the pads, the long parts of the pins, and the top parts of the pins. You may need to use alcohol and a toothbrush to gently clean up the pins to check for bridges. | # Choose a side of the RAM chip and squirt flux all over them. It's no worry if you flood the board with flux, as you are using non-corrosive / non-conductive flux. If your pads were not pre-filled with solder, add some solder to your tip. Drag your solder iron slowly across the pins from one end to the other. As you drag, you should see each pin / pad get covered with solder. You will likely create a few bridges, so go over it again to see if they will work themselves out. If not, remove the bridge using desoldering braid, taking care to line the braid along the pin to avoid ripping up nearby pads. Go over the pins a final time by holding the iron momentarily against the corner formed by the pin and pad to heat both simultaneously, without dragging the iron between each pin. Repeat this for each side of the chip and thoroughly check for bridges between the pads, the long parts of the pins, and the top parts of the pins both physically and with a multimeter continuity test. You may need to use alcohol and a toothbrush to gently clean up the pins to check for bridges. | ||
# Once you are confident the RAM chip is correctly attached, use alcohol and a toothbrush to gently clean up the pins. Allow the alcohol to completely dry off. Alcohol will have soaked under the chip itself, so allow it a good 15 minutes to dry or blow the alcohol out from under the chip using compressed air to expedite the process. | # Once you are confident the RAM chip is correctly attached, use alcohol and a toothbrush to gently clean up the pins. Allow the alcohol to completely dry off. Alcohol will have soaked under the chip itself, so allow it a good 15 minutes to dry or blow the alcohol out from under the chip using compressed air to expedite the process. | ||
# Plug the power supply, fan, controller cables, hard drive, DVD drive, video cable, power cable, and a controller back into the Xbox and power it on. If it successfully boots up to XBlast, proceed to the next step. If the Xbox reboots infinitely or reboots three times then shows flashing red and green (FRAG), check back over your soldering, paying extra attention to the pins that carry power on the RAM pinout ([https:// | # Plug the power supply, fan, controller cables, hard drive, DVD drive, video cable, power cable, and a controller back into the Xbox and power it on. If it successfully boots up to XBlast, proceed to the next step. If the Xbox reboots infinitely or reboots three times then shows flashing red and green (FRAG), check back over your soldering, paying extra attention to the pins that carry power on the RAM pinout ([https://consolemods.org/wiki/File:uUDghy8.jpg any pin starting with a V]). | ||
# Navigate to Settings > Tools > 128MB RAM Test. This will check each of the four extra RAM chips and report Failed or Success for RAM chips [https:// | # Navigate to Settings > Tools > 128MB RAM Test. This will check each of the four extra RAM chips and report Failed or Success for RAM chips [https://consolemods.org/wiki/File:lLPA4xC.jpg 1], [https://consolemods.org/wiki/File:dc4UA9k.jpg 2], [https://consolemods.org/wiki/File:dc4UA9k.jpg 3], and [https://consolemods.org/wiki/File:lLPA4xC.jpg 4]. You should receive a Success for the RAM chip you just completed. If you did not, you likely either have a bridge or a pin is not properly connected to the pad ([https://consolemods.org/wiki/File:uUDghy8.jpg likely an address or data pin]). If you have a multimeter, it may help to test the tip of the pad and the top of the pin for continuity. | ||
#* If you plugged in your controller after powering on the Xbox and cannot navigate, try rebooting the console. | #* If you plugged in your controller after powering on the Xbox and cannot navigate, try rebooting the console. | ||
# Repeat steps 2-8 for each of the other empty RAM pads, checking each RAM chip one by one. Once they are all reading as Success, you can flash your desired BIOS that supports 128MB of RAM. | # Repeat steps 2-8 for each of the other empty RAM pads, checking each RAM chip one by one. Once they are all reading as Success, you can flash your desired BIOS that supports 128MB of RAM. | ||
== | == 1.6 Xbox == | ||
=== | === Modifying XBlast OS === | ||
A modified XBlast OS must be flashed to the TSOP or modchip to allow RAM checks for a 1.6 Xbox. You can modify the source as shown below and re-compile it. | |||
[[File:XBlast 1.6 RAM Modification.png]] | |||
=== | === Installing RAM === | ||
Disassemble your Xbox down to the motherboard. Locate the four existing RAM chips. Swab the tops and pins of the RAM chips with alcohol to get rid of any dust contaminants. Perform the following instruction set for ONE RAM chip at a time. | |||
# Place the first new RAM chip on top of one of the existing RAM chips. Ensure that the orientation is correct by checking that the slightly indented circle on the top of the RAM chip is on the corner closest to the white circle printed on the motherboard. | |||
# Push down two pins on the same corner (such as [https://consolemods.org/wiki/File:uUDghy8.jpg pins 30 and 31]) so they almost touch the corresponding pins below it. Align the RAM so all the pins will match up with the ones below, avoiding overlapping pins incorrectly. It's recommended to put a small piece of electrical tape hanging off of one side of the chip, and your finger on top of the chip so that when it is perfectly aligned, you can drop the tape down to hold it in place and make small adjustments if needed. Once it is in place, tack down the two corner pins with solder. You can make very small adjustments, taking care not to bend the pin too much, and push down two pins on the opposite corner and tack them in place. | |||
# Push down the rest of the pins of the RAM chip '''except''' [https://consolemods.org/wiki/File:uUDghy8.jpg pin 28]]. They will not touch the pins below, but will be close enough to solder. | |||
# Put flux all over the pins. Drag your solder iron slowly across the pins from one end to the other while adding very little solder. As you drag, you should see each vertical pin pair get covered with solder. You will likely create a few horizontal bridges, so go over them again to see if they will work themselves out. If not, remove the bridge using desoldering braid. Thoroughly check for bridges between the pins physically and with a multimeter continuity test. You may need to use alcohol and a toothbrush to gently clean up the pins to check for bridges. | |||
# Once you are confident the RAM chip is fully attached (except pin 28), use alcohol and a toothbrush to gently clean up the pins. Allow the alcohol to completely dry off. Alcohol will have soaked under the chip itself, so allow it a good 15 minutes to dry or blow the alcohol out from under the chip using compressed air to expedite the process. | |||
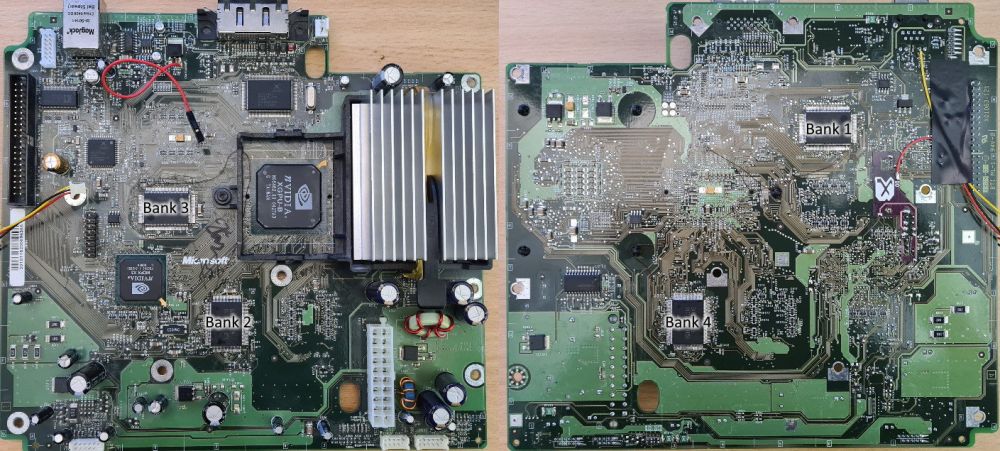
# Observe which RAM bank you just upgraded. <br> [[File:1.6 Xbox RAM Upgrade 1.jpeg|1000px]] | |||
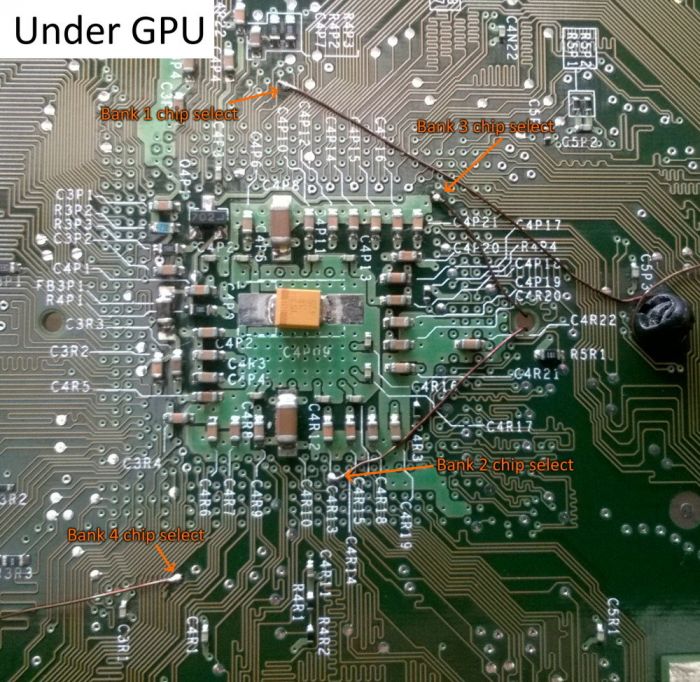
* | # Locate the chip select point corresponding to the RAM bank you just upgraded. <br> [[File:1.6 Xbox RAM Upgrade 2.jpeg|700px]] | ||
* | #* Bank 1 CS is left of the label for C4P10 | ||
* | #* Bank 2 CS is between the labels for C4R12 and C4R13 | ||
* | #* Bank 3 CS is left and above the label for C4P21 | ||
#* Bank 4 CS is between and above the labels C4R1 and C3R1 | |||
* | # Measure and cut a piece of wire to run from the chip select point to pin 28 on the RAM module you just installed. | ||
* | #* For banks 2 and 3, push the wire through the hole to the left of the GPU. | ||
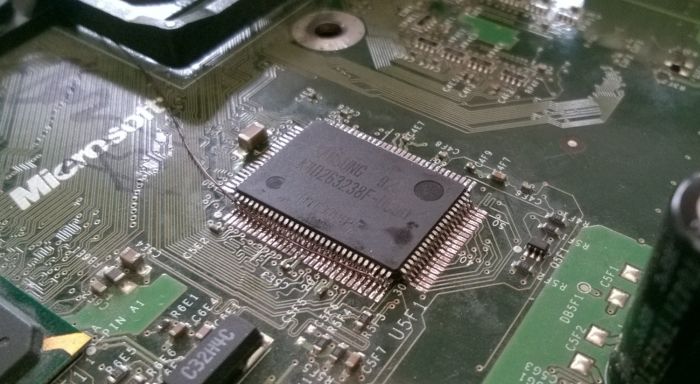
* | #* A finished chip should look like the below: <br> [[File:1.6 Xbox RAM Upgrade 3.jpeg|700px]] | ||
# Plug the power supply, fan, controller cables, hard drive, DVD drive, video cable, power cable, and a controller back into the Xbox and power it on. If it successfully boots up to XBlast, proceed to the next step. If the Xbox reboots infinitely or reboots three times then shows flashing red and green (FRAG), check back over your soldering, paying extra attention to the pins that carry power on the RAM pinout ([https://consolemods.org/wiki/File:uUDghy8.jpg any pin starting with a V]). | |||
# Navigate to Settings > Tools > 128MB RAM Test. This will check each of the four extra RAM chips and report Failed or Success for RAM chips [https://consolemods.org/wiki/File:lLPA4xC.jpg 1], [https://consolemods.org/wiki/File:dc4UA9k.jpg 2], [https://consolemods.org/wiki/File:dc4UA9k.jpg 3], and [https://consolemods.org/wiki/File:lLPA4xC.jpg 4]. You should receive a Success for the RAM chip you just completed. If you did not, you likely either have a bridge or a vertical pin pair is not properly connected ([https://consolemods.org/wiki/File:uUDghy8.jpg likely an address or data pin]). If you have a multimeter, it may help to probe each pin in a vertical pair for continuity. | |||
#* If you plugged in your controller after powering on the Xbox and cannot navigate, try rebooting the console. | |||
# Repeat these steps for each of the RAM chips, checking each RAM chip one by one. Once they are all reading as Success, you can flash your desired BIOS that supports 128MB of RAM. | |||
Latest revision as of 19:43, 20 February 2024
| This process is dangerous and can cause permanent damage to your Xbox motherboard if you do not have advanced soldering skills. Proceed with caution. |
On version 1.0-1.5 Xboxes, there are empty spots that RAM chips can be soldered onto. With the right software, you can take advantage of this extra RAM to play three of the Sega Chihiro (Xbox-based arcade board) games, run emulators with better compatibility and performance, and tweak some games via XBE patches to run with better performance. A 1.6/1.6b Xbox does not have extra RAM sockets, but Prehistoricman recently discovered that you can add extra RAM on top of existing modules and use a wire for chip select to allow for RAM upgrades.
This guide is for the "drag soldering" method of installing RAM chips. While some recommend a method with a heat gun, it is easier to mess up your installation or accidentally overheat nearby capacitors with a heat gun.
- Note that kernels 3944, 4034, 4817, and 5838 will not boot with the stock BIOS if the RAM has been upgraded. You will need to use a custom BIOS that supports 128MB of RAM on the TSOP or modchip.
Required Items
You will need:
- Great confidence in your soldering skill - this is not a job for the inexperienced.
- XBlast OS installed to your console's TSOP or modchip (needs to be modified per instructions below for 1.6 Xbox).
- A soldering iron, preferably a hoof or chisel tip.
- Non-corrosive and non-conductive flux, preferably liquid like Kester 959T.
- Solder, preferably leaded 60/40 rosin core.
- Desoldering wick or solder braid, preferably with rosin/flux.
- Isopropyl alcohol (IPA), preferably 90%+.
- Cotton swabs.
- 28-30 AWG wire (for 1.6/b only).
- (optional but highly recommended) A multimeter for checking continuity.
- (optional but highly recommended) A soft bristle toothbrush.
- (optional but highly recommended) A microscope or stationary magnifying glass and good lighting.
- (optional) Electrical tape.
- (optional) A brass wool tip cleaner.
Choosing RAM
Any of the below Samsung RAM chips can be mixed and matched on a non-1.6b Xbox motherboard; you will need 4 chips in total.
- Samsung K4D263238F-UC50 - Newer and less power draw than D variant, lead free.
- Samsung K4D263238F-QC50 - Newer and less power draw than D variant.
- Samsung K4D263238D-QC50 - Newer and less power draw than M variant.
- Samsung K4D263238M-QC50 - Base version of RAM for 1.0-1.4.
- Any variant of the above with -QC40 or -UC40 - Can be clocked slightly faster.
- Hynix HY5DU283222AQ-5 - Base version of RAM for 1.6b.
Hynix and Samsung RAM can also be mixed togeather, as the Xbox will automically adjust the RAM timings to match the slightly slower ones on the Hynix modules.
Online marketplaces such as AliExpress sell knock-off "Samsung" RAM, which are apparently resurfaced Hynix chips. Reportedly, these can work, but have a higher chance of being dead on arrival.
Fake chips can be easily identified by the double-dot indicator at the bottom-left corner.

1.0-1.4 Xbox
Installing RAM
- Disassemble your Xbox down to the motherboard. Observe the empty pads and check if they are pre-filled with solder. Earlier motherboards (1.0/1.1) generally have the pads pre-filled so you will not need to add any solder, but it is much harder to align the RAM chip pins on the pads if they are pre-filled, so if you have difficulty aligning the chips you can remove the solder with desoldering braid, taking care to line the braid up along the pins to avoid ripping nearby pads. As a tip, you may also find it easier to start with the two RAM chips on the bottom of the motherboard, as there are less components in the way.
- Swab the empty pads and the area within and around them with alcohol to get rid of any dust contaminants.
- Place the first RAM chip onto the board. Ensure that the orientation is correct by checking that the slightly indented circle on the top of the RAM chip is on the corner closest to the white circle printed on the motherboard.
- Line up the pins of the RAM to their pads, checking each side to make sure you are not overlapping pins and pads incorrectly. It's recommended to put a small piece of electrical tape hanging off of one side of the chip, and your finger on top of the chip so that when it is perfectly aligned, you can drop the tape down to hold it in place and make small adjustments if needed. Once it is in place, tack down one corner pin with solder. You can make very small adjustments, taking care not to bend the pin too much, and tack down the opposite corner pin.
- Choose a side of the RAM chip and squirt flux all over them. It's no worry if you flood the board with flux, as you are using non-corrosive / non-conductive flux. If your pads were not pre-filled with solder, add some solder to your tip. Drag your solder iron slowly across the pins from one end to the other. As you drag, you should see each pin / pad get covered with solder. You will likely create a few bridges, so go over it again to see if they will work themselves out. If not, remove the bridge using desoldering braid, taking care to line the braid along the pin to avoid ripping up nearby pads. Go over the pins a final time by holding the iron momentarily against the corner formed by the pin and pad to heat both simultaneously, without dragging the iron between each pin. Repeat this for each side of the chip and thoroughly check for bridges between the pads, the long parts of the pins, and the top parts of the pins both physically and with a multimeter continuity test. You may need to use alcohol and a toothbrush to gently clean up the pins to check for bridges.
- Once you are confident the RAM chip is correctly attached, use alcohol and a toothbrush to gently clean up the pins. Allow the alcohol to completely dry off. Alcohol will have soaked under the chip itself, so allow it a good 15 minutes to dry or blow the alcohol out from under the chip using compressed air to expedite the process.
- Plug the power supply, fan, controller cables, hard drive, DVD drive, video cable, power cable, and a controller back into the Xbox and power it on. If it successfully boots up to XBlast, proceed to the next step. If the Xbox reboots infinitely or reboots three times then shows flashing red and green (FRAG), check back over your soldering, paying extra attention to the pins that carry power on the RAM pinout (any pin starting with a V).
- Navigate to Settings > Tools > 128MB RAM Test. This will check each of the four extra RAM chips and report Failed or Success for RAM chips 1, 2, 3, and 4. You should receive a Success for the RAM chip you just completed. If you did not, you likely either have a bridge or a pin is not properly connected to the pad (likely an address or data pin). If you have a multimeter, it may help to test the tip of the pad and the top of the pin for continuity.
- If you plugged in your controller after powering on the Xbox and cannot navigate, try rebooting the console.
- Repeat steps 2-8 for each of the other empty RAM pads, checking each RAM chip one by one. Once they are all reading as Success, you can flash your desired BIOS that supports 128MB of RAM.
1.6 Xbox
Modifying XBlast OS
A modified XBlast OS must be flashed to the TSOP or modchip to allow RAM checks for a 1.6 Xbox. You can modify the source as shown below and re-compile it.

Installing RAM
Disassemble your Xbox down to the motherboard. Locate the four existing RAM chips. Swab the tops and pins of the RAM chips with alcohol to get rid of any dust contaminants. Perform the following instruction set for ONE RAM chip at a time.
- Place the first new RAM chip on top of one of the existing RAM chips. Ensure that the orientation is correct by checking that the slightly indented circle on the top of the RAM chip is on the corner closest to the white circle printed on the motherboard.
- Push down two pins on the same corner (such as pins 30 and 31) so they almost touch the corresponding pins below it. Align the RAM so all the pins will match up with the ones below, avoiding overlapping pins incorrectly. It's recommended to put a small piece of electrical tape hanging off of one side of the chip, and your finger on top of the chip so that when it is perfectly aligned, you can drop the tape down to hold it in place and make small adjustments if needed. Once it is in place, tack down the two corner pins with solder. You can make very small adjustments, taking care not to bend the pin too much, and push down two pins on the opposite corner and tack them in place.
- Push down the rest of the pins of the RAM chip except pin 28]. They will not touch the pins below, but will be close enough to solder.
- Put flux all over the pins. Drag your solder iron slowly across the pins from one end to the other while adding very little solder. As you drag, you should see each vertical pin pair get covered with solder. You will likely create a few horizontal bridges, so go over them again to see if they will work themselves out. If not, remove the bridge using desoldering braid. Thoroughly check for bridges between the pins physically and with a multimeter continuity test. You may need to use alcohol and a toothbrush to gently clean up the pins to check for bridges.
- Once you are confident the RAM chip is fully attached (except pin 28), use alcohol and a toothbrush to gently clean up the pins. Allow the alcohol to completely dry off. Alcohol will have soaked under the chip itself, so allow it a good 15 minutes to dry or blow the alcohol out from under the chip using compressed air to expedite the process.
- Observe which RAM bank you just upgraded.
- Locate the chip select point corresponding to the RAM bank you just upgraded.
- Bank 1 CS is left of the label for C4P10
- Bank 2 CS is between the labels for C4R12 and C4R13
- Bank 3 CS is left and above the label for C4P21
- Bank 4 CS is between and above the labels C4R1 and C3R1
- Measure and cut a piece of wire to run from the chip select point to pin 28 on the RAM module you just installed.
- For banks 2 and 3, push the wire through the hole to the left of the GPU.
- A finished chip should look like the below:
- Plug the power supply, fan, controller cables, hard drive, DVD drive, video cable, power cable, and a controller back into the Xbox and power it on. If it successfully boots up to XBlast, proceed to the next step. If the Xbox reboots infinitely or reboots three times then shows flashing red and green (FRAG), check back over your soldering, paying extra attention to the pins that carry power on the RAM pinout (any pin starting with a V).
- Navigate to Settings > Tools > 128MB RAM Test. This will check each of the four extra RAM chips and report Failed or Success for RAM chips 1, 2, 3, and 4. You should receive a Success for the RAM chip you just completed. If you did not, you likely either have a bridge or a vertical pin pair is not properly connected (likely an address or data pin). If you have a multimeter, it may help to probe each pin in a vertical pair for continuity.
- If you plugged in your controller after powering on the Xbox and cannot navigate, try rebooting the console.
- Repeat these steps for each of the RAM chips, checking each RAM chip one by one. Once they are all reading as Success, you can flash your desired BIOS that supports 128MB of RAM.


