Xbox 360:GPU Retrofit: Difference between revisions
Senator-man (talk | contribs) (Xenon Retrofit Instructions) |
|||
| Line 3: | Line 3: | ||
Some GPUs can be retrofitted onto earlier boards. This page contains instructions for what changes need to be done in order for the retrofit to work. | Some GPUs can be retrofitted onto earlier boards. This page contains instructions for what changes need to be done in order for the retrofit to work. | ||
== Xenon == | |||
All variants of the phat GPU can be retrofitted onto a Xenon motherboard. [https://youtu.be/DF9NH12yjLc?si=OdpUdn8KUXmx_F38 (Demo Video with GPU RHEA)] | |||
Guide By: Senator_man | |||
=== Limitations === | |||
Read this '''<u>BEFORE</u>''' doing anything with board | |||
90nm chips are work without huge modifications on board because they very similar to factory ones, but there is still some aspects i must mention: | |||
'''Limitations of board with 90nm GPU:''' | |||
* Standart JTAG wiring will cause RROD with 0021 error code. So use this one: | |||
** [[File:IMG 20240415 134219.jpg|333x333px]] | |||
* Board with Samsung RAM will '''NOT''' boot RGH2, because on Xenon it uses Falcon(at least at this moment) bootloader which haven't support for this RAM | |||
'''Limitations of board with 65nm GPU:''' | |||
* Retail Xenon firmware will '''NOT''' boot because it has no support for 65nm gpu, so you need to to xeBuild as Jasper | |||
* Jasper firmware can '''NOT''' be booted without blowing fuse | |||
* Jasper firmware has '''NO''' support of Xenon type 1 KV, so Retail nand can be only booted on Elpis motherboard with Jasper firmware | |||
* JTAG is not tested | |||
=== Instructions === | |||
''' GPU Table ''' | |||
{| class="wikitable" | |||
|- | |||
! Name !! Part Number | |||
!Specifics!! GPU/eDRAM Lithography !! GPU/eDRAM Temp Target !! GPU/eDRAM Temp Critical | |||
|- | |||
|Y2 | |||
|X02127 | |||
|Unreliable | |||
|90nm/90nm | |||
|80C/82C | |||
|100C/102C | |||
|- | |||
|Rhea | |||
|X810480 | |||
|Unreliable | |||
with black | |||
underfill | |||
|90nm/90nm | |||
|75C/78C | |||
|100C/102C | |||
|- | |||
|Rhea | |||
(revisited) | |||
|X810480 | |||
X816970 | |||
X816971 | |||
|All chips | |||
with white | |||
underfill reliable | |||
|90nm/90nm | |||
|75C/78C | |||
|100C/102C | |||
|- | |||
|Elpis | |||
|X819195 | |||
|no need to do | |||
PCI_e swap | |||
|90nm/90nm | |||
|75C/78C | |||
|100C/102C | |||
|- | |||
| Zeus || X810478<br>X817793 | |||
| -|| 65nm/90nm || 71C/73C || 90C/92C | |||
|- | |||
| Kronos || X820894 | |||
| -|| 65nm/65nm || 75C/77C || 90C/92C | |||
|} | |||
''' Install GPU ''' | |||
* Replace 90nm U4D1 with 90nm or 65nm | |||
'''PCI_e Swap''' (not needed for Elpis GPU) | |||
'''Main modification to install newer chips, scheme of wiring:''' | |||
* [[File:PCI e swap.png|400x400px]] | |||
'''Example of perfoming this mod:''' | |||
* [[File:PCI e swap example pt1.png|400x400px]] | |||
* [[File:PCI e swap example pt2.png|400x400px]] | |||
* [[File:PCI e swap example pt3.png|400x400px]] | |||
* [[File:PCI e swap example pt4.png|400x400px]] | |||
* [[File:PCI e swap example pt5.png|400x400px]] | |||
* [[File:PCI e swap example pt7.png|400x400px]] | |||
'''Modification for 65nm''' | |||
GPU part of your board is now basically is Zephyr_B/C, if you installing 65nm chip follow instructions down below. This is no need to do any other changes for 90nm chip. | |||
''' Modify Firmware ''' | |||
* Use [https://github.com/Octal450/J-Runner-with-Extras/releases/latest J-Runner with Extras] to dump the nand | |||
* RGH/JTAG the console to get the CPU key | |||
* Set the required XeBuild options and build the image | |||
* Open the SMC Config Editor from the Nand menu, and update the thermal targets from the table above | |||
* Write the nand to the console | |||
== Zephyr_B/C== | == Zephyr_B/C== | ||
Revision as of 22:25, 25 April 2024
| This page is intended for advanced technicians only. If you do not have advanced component and BGA rework skills, you will not be able to complete the process successfully. |
Some GPUs can be retrofitted onto earlier boards. This page contains instructions for what changes need to be done in order for the retrofit to work.
Xenon
All variants of the phat GPU can be retrofitted onto a Xenon motherboard. (Demo Video with GPU RHEA)
Guide By: Senator_man
Limitations
Read this BEFORE doing anything with board
90nm chips are work without huge modifications on board because they very similar to factory ones, but there is still some aspects i must mention:
Limitations of board with 90nm GPU:
- Standart JTAG wiring will cause RROD with 0021 error code. So use this one:
- Board with Samsung RAM will NOT boot RGH2, because on Xenon it uses Falcon(at least at this moment) bootloader which haven't support for this RAM

Limitations of board with 65nm GPU:
- Retail Xenon firmware will NOT boot because it has no support for 65nm gpu, so you need to to xeBuild as Jasper
- Jasper firmware can NOT be booted without blowing fuse
- Jasper firmware has NO support of Xenon type 1 KV, so Retail nand can be only booted on Elpis motherboard with Jasper firmware
- JTAG is not tested
Instructions
GPU Table
| Name | Part Number | Specifics | GPU/eDRAM Lithography | GPU/eDRAM Temp Target | GPU/eDRAM Temp Critical |
|---|---|---|---|---|---|
| Y2 | X02127 | Unreliable | 90nm/90nm | 80C/82C | 100C/102C |
| Rhea | X810480 | Unreliable
with black underfill |
90nm/90nm | 75C/78C | 100C/102C |
| Rhea
(revisited) |
X810480
X816970 X816971 |
All chips
with white underfill reliable |
90nm/90nm | 75C/78C | 100C/102C |
| Elpis | X819195 | no need to do
PCI_e swap |
90nm/90nm | 75C/78C | 100C/102C |
| Zeus | X810478 X817793 |
- | 65nm/90nm | 71C/73C | 90C/92C |
| Kronos | X820894 | - | 65nm/65nm | 75C/77C | 90C/92C |
Install GPU
- Replace 90nm U4D1 with 90nm or 65nm
PCI_e Swap (not needed for Elpis GPU)
Main modification to install newer chips, scheme of wiring:

Example of perfoming this mod:


Modification for 65nm
GPU part of your board is now basically is Zephyr_B/C, if you installing 65nm chip follow instructions down below. This is no need to do any other changes for 90nm chip. Modify Firmware
- Use J-Runner with Extras to dump the nand
- RGH/JTAG the console to get the CPU key
- Set the required XeBuild options and build the image
- Open the SMC Config Editor from the Nand menu, and update the thermal targets from the table above
- Write the nand to the console
Zephyr_B/C
Both variants of the 65nm GPU can be retrofitted onto a Zephyr_B/C motherboard. (Demo Video)
Guide By: Octal450
Instructions
GPU Table
| Name | Part Number | GPU/eDRAM Lithography | GPU/eDRAM Temp Target | GPU/eDRAM Temp Critical |
|---|---|---|---|---|
| Zeus | X810478 X817793 |
65nm/90nm | 71C/73C | 90C/92C |
| Kronos | X820894 | 65nm/65nm | 75C/77C | 90C/92C |
Install GPU
- Replace 90nm U4D1 with 65nm
Set VID 1.075V
- Remove 0 ohm R8B9
- Remove 0 ohm R8B10
Set FSB/PCIe/Memory Calibration
- FSB:
- Remove 4.87K ohm R5R3
- Install 40.2 ohm as pullup to nearby V_GPUCORE
- You can either use a wire to the capacitor as shown, or scrape to expose V_GPUCORE voltage plane


- PCIe:
- Remove 1.47K ohm R4R3
- Remove 562 ohm R5D1
- Replace 2K ohm R5D2 with 49.9 ohm
- Memory:
- Replace 40.2 ohm R4R8 with 240 ohm
- Replace 40.2 ohm R4T1 with 240 ohm
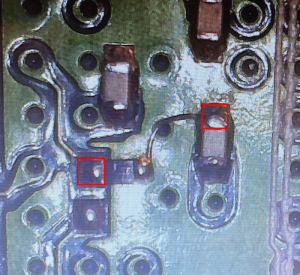
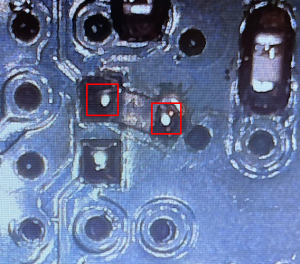
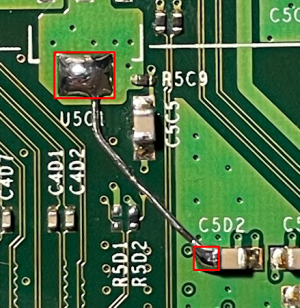
Tie V_GPUPCIE to V_GPUCORE
- Remove IC U5C1
- Install jumper as shown to tie V_GPUPCIE to V_GPUCORE
- Use a 28awg or thicker gauge wire
- Be careful not to short to any nearby components or pads
- Strongly recommended to cover jumper with PCB mask

Modify Firmware
- Use J-Runner with Extras to dump the nand
- Change the type to Jasper 16MB, then RGH the console to get the CPU key
- Set the required XeBuild options and build the image
- Open the SMC Config Editor from the Nand menu, and update the thermal targets from the table above
- Write the nand to the console
Falcon
Both variants of the 65nm GPU can be retrofitted onto a Falcon motherboard. (Demo Video)
Guide By: Octal450
Instructions
GPU Table
| Name | Part Number | GPU/eDRAM Lithography | GPU/eDRAM Temp Target | GPU/eDRAM Temp Critical |
|---|---|---|---|---|
| Zeus | X810478 X817793 |
65nm/90nm | 71C/73C | 90C/92C |
| Kronos | X820894 | 65nm/65nm | 75C/77C | 90C/92C |
Install GPU
- Replace 90nm U4D1 with 65nm
Set VID 1.075V
- Remove 0 ohm R8B9
- Remove 0 ohm R8B10
Set FSB/PCIe/Memory Calibration
- FSB:
- Install 40.2 ohm R4R9
- Remove 4.87K ohm R5R3
- PCIe:
- Remove 1.47K ohm R4R3
- Remove 562 ohm R5D1
- Replace 2K ohm R5D2 with 49.9 ohm
- Memory:
- Replace 40.2 ohm R4R8 with 240 ohm
- Replace 40.2 ohm R4T1 with 240 ohm
Tie V_GPUPCIE to V_GPUCORE
- Remove 0 ohm R4C31
- Install 0 ohm R4P13
- Install 0 ohm R4P14
- Remove IC U5C1
Modify Firmware
- Use J-Runner with Extras to dump the nand
- Change the type to Jasper 16MB, then RGH the console to get the CPU key
- Set the required XeBuild options and build the image
- Open the SMC Config Editor from the Nand menu, and update the thermal targets from the table above
- Write the nand to the console
Jasper
The Kronos GPU can be retrofitted onto a Jasper motherboard. (Demo video)
Guide By: Octal450
Instructions
GPU Table
| Name | Part Number | GPU/eDRAM Lithography | GPU/eDRAM Temp Target | GPU/eDRAM Temp Critical |
|---|---|---|---|---|
| Kronos | X820894 | 65nm/65nm | 75C/77C | 90C/92C |
Install GPU
- Replace Zeus U4D1 with Kronos
Modify Firmware (Optional)
- This step is optional, Zeus targets 71C/73C, there is no harm by running the chip a few degrees cooler
- Use J-Runner with Extras to dump the nand
- Open the SMC Config Editor from the Nand menu, and update the thermal targets from the table above
- Write the nand to the console