Xbox 360:GPU Retrofit: Difference between revisions
No edit summary |
|||
| (13 intermediate revisions by one other user not shown) | |||
| Line 3: | Line 3: | ||
Some GPUs can be retrofitted onto earlier boards. This page contains instructions for what changes need to be done in order for the retrofit to work. | Some GPUs can be retrofitted onto earlier boards. This page contains instructions for what changes need to be done in order for the retrofit to work. | ||
== Zephyr_B/C== | |||
Both variants of the 65nm GPU can be retrofitted onto a Zephyr_B/C motherboard. [https://www.youtube.com/watch?v=AjppSp-QWdc (Demo Video)] | |||
Guide By: Octal450 | |||
=== Instructions === | |||
''' GPU Table ''' | |||
{| class="wikitable" | |||
|- | |||
! Name !! Part Number !! GPU/eDRAM Lithography !! GPU/eDRAM Temp Target !! GPU/eDRAM Temp Critical | |||
|- | |||
| Zeus || X810478<br>X817793 || 65nm/90nm || 71C/73C || 90C/92C | |||
|- | |||
| Kronos || X820894 || 65nm/65nm || 75C/77C || 90C/92C | |||
|} | |||
''' Install GPU ''' | |||
* Replace 90nm U4D1 with 65nm | |||
''' Set VID 1.075V ''' | |||
* Remove 0 ohm R8B9 | |||
* Remove 0 ohm R8B10 | |||
''' Set FSB/PCIe/Memory Calibration ''' | |||
* FSB: | |||
** Remove 4.87K ohm R5R3 | |||
** Install 40.2 ohm as pullup to nearby V_GPUCORE | |||
*** You can either use a wire to the capacitor as shown, or scrape to expose V_GPUCORE voltage plane | |||
*** [[File:Fsbcal65.png|300px]][[File:Fsbcal65b.png|300px]] | |||
* PCIe: | |||
** Remove 1.47K ohm R4R3 | |||
** Remove 562 ohm R5D1 | |||
** Replace 2K ohm R5D2 with 49.9 ohm | |||
* Memory: | |||
** Replace 40.2 ohm R4R8 with 240 ohm | |||
** Replace 40.2 ohm R4T1 with 240 ohm | |||
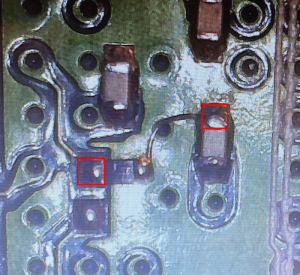
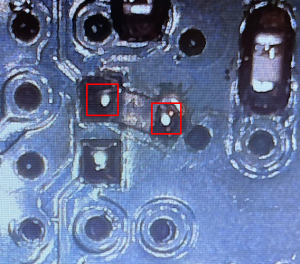
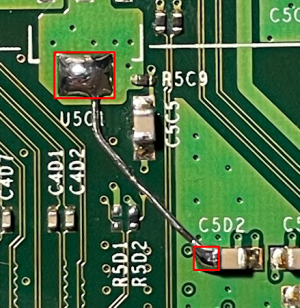
''' Tie V_GPUPCIE to V_GPUCORE ''' | |||
* Remove IC U5C1 | |||
* Install jumper as shown to tie V_GPUPCIE to V_GPUCORE | |||
** Use a 28awg or thicker gauge wire | |||
** Be careful not to short to any nearby components or pads | |||
** Strongly recommended to cover jumper with PCB mask | |||
** [[File:Vpcietie65.png|300px]] | |||
''' Modify Firmware ''' | |||
* Use [https://github.com/Octal450/J-Runner-with-Extras/releases/latest J-Runner with Extras] to dump the nand | |||
* Change the type to Jasper 16MB, then RGH the console to get the CPU key | |||
* Set the required XeBuild options and build the image | |||
* Open the SMC Config Editor from the Nand menu, and update the thermal targets from the table above | |||
* Write the nand to the console | |||
== Falcon == | == Falcon == | ||
Both variants of the | Both variants of the 65nm GPU can be retrofitted onto a Falcon motherboard. [https://www.youtube.com/watch?v=GnZIr4XbvZ0 (Demo Video)] | ||
Guide By: Octal450 | Guide By: Octal450 | ||
| Line 13: | Line 66: | ||
{| class="wikitable" | {| class="wikitable" | ||
|- | |- | ||
! Name !! Part Number !! GPU/eDRAM Lithography !! GPU/eDRAM Temp Target | ! Name !! Part Number !! GPU/eDRAM Lithography !! GPU/eDRAM Temp Target !! GPU/eDRAM Temp Critical | ||
|- | |- | ||
| Zeus || X817793 || 65nm/ | | Zeus || X810478<br>X817793 || 65nm/90nm || 71C/73C || 90C/92C | ||
|- | |- | ||
| | | Kronos || X820894 || 65nm/65nm || 75C/77C || 90C/92C | ||
|} | |} | ||
''' Install GPU ''' | ''' Install GPU ''' | ||
* Replace | * Replace 90nm U4D1 with 65nm | ||
''' Set VID 1.075V ''' | ''' Set VID 1.075V ''' | ||
| Line 46: | Line 99: | ||
''' Modify Firmware ''' | ''' Modify Firmware ''' | ||
* Use [https://github.com/Octal450/J-Runner-with-Extras/releases/latest J-Runner with Extras] to dump the nand, then RGH the console to get the CPU key | * Use [https://github.com/Octal450/J-Runner-with-Extras/releases/latest J-Runner with Extras] to dump the nand | ||
* Change the type to Jasper 16MB, then RGH the console to get the CPU key | |||
* Set the required XeBuild options and build the image | * Set the required XeBuild options and build the image | ||
* Open the SMC Config Editor from the Nand menu, and update the thermal targets from the table above | * Open the SMC Config Editor from the Nand menu, and update the thermal targets from the table above | ||
* Write the nand to the console | * Write the nand to the console | ||
== Jasper | == Jasper == | ||
The | The Kronos GPU can be retrofitted onto a Jasper motherboard. [https://www.youtube.com/watch?v=66CKvpfTKXU (Demo video)] | ||
Guide By: Octal450 | Guide By: Octal450 | ||
| Line 61: | Line 114: | ||
{| class="wikitable" | {| class="wikitable" | ||
|- | |- | ||
! Name !! Part Number !! GPU/eDRAM Lithography !! GPU/eDRAM Temp Target | ! Name !! Part Number !! GPU/eDRAM Lithography !! GPU/eDRAM Temp Target !! GPU/eDRAM Temp Critical | ||
|- | |- | ||
| | | Kronos || X820894 || 65nm/65nm || 75C/77C || 90C/92C | ||
|} | |} | ||
''' Install GPU ''' | ''' Install GPU ''' | ||
* Replace | * Replace Zeus U4D1 with Kronos | ||
''' Modify Firmware ''' | ''' Modify Firmware (Optional)''' | ||
* This step is optional, Zeus targets 71C/73C, there is no harm by running the chip a few degrees cooler | |||
* Use [https://github.com/Octal450/J-Runner-with-Extras/releases/latest J-Runner with Extras] to dump the nand | * Use [https://github.com/Octal450/J-Runner-with-Extras/releases/latest J-Runner with Extras] to dump the nand | ||
* Open the SMC Config Editor from the Nand menu, and update the thermal targets from the table above | * Open the SMC Config Editor from the Nand menu, and update the thermal targets from the table above | ||
* Write the nand to the console | * Write the nand to the console | ||
Revision as of 02:27, 8 April 2024
| This page is intended for advanced technicians only. If you do not have advanced component and BGA rework skills, you will not be able to complete the process successfully. |
Some GPUs can be retrofitted onto earlier boards. This page contains instructions for what changes need to be done in order for the retrofit to work.
Zephyr_B/C
Both variants of the 65nm GPU can be retrofitted onto a Zephyr_B/C motherboard. (Demo Video)
Guide By: Octal450
Instructions
GPU Table
| Name | Part Number | GPU/eDRAM Lithography | GPU/eDRAM Temp Target | GPU/eDRAM Temp Critical |
|---|---|---|---|---|
| Zeus | X810478 X817793 |
65nm/90nm | 71C/73C | 90C/92C |
| Kronos | X820894 | 65nm/65nm | 75C/77C | 90C/92C |
Install GPU
- Replace 90nm U4D1 with 65nm
Set VID 1.075V
- Remove 0 ohm R8B9
- Remove 0 ohm R8B10
Set FSB/PCIe/Memory Calibration
- FSB:
- Remove 4.87K ohm R5R3
- Install 40.2 ohm as pullup to nearby V_GPUCORE
- You can either use a wire to the capacitor as shown, or scrape to expose V_GPUCORE voltage plane


- PCIe:
- Remove 1.47K ohm R4R3
- Remove 562 ohm R5D1
- Replace 2K ohm R5D2 with 49.9 ohm
- Memory:
- Replace 40.2 ohm R4R8 with 240 ohm
- Replace 40.2 ohm R4T1 with 240 ohm
Tie V_GPUPCIE to V_GPUCORE
- Remove IC U5C1
- Install jumper as shown to tie V_GPUPCIE to V_GPUCORE
- Use a 28awg or thicker gauge wire
- Be careful not to short to any nearby components or pads
- Strongly recommended to cover jumper with PCB mask

Modify Firmware
- Use J-Runner with Extras to dump the nand
- Change the type to Jasper 16MB, then RGH the console to get the CPU key
- Set the required XeBuild options and build the image
- Open the SMC Config Editor from the Nand menu, and update the thermal targets from the table above
- Write the nand to the console
Falcon
Both variants of the 65nm GPU can be retrofitted onto a Falcon motherboard. (Demo Video)
Guide By: Octal450
Instructions
GPU Table
| Name | Part Number | GPU/eDRAM Lithography | GPU/eDRAM Temp Target | GPU/eDRAM Temp Critical |
|---|---|---|---|---|
| Zeus | X810478 X817793 |
65nm/90nm | 71C/73C | 90C/92C |
| Kronos | X820894 | 65nm/65nm | 75C/77C | 90C/92C |
Install GPU
- Replace 90nm U4D1 with 65nm
Set VID 1.075V
- Remove 0 ohm R8B9
- Remove 0 ohm R8B10
Set FSB/PCIe/Memory Calibration
- FSB:
- Install 40.2 ohm R4R9
- Remove 4.87K ohm R5R3
- PCIe:
- Remove 1.47K ohm R4R3
- Remove 562 ohm R5D1
- Replace 2K ohm R5D2 with 49.9 ohm
- Memory:
- Replace 40.2 ohm R4R8 with 240 ohm
- Replace 40.2 ohm R4T1 with 240 ohm
Tie V_GPUPCIE to V_GPUCORE
- Remove 0 ohm R4C31
- Install 0 ohm R4P13
- Install 0 ohm R4P14
- Remove IC U5C1
Modify Firmware
- Use J-Runner with Extras to dump the nand
- Change the type to Jasper 16MB, then RGH the console to get the CPU key
- Set the required XeBuild options and build the image
- Open the SMC Config Editor from the Nand menu, and update the thermal targets from the table above
- Write the nand to the console
Jasper
The Kronos GPU can be retrofitted onto a Jasper motherboard. (Demo video)
Guide By: Octal450
Instructions
GPU Table
| Name | Part Number | GPU/eDRAM Lithography | GPU/eDRAM Temp Target | GPU/eDRAM Temp Critical |
|---|---|---|---|---|
| Kronos | X820894 | 65nm/65nm | 75C/77C | 90C/92C |
Install GPU
- Replace Zeus U4D1 with Kronos
Modify Firmware (Optional)
- This step is optional, Zeus targets 71C/73C, there is no harm by running the chip a few degrees cooler
- Use J-Runner with Extras to dump the nand
- Open the SMC Config Editor from the Nand menu, and update the thermal targets from the table above
- Write the nand to the console