Xbox 360:JTAG/AUD CLAMP + Open Tray: Difference between revisions
No edit summary |
|||
| Line 1: | Line 1: | ||
[[Category:Xbox360]] | [[Category:Xbox360]] | ||
Use this JTAG (or R-JTOP) wiring if the Boxxdr method doesn't boot, you receive E79 errors, or you have issues with HDMI. This method may cause your DVD drive to eject on bootup. Also, your console will reboot instead of shutting down if you turn off the console while a controller is charging via USB. | Use this JTAG (or R-JTOP) wiring if the Boxxdr method doesn't boot, you receive E79 errors, or you have issues with HDMI. This method may cause your DVD drive to eject on bootup. Also, your console will reboot instead of shutting down if you turn off the console while a controller is charging via USB. | ||
==Equipment Needed== | ==Equipment Needed== | ||
* A soldering iron, solder, and flux | * A soldering iron, solder, and flux | ||
* Isopropyl alcohol (90% or higher recommended) and cotton swabs | * Isopropyl alcohol (90% or higher recommended) and cotton swabs | ||
* 28AWG or 30AWG wire | * 28AWG or 30AWG wire | ||
* Two | * Two 1N914/4148 switching diodes | ||
* Heat shrink tubing | * Heat shrink tubing | ||
==Flashing a Different Dump== | ==Flashing a Different Dump== | ||
# Download and extract the [https://www.mediafire.com/file/y169u1he03mtheo/Open_Tray_Bins.zip/file Open_Tray bin pack]. In Jrunner, select "..." next to the Load Source field and navigate to the `Open_Tray Bins` folder and choose the `<model>.bin` file corresponding to your motherboard. In the upper right corner of the window, select the dashboard version you chose for the patched dump that you wrote to the motherboard and make sure that the "Jtag" radio button is selected. | # Download and extract the [https://www.mediafire.com/file/y169u1he03mtheo/Open_Tray_Bins.zip/file Open_Tray bin pack]. In Jrunner, select "..." next to the Load Source field and navigate to the `Open_Tray Bins` folder and choose the `<model>.bin` file corresponding to your motherboard. In the upper right corner of the window, select the dashboard version you chose for the patched dump that you wrote to the motherboard and make sure that the "Jtag" radio button is selected. | ||
# In the top left of the window, select the button labeled "Write Xell-Reloaded". If it says "Device Not Found" or anything about missing CB/CD files, see the troubleshooting steps at the bottom of this page. If you get messages about bad blocks, ignore them. It may prompt you for your motherboard model again, make the correct choice and press OK. The progress bar will begin moving and stop when it reaches 03FF (or 1900 for a 256MB/512MB Jasper). This process will take ~3 minutes (~10 minutes for a 256MB / 512MB Jasper). | # In the top left of the window, select the button labeled "Write Xell-Reloaded". If it says "Device Not Found" or anything about missing CB/CD files, see the troubleshooting steps at the bottom of this page. If you get messages about bad blocks, ignore them. It may prompt you for your motherboard model again, make the correct choice and press OK. The progress bar will begin moving and stop when it reaches 03FF (or 1900 for a 256MB/512MB Jasper). This process will take ~3 minutes (~10 minutes for a 256MB / 512MB Jasper). | ||
# Once it has successfully written to the motherboard, unplug the power cable from your Xbox 360 and unplug the USB cable from the computer and programmer. | # Once it has successfully written to the motherboard, unplug the power cable from your Xbox 360 and unplug the USB cable from the computer and programmer. | ||
==Motherboard Soldering== | ==Motherboard Soldering== | ||
| Line 25: | Line 18: | ||
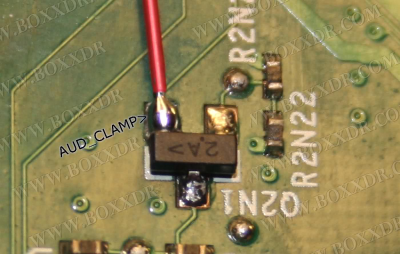
# Solder a wire onto the non-striped side of the first diode. Solder the striped end of the diode to the bottom right point of the Q2N1 module as shown in the image below. Cut a length of heat shrink tubing to cover all exposed metal of the diode and heat it with a hair dryer until it stops shrinking. Solder the other end of the wire to point D. <br> [[File:Non-Xenon-JTAG6.png|400px]] | # Solder a wire onto the non-striped side of the first diode. Solder the striped end of the diode to the bottom right point of the Q2N1 module as shown in the image below. Cut a length of heat shrink tubing to cover all exposed metal of the diode and heat it with a hair dryer until it stops shrinking. Solder the other end of the wire to point D. <br> [[File:Non-Xenon-JTAG6.png|400px]] | ||
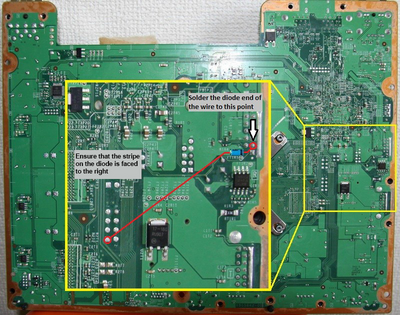
# Solder a wire onto the non-striped side of the second diode. Solder the striped side of the diode directly to the right-most point in the image below. Cut a length of heat shrink tubing to cover all exposed metal of the diode and heat it with a hair dryer until it stops shrinking. Solder the other end of the wire to the left-most point (point C in the diagram above). <br> [[File:Boxxdr-DVD-JTAG2.png|400px]] | # Solder a wire onto the non-striped side of the second diode. Solder the striped side of the diode directly to the right-most point in the image below. Cut a length of heat shrink tubing to cover all exposed metal of the diode and heat it with a hair dryer until it stops shrinking. Solder the other end of the wire to the left-most point (point C in the diagram above). <br> [[File:Boxxdr-DVD-JTAG2.png|400px]] | ||
#* | #* | ||
==Testing the Console== | |||
==Testing | |||
Once you've finished soldering, clean up any flux with isopropyl alcohol and cotton swabs. Partially re-assemble your Xbox 360, ensuring that: | Once you've finished soldering, clean up any flux with isopropyl alcohol and cotton swabs. Partially re-assemble your Xbox 360, ensuring that: | ||
*Heatsinks are attached (If they were removed for some reason) | |||
*Fan(s) are in place and plugged in (On a phat console, the fans can be angled on top of the heatsinks to cool them for testing) | |||
* Heatsinks are attached ( | *The RF board is plugged into the front of the console | ||
* | *An A/V or HDMI cable is plugged into the Xbox 360 and into a TV or monitor | ||
* The | *A power brick is plugged in to both the wall and Xbox 360 | ||
*(Optional) An ethernet cable is plugged into the Xbox 360 and a LAN (e.g. a switch, router, or directly to a PC) | |||
* | Turn on your console, and it should boot into XeLL RELOADED within a minute. If you don't have an ethernet cable connected, write down (and/or take a picture of) the "CPU Key" listed on screen. You can now go back to the [[Xbox 360:JTAG#Decrypting%20the%20NAND|'''JTAG''']] or [[Xbox 360:R-JTOP#Decrypting%20the%20NAND|'''R-JTOP''']] hack page and continue from the beginning of the "Decrypting The NAND" section. | ||
* | * If your console doesn't boot into XeLL, check all previous steps and double check your wiring accuracy and quality. Also try using a non-HDMI cable, as XeLL doesn't seem to always boot with a HDMI cable. Once your console is fully hacked you can swap the video cable back out. | ||
Turn on your console, and it should boot into XeLL within a minute. | |||
* If your console doesn't boot into XeLL, check all previous steps and double check your wiring accuracy and quality. Also | |||
==Troubleshooting== | ==Troubleshooting== | ||
* '''What should I do if I ripped off a soldering pad?''' | * '''What should I do if I ripped off a soldering pad?''' | ||
** Look online for an alternate point to solder onto. Practice more on junk electronics before attempting to continue. | ** Look online for an alternate point to solder onto. Practice more on junk electronics before attempting to continue. | ||
Revision as of 22:29, 16 December 2023
Use this JTAG (or R-JTOP) wiring if the Boxxdr method doesn't boot, you receive E79 errors, or you have issues with HDMI. This method may cause your DVD drive to eject on bootup. Also, your console will reboot instead of shutting down if you turn off the console while a controller is charging via USB.
Equipment Needed
- A soldering iron, solder, and flux
- Isopropyl alcohol (90% or higher recommended) and cotton swabs
- 28AWG or 30AWG wire
- Two 1N914/4148 switching diodes
- Heat shrink tubing
Flashing a Different Dump
- Download and extract the Open_Tray bin pack. In Jrunner, select "..." next to the Load Source field and navigate to the
Open_Tray Binsfolder and choose the<model>.binfile corresponding to your motherboard. In the upper right corner of the window, select the dashboard version you chose for the patched dump that you wrote to the motherboard and make sure that the "Jtag" radio button is selected. - In the top left of the window, select the button labeled "Write Xell-Reloaded". If it says "Device Not Found" or anything about missing CB/CD files, see the troubleshooting steps at the bottom of this page. If you get messages about bad blocks, ignore them. It may prompt you for your motherboard model again, make the correct choice and press OK. The progress bar will begin moving and stop when it reaches 03FF (or 1900 for a 256MB/512MB Jasper). This process will take ~3 minutes (~10 minutes for a 256MB / 512MB Jasper).
- Once it has successfully written to the motherboard, unplug the power cable from your Xbox 360 and unplug the USB cable from the computer and programmer.
Motherboard Soldering

- On the underside of the motherboard, solder a wire from point A to B.
- Solder a wire onto the non-striped side of the first diode. Solder the striped end of the diode to the bottom right point of the Q2N1 module as shown in the image below. Cut a length of heat shrink tubing to cover all exposed metal of the diode and heat it with a hair dryer until it stops shrinking. Solder the other end of the wire to point D.
- Solder a wire onto the non-striped side of the second diode. Solder the striped side of the diode directly to the right-most point in the image below. Cut a length of heat shrink tubing to cover all exposed metal of the diode and heat it with a hair dryer until it stops shrinking. Solder the other end of the wire to the left-most point (point C in the diagram above).


Testing the Console
Once you've finished soldering, clean up any flux with isopropyl alcohol and cotton swabs. Partially re-assemble your Xbox 360, ensuring that:
- Heatsinks are attached (If they were removed for some reason)
- Fan(s) are in place and plugged in (On a phat console, the fans can be angled on top of the heatsinks to cool them for testing)
- The RF board is plugged into the front of the console
- An A/V or HDMI cable is plugged into the Xbox 360 and into a TV or monitor
- A power brick is plugged in to both the wall and Xbox 360
- (Optional) An ethernet cable is plugged into the Xbox 360 and a LAN (e.g. a switch, router, or directly to a PC)
Turn on your console, and it should boot into XeLL RELOADED within a minute. If you don't have an ethernet cable connected, write down (and/or take a picture of) the "CPU Key" listed on screen. You can now go back to the JTAG or R-JTOP hack page and continue from the beginning of the "Decrypting The NAND" section.
- If your console doesn't boot into XeLL, check all previous steps and double check your wiring accuracy and quality. Also try using a non-HDMI cable, as XeLL doesn't seem to always boot with a HDMI cable. Once your console is fully hacked you can swap the video cable back out.
Troubleshooting
- What should I do if I ripped off a soldering pad?
- Look online for an alternate point to solder onto. Practice more on junk electronics before attempting to continue.