GBA:Innovation GBA TV Converter Installation Guide: Difference between revisions
Jump to navigation
Jump to search
Black Majic (talk | contribs) (Initial Wikification and edits) |
Black Majic (talk | contribs) m (minor edits for style) |
||
| Line 2: | Line 2: | ||
**Original TV Installation** | **Original TV Installation** | ||
This page describes how to install the [[Gbainnovationadapter|Innovation | This page describes how to install the [[Gbainnovationadapter|Innovation GBA TV Converter]] into your [[GBA:Game Boy Advance]] system. | ||
{{Warning|This method will produce a [http://youtu.be/MMewJwq6zGY horrible quality picture]. These instructions exist because the manual is very poorly written. It is strongly recommend that you skip this ribbon installation and use [[ | {{Warning|This method will produce a [http://youtu.be/MMewJwq6zGY horrible quality picture]. These instructions exist because the manual is very poorly written. It is strongly recommend that you skip this ribbon installation and use [[Gbacustominstall|the direct-pin soldering method]]}} | ||
== Instructions == | == Instructions == | ||
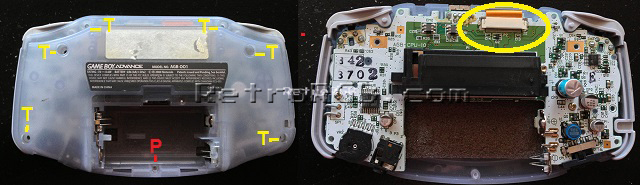
# Open your GBA and determine if the LCD video cable is 32 or 40 pin (image labelled 'T' for the tri-wing screws and 'P' for Philips): <br>[[File:GBAPage04.jpg]]<br>[[File:GBAPage05.jpg]] | # Open your GBA and determine if the LCD video cable is 32 or 40 pin (image labelled 'T' for the tri-wing screws and 'P' for Philips):<br>[[File:GBAPage04.jpg]]<br>[[File:GBAPage05.jpg]] | ||
# If it's a 40-pin, you can just buy the TV kit and use the adapter cable it comes with. If your GBA is a 32-pin model, you will need to buy the separate adapter kit (search Google, Amazon and eBay for the adapter cable), in addition to the TV kit: | # If it's a 40-pin, you can just buy the TV kit and use the adapter cable it comes with. If your GBA is a 32-pin model, you will need to buy the separate adapter kit (search Google, Amazon and eBay for the adapter cable), in addition to the TV kit:<br>[[File:GBAPage06.jpg]] | ||
# Line up the ribbon connector -- the stock ribbon cable for 40-pin installs one way, but the adapter cable kit has a slot for both. Be sure that you use slot 1 for the 32-pin connector. | # Line up the ribbon connector -- the stock ribbon cable for 40-pin installs one way, but the adapter cable kit has a slot for both. Be sure that you use slot 1 for the 32-pin connector.<br>[[File:GBAPage07.jpg]] | ||
# Push the connector on so it’s a tight connection. Make sure the ribbon cable is run along the side of the cartridge input. <br>[[File:GBAPage08.jpg]] | # Push the connector on so it’s a tight connection. Make sure the ribbon cable is run along the side of the cartridge input. <br>[[File:GBAPage08.jpg]] | ||
# Reassemble the case using the new rear cover that comes with the kit, and test it with your TV. | # Reassemble the case using the new rear cover that comes with the kit, and test it with your TV. | ||
If it's not working correctly, check the ribbon connector's connection. | If it's not working correctly, check the ribbon connector's connection. | ||
Now that the adapter is installed, [[gbargb|RGB output]] can be achieved, or the [[ | Now that the adapter is installed, [[gbargb|RGB output]] can be achieved, or the [[Gbacustominstall|direct-solder method]] can be used for a higher quality connection and output. | ||
Revision as of 03:28, 30 April 2022
- Original TV Installation**
This page describes how to install the Innovation GBA TV Converter into your GBA:Game Boy Advance system.
| This method will produce a horrible quality picture. These instructions exist because the manual is very poorly written. It is strongly recommend that you skip this ribbon installation and use the direct-pin soldering method |
Instructions
- Open your GBA and determine if the LCD video cable is 32 or 40 pin (image labelled 'T' for the tri-wing screws and 'P' for Philips):

- If it's a 40-pin, you can just buy the TV kit and use the adapter cable it comes with. If your GBA is a 32-pin model, you will need to buy the separate adapter kit (search Google, Amazon and eBay for the adapter cable), in addition to the TV kit:
File:GBAPage06.jpg - Line up the ribbon connector -- the stock ribbon cable for 40-pin installs one way, but the adapter cable kit has a slot for both. Be sure that you use slot 1 for the 32-pin connector.

- Push the connector on so it’s a tight connection. Make sure the ribbon cable is run along the side of the cartridge input.

- Reassemble the case using the new rear cover that comes with the kit, and test it with your TV.


If it's not working correctly, check the ribbon connector's connection. Now that the adapter is installed, RGB output can be achieved, or the direct-solder method can be used for a higher quality connection and output.