GBA:Creating Game Backups: Difference between revisions
(Dumping GBA games with GBI) |
|||
| Line 167: | Line 167: | ||
</div> | </div> | ||
=== Link cable + | === Game Boy Player (GameCube) === | ||
<div class="mw-collapsible"> | |||
[[File:GBI_Dumper.PNG|thumb|The GBI dumper app]] | |||
Requirements: | |||
* A homebrewed GameCube with a Game Boy Player | |||
* An SD card inserted into either the memory card or SP2 port | |||
Process: | |||
# Download [https://www.gc-forever.com/wiki/index.php?title=Game_Boy_Interface Game Boy Interface (GBI)], extract the zip, and copy the files to your SD card. Ensure that the GBI folder is on the root of the SD card, as the `default.mb.gz` file must be in this location to work. | |||
# Insert the game you wish to dump. | |||
# Launch `gbi.dol` (not any other variant) and hold Start+Z immediately until it boots into the dumper. | |||
# Choose one of the following options: | |||
#* Dump BIOS — Dumps the Game Boy Player BIOS | |||
#* Dump ROM — Dumps the inserted GBA game | |||
#* Dump save — Dumps the inserted GBA game's save | |||
* The app will begin dumping the selected item. The "Dump BIOS" and "Dump save" options should be almost instant, while the "Dump ROM" option will take about 10 seconds per 128 KB. If the screen doesn't update after 20 seconds, reboot the system and try again. | |||
{{Note|This method does not work with Gameboy and Gameboy Color games, as inserting one will physically switch the GBA's BIOS to the backwards-compatible one.}} | |||
</div> | |||
=== Link cable + GameCube/Wii === | |||
<div class="mw-collapsible"> | <div class="mw-collapsible"> | ||
Requirements: | Requirements: | ||
* A Gameboy Advance or Gameboy Advance SP | * A Gameboy Advance or Gameboy Advance SP | ||
* A homebrewed | * A homebrewed GameCube or GameCube-compatible Wii | ||
* An SD card | * An SD card | ||
* [https://www.amazon.com/dp/B00G2F1N80/ A Gamecube GBA Link cable] | * [https://www.amazon.com/dp/B00G2F1N80/ A Gamecube GBA Link cable] | ||
* [https://github.com/FIX94/gba-link-cable-dumper/ GBA Link cable dumper] | * [https://github.com/FIX94/gba-link-cable-dumper/ GBA Link cable dumper] | ||
* A | * A GameCube controller | ||
* Additionally, for modded | * Additionally, for modded GameCubes, an SD Gecko or SD2SP2 will be required. | ||
To begin download GBA Link Cable Dumper and place it on your SD card: | To begin, download GBA Link Cable Dumper and place it on your SD card: | ||
* For | * For GameCube's using Swiss, place linkcabledump_gc.dol on the root of your SD card | ||
* For Wii's, create a folder in apps titled "linkcabledump", place the linkcabledump_wii.dol inside, and rename it to boot.dol | * For Wii's, create a folder in apps titled "linkcabledump", place the linkcabledump_wii.dol inside, and rename it to boot.dol | ||
Launch GBA Link Cable Dumper via your preferred method on | Launch GBA Link Cable Dumper via your preferred method on GameCube (Swiss, savegame exploit, etc.) or through the Homebrew Channel on Wii. | ||
Once it has launched, connect your GBA via the link cable to controller port 2 (and on Wii your | Once it has launched, connect your GBA via the link cable to controller port 2 (and on Wii your GameCube controller to port 1) and turn it on without a game inserted or holding START+SELECT while a game is inserted.<br> | ||
After a short moment, you will be prompted if you wish to dump the game that is currently inserted or the GBA BIOS.<br> | After a short moment, you will be prompted if you wish to dump the game that is currently inserted or the GBA BIOS.<br> | ||
Insert the GBA game you want to dump into the GBA cart slot and press A to start dumping.<br> | Insert the GBA game you want to dump into the GBA cart slot and press A to start dumping.<br> | ||
This process will take a long time, especially with large ROMs. Even a 4 MB ROM will take about 6 minutes due to the slow serial interface.<br> | This process will take a long time, especially with large ROMs. Even a 4 MB ROM will take about 6 minutes due to the slow serial interface.<br> | ||
To exit the application once you're done, simply press START on your | To exit the application once you're done, simply press START on your GameCube controller and turn off the GBA.<br> | ||
{{Note|This method does not work with Gameboy and Gameboy Color games, as inserting one will physically switch the GBA's BIOS to the backwards-compatible one.}} | |||
</div> | </div> | ||
== Deprecated/Hard to find == | == Deprecated/Hard to find == | ||
Latest revision as of 15:53, 14 March 2024
| Always verify your ROM/save file is working correctly in an emulator like BGB before proceeding with restoring another file or another cartridge. Genuine game cartridges can not be rewritten/flashed with a different ROM. |
There is a wide variety of methods/hardware/software needed to backup ROMs and Save Game Files for Game Boy family games. Each major method/hardware specific guides will be broken down into subcategories below.
Dedicated Flash/Backup Devices
Joey JR/Joey Gen 4 (BennVenn)
This is BennVenn's "ultra rugged" and "ultra portable" cart reader. Unlike the gen 3, this unit does not require installing custom software and using unsigned drivers (on Windows PCs) and thus makes setup and use even easier. When plugged into a computer with a cart inserted, the Joey shows up as a removable drive with the game files on that drive. From there, you can just add or copy files to backup ROM/RAM or to restore RAM. Flashing support has been added to close the feature gap between gen 3 readers and gen 4 readers. The Joey Jr. will also
Resources required:
| Joey JR (Joey Gen 4) |
| USB-C Cable |
| PC/Laptop |
| Compatible Cartridge |
| Most errors/issues with the Joey Jr. are the result of dirty contacts on cartridges. It is recommended that the contacts on the cartridge are cleaned before attempting to dump ROM/SAV files. |
Backup Procedures:
- Ensure Joey Jr. is not connected to your computer
- Insert the game cartridge into the Joey Jr. and ensure it is fully seated.
- Connect the USB-C Cable from your computer to your Joey Jr.
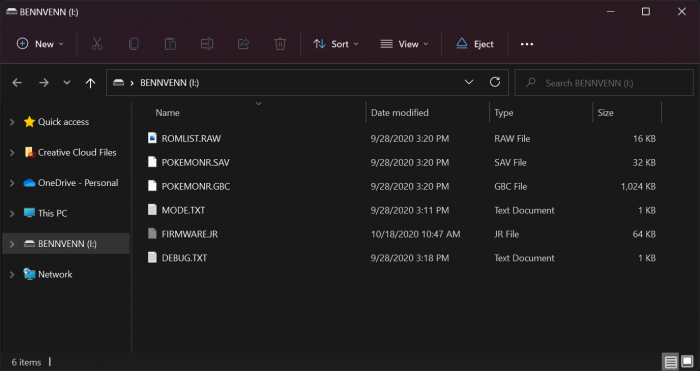
- Your Joey Jr. should show up on your computer as a USB Drive labeled BENNVENN.
- Inside the drive you will see a handful of files. The only files we care about for the sake of dumping carts/saves are *.GB, *.GBC, *.SAV, *.RTC
POKEMONR.GBC is the ROM. POKEMONR.SAV is the save file. Games that use the RTC clock will also have a *.RTC file.
- Drag the files you want to keep (GBC, SAV, RTC) to a folder on your computer.
- Utilize an Emulator such as BGB to verify that your SAV/ROM files were corrected saved/backed up and usable.
| It is STRONGLY RECOMMENDED that you test your ROM/SAV file using an emulator such as BGB to verify that the files were correctly saved/backed up. |
Flashing Procedures:
- Follow steps 1-5 from the Backup Procedures above.
- Drag the files from your computer back to the "BENNVENN" USB drive. JoeyJr. will automatically delete the old files and replace them with the new ones you dragged over.
GBxCart RW (insideGadgets)
This is functionally similar to the Joey gen 3 except that the device is completely open source. Compatibility is largely the same but the GBx device does support a few carts that the joey gen 3 does not and vice versa. All original carts are supported on both devices. he Pro model is identical to the standard model except that the PCB is shaped differently to allow you to install the the reader in a Game Boy Advance cartridge shell (aftermarket shells fit better). You can buy one from insideGadgets.
A video of this process can be found on MrMario2011's channel.
Resources required:
- GBxCartRW
- USB-C Cable
- PC/Laptop
- Compatible Cartridge
- FlashGBX by Lesserkuma
Backup Procedures:
- Ensure that FlashGBX is installed and the software is opened on your computer.
- Without the GBxCartRW being connected to your computer, insert your cartridge into the GBxCartRW
- Plug the GBxCartRW in via the USB-C cable connected to your computer.
- Press the Okay button in the FlashGBX window.
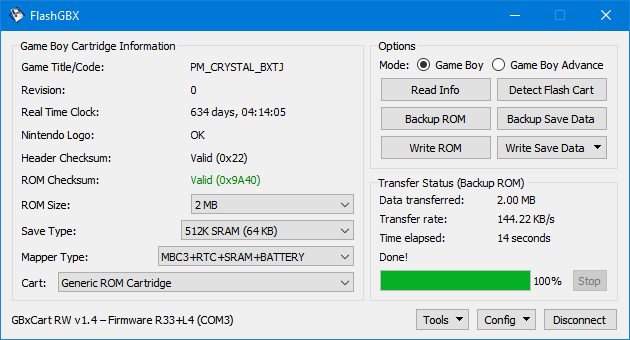
- Select the GameBoy option in the top right, the cartridge information will appear.
- Press the BACKUP ROM button and select the location you would like to save the ROM file.
- If you would like to backup your SAVE FILE, press the BACKUP SAVE DATA button instead.
- FlashGBX will prompt you when the backup is complete.
- Verify that the ROM you backed up is functioning via an emulator such as GBG.
Flashing Procedures:
- Complete steps 1-5 of the Backup Procedures.
- Press the WRITE SAVE DATA button.
- If you have a flash cart or repro. cartridge and would like to flash it with a new ROM press the WRITE ROM button instead.
- Press the Restore from save data file button.
- Navigate to the location of your save data file and select it.
- FlashGBX will prompt you to let you know that the save file has been restored.
Cart Flasher for GameBoy (J. Rodrigo)
ALTANE
This device is very similar to the Reiner Ziegler based flashers above and has similar compatibility and features. Does not support bootleg or repro cart flashing but will flash homebrew carts like the device above. See this site for more info or you can buy one from Retromodding.
RetroBlaster
The RetroBlaster allows for reading and writing of game ROMs and save data with specific mapper support.
The RetroBlaster supports:
- NES / Famicom
- SNES / Super Famicom
- Nintendo 64
- Game Boy / Game Boy Color
- Game Boy Advance
- Sega Genesis / Mega Drive
- TurboGrafx-16 / PC Engine
For more information, check out the RetroBlaster page.
Open-Source Flash/Backup Devices
GB Cart Read (InsideGadgets)
Open Source Cartridge Reader (OSCaR) by Sanni
https://github.com/sanni/cartreader This is a fully open source reader that supports both Game Boy (Color) and Game Boy Advance cartridges. Compatibility with OEM games is near 100%, just like the other readers above, but this reader actually supports a few other systems as well like N64, SNES, Megadrive, etc. Sanni is constantly updating the software and hardware to add support for more devices. Beyond the support for more systems (which is outside the scope of this wiki), this device has a few more things that set it apart from the other readers. The biggest difference is that it is not actually sold anywhere. If you want one, you'll have to DIY it or buy a home made reader from a third party. Another big difference is that this device does not interface with a PC for reading and writing carts. It stores games and saves on a (micro) SD card attached to the reader. Because of the modular design of this reader, you can also add a battery, buttons, and screen to it and eliminate the requirement of a PC altogether. This reader has the worst bootleg compatibility out of the Joey gen 3 and GBxCart RW but it does still support most of the common bootlegs.
Flash/Backup as secondary function
RetroN5 (Hyperkin)
The RetroN 5 multi-emulator device can be unofficially modified to add the ability to read game ROMs and saves.
The RetroN 5 supports:
- NES / Famicom
- SNES / Super Famicom
- Game Boy / Game Boy Color
- Game Boy Advance
- Sega Genesis / Mega Drive
- Sega Master System
For more information, see the Backups with RetroN 5 page.
Retro Freak
The Retro Freak multi-emulator device can natively back up game ROMs and saves — however, they are encrypted. Through use of a custom firmware, the Retro Freak can create normal unencrypted game ROMs and saves.
The Retro Freak supports:
- NES / Famicom
- SNES / Super Famicom
- Game Boy / Game Boy Color
- Game Boy Advance
- Sega Genesis / Mega Drive
- TurboGrafx-16 / PC Engine
- SuperGrafx
For more information, see the rfdumper GitHub.
Nintendo 64 + Everdrive 64 + Transfer Pak (u/Saturnu)
Game Boy Player (GameCube)
Requirements:
- A homebrewed GameCube with a Game Boy Player
- An SD card inserted into either the memory card or SP2 port
Process:
- Download Game Boy Interface (GBI), extract the zip, and copy the files to your SD card. Ensure that the GBI folder is on the root of the SD card, as the
default.mb.gzfile must be in this location to work. - Insert the game you wish to dump.
- Launch
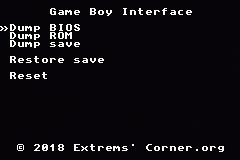
gbi.dol(not any other variant) and hold Start+Z immediately until it boots into the dumper. - Choose one of the following options:
- Dump BIOS — Dumps the Game Boy Player BIOS
- Dump ROM — Dumps the inserted GBA game
- Dump save — Dumps the inserted GBA game's save
- The app will begin dumping the selected item. The "Dump BIOS" and "Dump save" options should be almost instant, while the "Dump ROM" option will take about 10 seconds per 128 KB. If the screen doesn't update after 20 seconds, reboot the system and try again.
| This method does not work with Gameboy and Gameboy Color games, as inserting one will physically switch the GBA's BIOS to the backwards-compatible one. |
Link cable + GameCube/Wii
Requirements:
- A Gameboy Advance or Gameboy Advance SP
- A homebrewed GameCube or GameCube-compatible Wii
- An SD card
- A Gamecube GBA Link cable
- GBA Link cable dumper
- A GameCube controller
- Additionally, for modded GameCubes, an SD Gecko or SD2SP2 will be required.
To begin, download GBA Link Cable Dumper and place it on your SD card:
- For GameCube's using Swiss, place linkcabledump_gc.dol on the root of your SD card
- For Wii's, create a folder in apps titled "linkcabledump", place the linkcabledump_wii.dol inside, and rename it to boot.dol
Launch GBA Link Cable Dumper via your preferred method on GameCube (Swiss, savegame exploit, etc.) or through the Homebrew Channel on Wii.
Once it has launched, connect your GBA via the link cable to controller port 2 (and on Wii your GameCube controller to port 1) and turn it on without a game inserted or holding START+SELECT while a game is inserted.
After a short moment, you will be prompted if you wish to dump the game that is currently inserted or the GBA BIOS.
Insert the GBA game you want to dump into the GBA cart slot and press A to start dumping.
This process will take a long time, especially with large ROMs. Even a 4 MB ROM will take about 6 minutes due to the slow serial interface.
To exit the application once you're done, simply press START on your GameCube controller and turn off the GBA.
| This method does not work with Gameboy and Gameboy Color games, as inserting one will physically switch the GBA's BIOS to the backwards-compatible one. |
Deprecated/Hard to find
These are listed for reference only:

