Xbox 360:FileZilla: Difference between revisions
Jump to navigation
Jump to search
LjMario007 (talk | contribs) (LjMario007 moved page Xbox 360:FileZilla to Xbox 360:WinSCP: change to WinSCP as discussed in the discord) Tag: New redirect |
m (Text replacement - "Category:Xbox360" to "Category:Xbox 360") |
||
| (One intermediate revision by one other user not shown) | |||
| Line 1: | Line 1: | ||
# | [[Category:Xbox 360]] | ||
[https://filezilla-project.org/ FileZilla] allows you to transfer files can be transferred to and from your Xbox 360. On a custom dashboard, an FTP server will often be running in the background, which allows you to transfer files to and from your Xbox 360 over the network. | |||
==Using Filezilla== | |||
# Make sure you have either an Ethernet or WiFi connection between your Xbox 360 and PC. | |||
# Take note of your Xbox 360's IP address. It should be on the dashboard. | |||
## If there is no IP; change the IP address to a static one. You may need to also set the gateway to your PC's IP address, but this isn't usually necessary. | |||
# Open a [https://filezilla-project.org/ FileZilla] session and enter your Xbox 360's IP into the host field in the top left, and "xbox" as the username and password. Press enter to connect. | |||
## You may need to navigate to Network and Sharing Center → Change Adapter Settings → Right click the ethernet adapter → Properties → Configure... → Speed & Duplex → Select 100Mbps Full Duplex from dropdown and hit OK. | |||
# In the right-hand side, you should see a directory listing of the different partitions on the drive. | |||
## Flash: is your operating system directory, do not modify anything here unless you know what you are doing. | |||
## Hdd1: is the main data partition. | |||
## HddX: is for original xbox backwards compatibility. It may not be present on your console if you have never run an original xbox game. | |||
# You can browse your PC on the left-hand side and upload or download files by right clicking them and choosing the relevant option on either session. Choosing "Add to Queue" will save the transfer into a list, and pressing Ctrl+P will start processing the list; this is handy if you are not yet ready to transfer large amounts of files. | |||
Make sure to use these settings in FileZilla: | |||
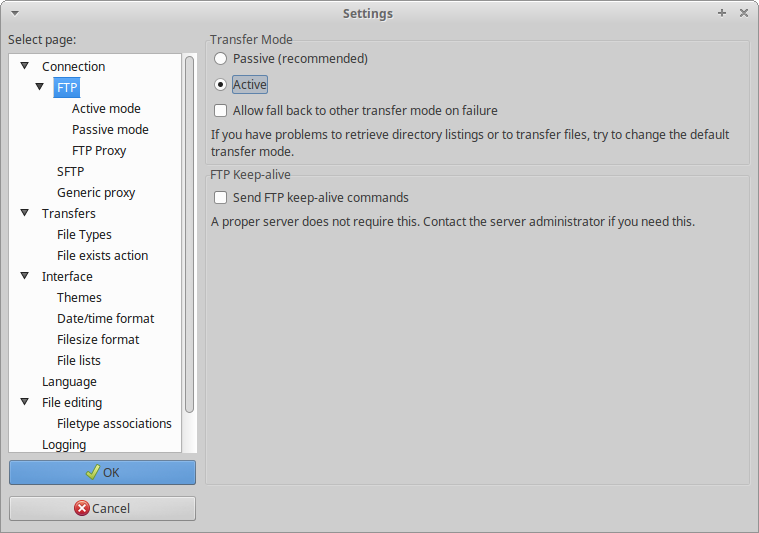
# Active mode and disable fallback <br> [[File:FileZilla1.png]] | |||
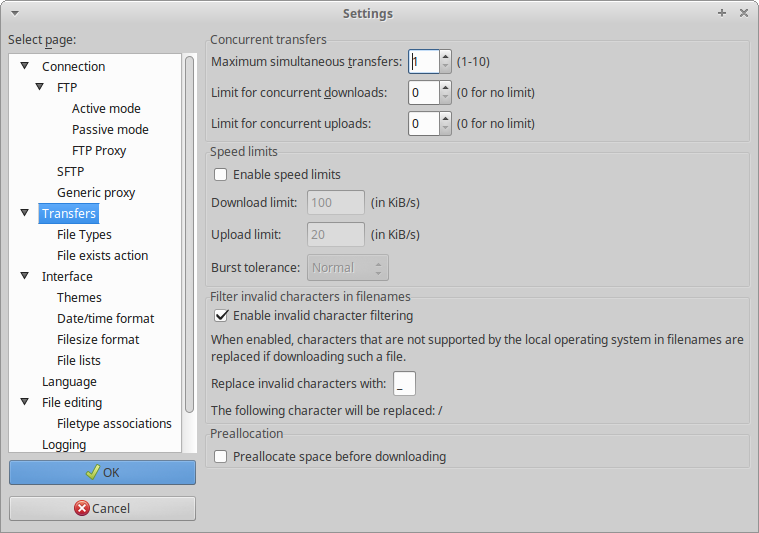
# One transfer at a time to reduce fragmentation. Your goal isn't to get files onto your Xbox 360 as fast as possible, it's to get them on there in one contiguous piece without being fragmented on the file system. <br> [[File:FileZilla2.png]] | |||
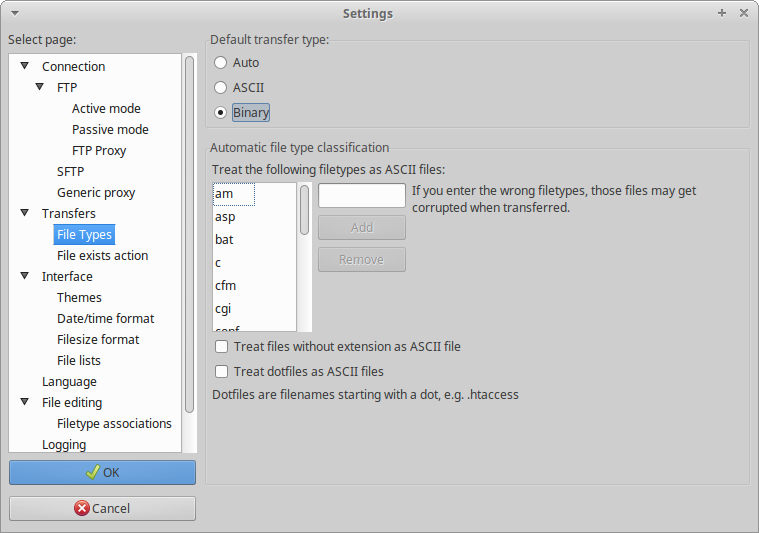
# Binary mode, and disable ASCII options <br> [[File:FileZilla3.png]] | |||
Latest revision as of 20:21, 4 September 2024
FileZilla allows you to transfer files can be transferred to and from your Xbox 360. On a custom dashboard, an FTP server will often be running in the background, which allows you to transfer files to and from your Xbox 360 over the network.
Using Filezilla
- Make sure you have either an Ethernet or WiFi connection between your Xbox 360 and PC.
- Take note of your Xbox 360's IP address. It should be on the dashboard.
- If there is no IP; change the IP address to a static one. You may need to also set the gateway to your PC's IP address, but this isn't usually necessary.
- Open a FileZilla session and enter your Xbox 360's IP into the host field in the top left, and "xbox" as the username and password. Press enter to connect.
- You may need to navigate to Network and Sharing Center → Change Adapter Settings → Right click the ethernet adapter → Properties → Configure... → Speed & Duplex → Select 100Mbps Full Duplex from dropdown and hit OK.
- In the right-hand side, you should see a directory listing of the different partitions on the drive.
- Flash: is your operating system directory, do not modify anything here unless you know what you are doing.
- Hdd1: is the main data partition.
- HddX: is for original xbox backwards compatibility. It may not be present on your console if you have never run an original xbox game.
- You can browse your PC on the left-hand side and upload or download files by right clicking them and choosing the relevant option on either session. Choosing "Add to Queue" will save the transfer into a list, and pressing Ctrl+P will start processing the list; this is handy if you are not yet ready to transfer large amounts of files.
Make sure to use these settings in FileZilla:


