PS4:How to Install PKG Files: Difference between revisions
Jump to navigation
Jump to search
(Kitty Cat) |
m (Derf moved page PS4:How to Install PKG Files to PS4:How to Install PKG Files) |
(No difference)
| |
Revision as of 23:27, 6 October 2024
What are PKGS and FPKGS
- In short:
- pkg = Official game, update or dlc file a normal pkg that checks the user who launches the app has a license to run they are usually game updates found on Orbis-Patches used to update your retail owned games digitally and physically while running Goldhen.
- fpkg = dumped game with fake verification via Debug or Goldhen.
- To note all pkgs come in the .pkg file format
Recommended order of installation
- To avoid any issues the follow order of installing files is recommended Base Game>Update>DLC.
USB Method
You can use any kind of USB drive or External USB-HDD/SSD enclosure as long as it can power on from the usb port and is formatted in EXFAT
- Format your drive to EXFAT
- Place your pkgs on the drive
- After jailbreaking or while jailbroken
- Plug the drive into your PS4
- Go into Goldhen at the top left of the home screen
- Go into Debug Settings
- Under "Package Installer" make sure "Package Source" is usb[ usb:/ ]
if it is Hdd [ hdd:/data/pkg/ ] change it to usb[ usb:/ ]
- Go into Package Installer
From there you can choose to install any 1 pkg you want or alternatively you will be automatically asked if you want to install all the available pkgs.
FTP Method Windows PC direct to PS4 internal storage (fastest transfer speed)
- Goldhen 2.3 or above required
- After jailbreaking
- Connect an ethernet cable between your PC and PS4
- Create a folder called "pkg" and put your pkgs inside of it
- Connect your PS4 to your PC with a LAN cable(in case you unplugged it)
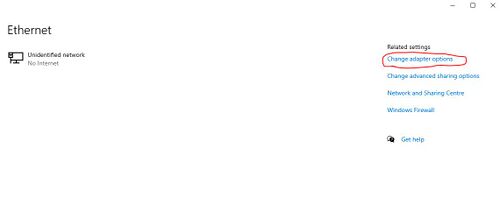
- On your PC go into Start>Settings>Network & Internet>Ethernet and then at the top right choose "Change Adapter Options"
- Find the ethernet Adapter you are using and right click on it then choose "properties"
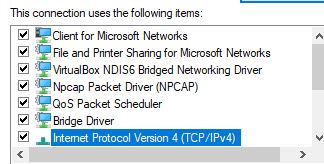
- Double left click on "Internet Protocol Version 4 (TCP/IPv4)"
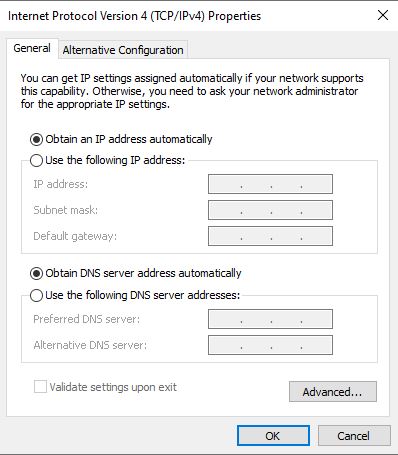
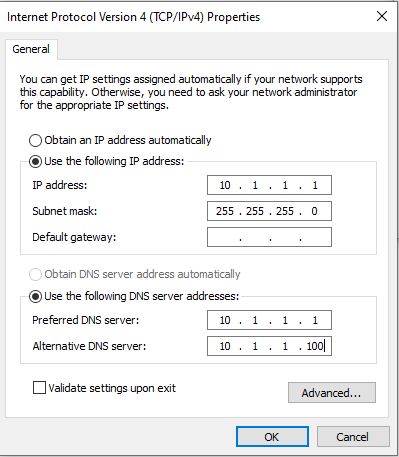
- Press on the empty circle next to "Use the following IP address:" to unlock the fields below it
- Fill them in to match as shown in the image below
- Go to your PS4 and go into Settings>Network>Set Up Internet Connection
- Choose "Use a LAN Cable" then choose "Custom" then choose "Manual"
- Set "IP Address" to "10.1.1.2"
- Set "Subnet Mask" to "255.255.255.0"
- Set "Default Gateway" to "10.1.1.0"
- Set "Primary DNS" to "10.1.1.1"
- Set "Secondary DNS" to "10.1.1.100"
- Set "MTU Settings" to "Automatic" Set "Proxy Server" to "Do Not Use"
- Test Internet Connection and once you get an IP Adresss go back to the home screen
- Go into Goldhen at the top left of the home screen
- Go into "Server Settings"
- Enable the FTP server by making sure the box to the right of "Enable FTP Server" is ticked
- Find your Console IP address by going into Settings>System>System Information (if the steps above were followed it will be "10.1.1.2" or similar)
- Download FileZilla
- In FileZilla in "Host:" type your PS4 IP address **Example** "ftp://10.1.1.2" and in "Port:" "2121" (If the connection fails type in a username anything will do or restart the FTP server on the ps4 then restart FileZilla)
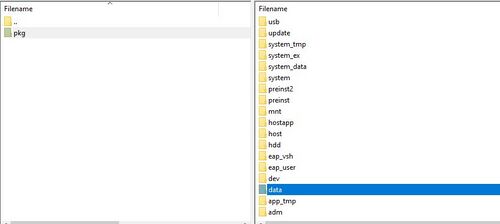
- On the left window of Filezilla go to where you made the folder "pkg" and drag and drop it to the right side window into the folder called "data"
(In the future you can go into the "data" folder and drag directly into the "pkg" folder)
- Go into Goldhen at the top left of the home screen
- Go into Debug Settings
- Under "Package Installer" change "Package Source" from usb[ usb:/ ] To Hdd [ hdd:/data/pkg/ ]
- Go into Package Installer
- From there you can choose to install any 1 pkg you want or alternatively you will be automatically asked if you want to install all the available pkgs.
- Remember to delete pkgs from the "pkg" folder after installing them to regain space.
FTP Method over network to PS4 internal storage
- Goldhen 2.3 or above required
- After jailbreaking connect your PS4 to your home network over WiFi or Ethernet (WiFi and Ethernet Transfers with this method are significantly slower than direct PC to PS4 method above
- Create a folder called "pkg" and put your pkgs inside of it
- Go into Goldhen at the top left of the home screen
- Go into "Server Settings"
- Enable the FTP server by making sure the box to the right of "Enabel FTP Server" is ticked
- Find your Console IP address by going into Settings>System>System Information
- Download FileZilla
- In Filezilla in "Host:" type your PS4 IP address **Example** "ftp://192.168.0.1" and in "Port:" "2121" (If the connection fails type in a username anything will do or restart the FTP server on the ps4 then restart FileZilla)
- On the left window of Filezilla go to where you made the folder "pkg" and drag and drop it to the right side window into the folder called *data*
(In the future you can go into the "data" folder and drag directly into the "pkg" folder)
- Go into Goldhen at the top left of the home screen
- Go into Debug Settings
- Under "Package Installer" change "Package Source" from usb[ usb:/ ] To Hdd [ hdd:/data/pkg/ ]
- Go into Package Installer
- From there you can choose to install any 1 pkg you want or alternatively you will be automatically asked if you want to install all the available pkgs.
- Remember to delete pkgs from the "pkg" folder after installing them to regain space.
