Xbox 360:Matrix Programmer
The Matrix programmer is an inexpensive device used to read/write to Xbox 360 NANDs or – with some modification – program glitch chips as well. It works in conjunction with the Windows program NandPro or J-Runner and can be used for JTAG and RGH installs. If you ever want to revert back, the stock Matrix firmware can be found here. This tutorial was mostly derived from JoinTheResistance's Matrix Conversion tutorial and RetroRebellion's YouTube video.
Adding Glitch Chip Programming Capabilities
With some soldering skill, you can add glitch chip programming capabilities to a Matrix programmer, which allows you to program glitch chips that use a xc2c32a or xc2c64a chips. Chips include CoolRunners (like CR3) and Matrix glitchers, X360 Ace and Xecuter DGX/RGX are not supported.
Equipment Needed
- Matrix SPI USB NAND Flasher (or similar PIC18F2455/PIC18F2550 based device)
- A mini-USB to USB cable
- A soldering iron, solder, and flux
- 28AWG or 30AWG wire
- Isopropyl alcohol (90% or higher recommended) and cotton swabs
- A 300 or 400 ohm resistor
- A 10uF capacitor with a rating of at least 6.3V
- A 3.3V zener diode (e.g. 1n4728a) or a 3.3V regulator
- (Optional) A small through-hole board or breadboard
Soldering on the Matrix
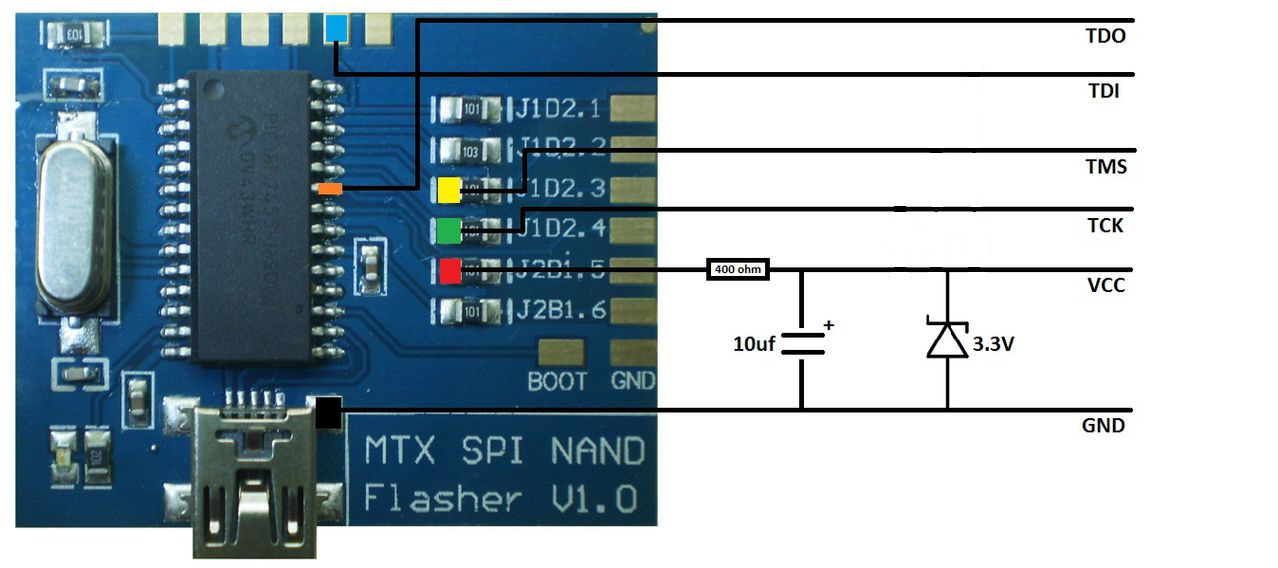
Below is the wiring diagram for the Matrix or this diagram for alternate points. If you are wiring for a non-Matrix programmer, see this schematic for how to wire it.
Setting the Matrix to Bootloader Mode
To set the Matrix in bootloader mode, short the boot pad to GND using a tiny bit of wire or blobbing solder from one pad to the other. Alternatively, you can solder a switch in place to be able to easily change between bootloader mode and regular mode in the future.
Installing Drivers
- Plug the Matrix into your PC using a mini-USB to USB cable.
- Open Device Manager by pressing Win+R and entering in
devmgmt.mscor by searching for it in the Start menu. Locate theUnknown Devicein Device Manager, right click it and select "Update Driver Software" > "Browse my computer for driver software" > Browse, then select the DRIVER folder that's located inside the ...\Nand&CoolRunner_Flasher_USB_v1.1\PIC FIRMWARE directory. - Click OK and it will install the driver and the device will now show up as "Microchip Custom Usb Device" under the "Custom Usb Devices" category.
- If you have issues installing the driver and are on Windows 10, check out this page for steps to temporarily disable signed driver enforcement.
- If you receive a warning saying "Windows can't verify the publisher of this driver software", choose "Install this driver software anyway".
Programming the Matrix
- Open the PIC FIRMWARE folder, right click
PDFSUSB.exeand choose "Run as Administrator". From the dropdown menu, selectPICDEM FS USB 0 (BOOT). - Select "Read device" and then "Save to HEX file", saving it with a memorable name in a safe place to make a backup of the stock Matrix firmware in case something goes wrong.
- Select "Erase Device" and, after it completes, select "Load HEX File" and choose "Program device". Select
PICFLASH_XSVF.HEXand click "Open". After a few seconds it should say "Programming FLASH Completed" in the log. - Disconnect the Matrix from your PC, un-short the
bootpad from theGNDpad, then reconnect the Matrix to your PC. In Device Manager, if it shows up as a NandPro device, right click it and select "Uninstall", checking the box to delete the driver if the box exists, then clicking OK. - In Device Manager, right click the device and select "Update Driver Software" > "Browse my computer for driver software" > Browse, then select the XSVF folder that's located inside the
...\Nand&CoolRunner_Flasher_USB_v1.1\LIBUSB_DRIVER\directory.- If you have issues installing the driver and are on Windows 10, check out this page for steps to temporarily disable signed driver enforcement.
- If you receive a warning saying "Windows can't verify the publisher of this driver software", choose "Install this driver software anyway".
Device Usage
Following any given tutorial, you can read/write to the NAND using J-Runner or NandPro. J-Runner will throw errors when writing to the NAND, but they can be ignored. However, if you had modified your Matrix to be able to flash glitch chips, you will need to use the XSVF_GUI program directly or with command prompt commands.
XSVF GUI
- Extract the XSVF GUI folder. Open the LIBUSB_DRIVER folder, and then the folder corresponding to your CPU (x86 for 32-bit, amd64 for AMD, and ia64 for Intel). Copy the two files inside to the XSVF_GUi_0.2.1 folder.
- Right-click
XSVF_GUi.exeand choose "Run as Administrator". You have the option of either choosing the file you'd like to flash or use one of the built in ones by selecting a hack method and the relevant file that you'd like to use.
Command Line
Open the XSVF folder in ...\Nand&CoolRunner_Flasher_USB_v1.1\LIBUSB_DRIVER\ and run prompt.bat. With your Matrix connected to your PC, you can flash timing files to your glitch chip with the command xsvf.exe filename.xsvf with "filename" being the name of the timing file you wish to flash. Included with XSVF GUI is the RGH1 timing files, but you can find most other timing files packaged with J-Runner.
