TG16:Jailbar Fix
[[File:
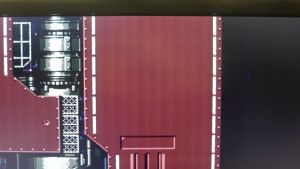
Although the RGB mod for the PC Engine/TurboGrafx-16 provides a nice sharp picture, it is spoiled somewhat by the presence of faint jailbars which are especially noticeable on light backgrounds. This problem has been documented since at least 2003 and various explanations have been given for it over the years. In 2016, Tim Worthington, the creator of the NESRGB and 2600RGB mod kits, discovered that the true cause of problem lies with the filtering capacitors on the HuC6260's voltage rails.
Explanation
The HuC6260 chip provides analog video output on the PCE/TG-16 and has two 5V lines, one for the analog circuitry and another for the digital circuitry. In his research, Tim discovered that the combined capacitance of all the decoupling capacitors on each voltage rail is only 400 nF, which is not enough to filter out noise from the rest of the board. This in turn creates the jailbars which are visible in RGB mods. By replacing just one of these capacitors with a 4.7 uF capacitor, the voltage filtering on the HuC6260 is greatly improved and the jailbars disappear. This modification can be applied to any PCE/TG-16 hardware, with the locations of the filtering capacitors differing on each console.
Materials Required
- Phillips head/JIS screwdriver
- 4.5 mm gamebit screwdriver (for most consoles)
- T10 screwdriver (for Japanese Duos)
- Soldering iron
- Leaded solder
- Flux
- Desoldering braid
- 4.7 uF ceramic capacitors (amount dependent on model)
- Tweezers
Procedure
Core Grafx/Core Grafx II
Original PC Engine
- Disassemble the PC Engine by removing the four 4.5 mm gamebit screws on the underside. Remove the bottom case and set it aside.
- Lift up the motherboard and carefully pull it back from the HuCard slot. Unscrew the three JIS/Phillips head screws holding the HuCard slot to the top case.
- Remove the RF shield by heating up its solder joints and carefully pulling each tab out. Set it aside.
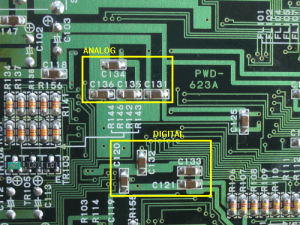
- Locate the SMD decoupling capacitors for the HuC6260. The capacitors for the digital 5V rail are C120, C121, C132 and C133. The capacitors for the analog 5V rail are C131, C134, C135 and C136. These capacitors are located in the middle of the motherboard, near the "PWB-623A" text.
- Apply flux to only one capacitor on each voltage rail and load the tip of your soldering iron with solder. Touch your tip to the body of the capacitor you wish to remove and hold it long enough for the solder joints to become molten. Carefully "sweep" the capacitor off and discard it.
- Use desoldering braid to remove the old solder from the pads.
- Reapply flux to the pads and place the new capacitor so each end is touching a pad. Use a pair of tweezers to help get the capacitor in the right spot and to hold it in place.
- Put a small amount of solder on your iron tip and tack down one end of the capacitor. The flux will help the solder flow from your tip onto the pad. Tack down the other end in the same way and use flux to help touch up the solder joints so they are smooth and shiny. Repeat for the other voltage rail.
- Clean up the area, reassemble the console and test. Enjoy a jailbar-free image from your PC Engine!
PC Engine Duo/TurboDuo
- Disassemble the Duo by removing the five 4.5 mm gamebit screws (T10 screws on the PC Engine Duo) on the underside. Remove the top case and set it aside.
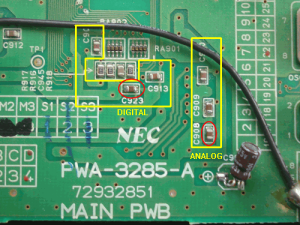
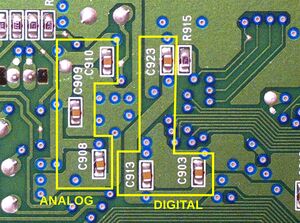
- Locate the SMD decoupling capacitors for the HuC6260. The capacitors for the digital 5V rail are C903, C913, and C923. The capacitors for the analog 5V rail are C908, C909, and C910. These capacitors are located in the bottom left corner of the motherboard, right near the HuCard slot.
- Apply flux to only one capacitor on each voltage rail and load the tip of your soldering iron with solder. Touch your tip to the body of the capacitor you wish to remove and hold it long enough for the solder joints to become molten. Carefully "sweep" the capacitor off and discard it.
- Use desoldering braid to remove the old solder from the pads.
- Reapply flux to the pads and place the new capacitor so each end is touching a pad. Use a pair of tweezers to help get the capacitor in the right spot and to hold it in place.
- Put a small amount of solder on your iron tip and tack down one end of the capacitor. The flux will help the solder flow from your tip onto the pad. Tack down the other end in the same way and use flux to help touch up the solder joints so they are smooth and shiny. Repeat for the other voltage rail.
- Clean up the area, reassemble the console and test. Enjoy a jailbar-free image from your Duo!
PC Engine Duo-R/Duo-RX
SuperGrafx
TurboGrafx-16
- Disassemble the TurboGrafx-16 by removing the seven 4.5 mm gamebit screws on the underside. Remove the bottom case and set it aside.
- Lift the power jack out and then remove the two JIS/Phillips head screws securing the HuCard slot to the top case. Lift the motherboard up and out of the top case.
- Remove the bottom RF shield by using desoldering braid on each of its soldered tabs. Be very careful as the TG-16 motherboard is delicate and you could pull a pad if too much force and/or heat is applied. The screws connecting the RF shield to the expansion port also need to be removed.
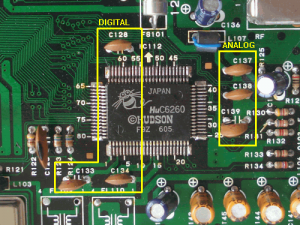
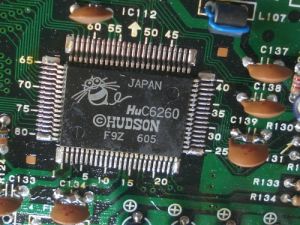
- Locate the decoupling capacitors for the HuC6260. The capacitors for the digital 5V rail are C128, C133 and C134. The capacitors for the analog 5V rail are C137, C138 and C139. These capacitors are located right next to the HuC6260 itself.
- For the TurboGrafx-16, it is possible to insert the new decoupling capacitor in between the leads for one of the capacitors on each 5V rail. To do this, begin by add extra solder to each leg of the capacitor you choose to work with.
- Apply flux to these legs and using tweezers, place the SMD capacitor between the legs and solder each side into place. Repeat for the other 5V rail.
- Clean up the area, reassemble the console and test. Enjoy a jailbar-free image from your TurboGrafx-16!
