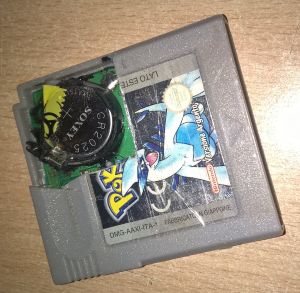
GBA:Game Battery Replacement
Some GBA games, and in fact many flashcards, contain a non-rechargeable lithium battery. It may be used for save memory or to run a clock.
The rest of this article assumes an official GBA game: some flashcards and a few fakes have a non-soldered battery, some bootlegs are pretty liberal with save type conversions, and the assumptions in the next section are based on official PCBs in the first place.
Is there a battery in the first place?
Unlike in the previous generation, where SRAM was the near universal de facto standard for saves, not that many licensed GBA games need constant power, as they could have used EEPROM or NOR Flash instead.
The save type can be determined by looking at the PCB, referring to an online database, or inspecting the ROM[1] - although this is fallible[2].
Even then, many later production SRAM titles had FRAM substituted (with a matching PCB) at the factory, therefore not having a battery in the first place. Since SRAM and FRAM are fully equivalent (as far as the console and software are concerned), this opens a harder but long term alternative to battery replacement.
"Disadvantages"
- Removing power to SRAM for the time normally required to replace a battery will cause data loss, of course. If a save backup is valuable but unavailable, the test points on the back can be used to provide a secondary power source, but care should be taken to minimize the consequent attempt to charge the battery. Another option is to provide regular power to the game card.
- Removing power to RTC will equivalently cause the time to be lost. This is problematic with the Hoenn Pokemon games because, as highlighted by the only tangentially related "Berry Glitch", the date (number of calendar days since a new game was started) and time are stored in the save, and if for example 800 days had passed then 800 days would need to be waited for time-related events to resume. Fortunately, PkHeX or an internal use e-reader card can enable the clock reset feature, providing a clean solution; alternatively, as a dirtier workaround, an RTC editing homebrew can be used.
The proper way
- The original battery is desoldered from the PCB. The tabs can be "peeled off" first to simplify the actual soldering work and avoid overheating the old battery.
- A new battery is obtained (the correct size is typically written on the PCB). It can be bought with tabs preinstalled (often at a significant premium, and requiring to ensure their correct size and layout) or the old ones can be straightened and spot welded on the new one.
- The new battery is soldered back in.
The ghetto way
This method does not require soldering and therefore avoids the unlikely risk of battery explosion, but it still carries that of stripping the PCB (due to potential mechanical damage rather than overheating), and is theoretically less reliable (though it can be made adequately so) due to the lack of mechanical fixation.
- The old battery is removed without desoldering the tabs, by grabbing the latter with pliers and "rolling" them away from the battery.
- The tabs are straightened back.
- Adhesive tape is placed below the bottom-most tab, facing up.
- The new battery is inserted between the tabs and wrapped with the tape. The increased thickness of the assembly, squeezed between the PCB and front case, provides reasonable stability.
