Dreamcast:GDEMU: Difference between revisions
mNo edit summary |
|||
| (10 intermediate revisions by 4 users not shown) | |||
| Line 1: | Line 1: | ||
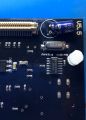
[[File:Gdemu-oled-2.jpg|thumb|GDEMU product image]] | |||
The | The GDEMU is an ODE (Optical Drive Emulator) by a Polish engineer who goes by the name "Deunan", who is also responsible for other ODEs like the [[Saturn:Phoebe/Rhea|Rhea and Phoebe]] for the Saturn and the [[Marty:Doc Brown]] for the [[Marty:Marty_Mods_Wiki|FM Town Marty]]. | ||
It's a plug-and-play all-in-one solution that allows you to load content from an SD card. | It's a plug-and-play, all-in-one solution that allows you to load content from an SD card. GDEMU supports both CDI and TOSEC-style dumped GD-ROM rips (GDI), but is incompatible with Redump images. | ||
As of 2022 it is no longer in production due to the component shortage. However, the developer intends to resume production in the future. While there are functional clones, many of them suffer issues as detailed below in the [[#Clones|Clones]] section. | |||
'''Note:''' Because the ODE doesn't use the 12v rail for the GD-Rom drive, it's safer to [[Dreamcast:Removing_12v_Regulator|remove it]] from the power supply. | |||
== | ==SD Card Management== | ||
Bob from RetroRGB has made [[File:GDEMU_SD_Mount.zip|a case]] for the GDEMU that makes it easier to install and change out. It requires | Disc images are arranged on a GDEMU SD card so that each image resides in its own sequentially numbered folder (e.g., 01, 02, 03, etc.). Disc images can be cycled by pressing the button on the GDEMU PCB itself. | ||
To simplify SD card management, as well as to leverage a visual menu system via [https://gdemu.wordpress.com/links/ GDMenu], additional tools can be utilized. | |||
'''Note:''' In addition to the tools listed below which are intended for use with GDMenu, a new open-source menu system for GDEMU, named [https://github.com/mrneo240/GDMENUCardManager/wiki/Instructions openMenu], is currently in development by [https://github.com/mrneo240 Hayden Kowalchuk]. It leverages a modified version of [https://github.com/mrneo240/GDMENUCardManager GDMENUCardManager]. | |||
===GDMenu and SD Card Management Tools=== | |||
* [https://github.com/esc0rtd3w/dreamcast-tools/blob/master/unsorted/GDEMU_SD.rar SD Card Maker] by Madsheep | |||
* [https://github.com/sonik-br/GDMENUCardManager GDMENUCardManager] by Matheus Fraguas | |||
* [https://github.com/megavolt85/openmenu OpenMenu] | |||
==3D-Printed Case== | |||
Bob from RetroRGB has made [[File:GDEMU_SD_Mount.zip|a case]] for the GDEMU that makes it easier to install and change out. It requires [https://www.laserbear.net/products/sd-extension-hardware-kit-for-sd-extension-mods a ~15cm SD card extension cable], 2x M2x8mm (for the SD card extension to the mount), 6x M3x8mm (for the case), and 1x M3x16mm (for the front most screw hole). | |||
===Assembly Instructions=== | ===Assembly Instructions=== | ||
* Use two M3x8mm thread forming screws to attach the GDEMU board to the SD mount bracket. | * Use two M3x8mm thread forming screws to attach the GDEMU board to the SD mount bracket. | ||
| Line 15: | Line 26: | ||
* Place the Button into the SD mount, and attach the bracket to the SD mount. Use 4 M3x8mm screws to attach the parts together. | * Place the Button into the SD mount, and attach the bracket to the SD mount. Use 4 M3x8mm screws to attach the parts together. | ||
* Install the GDEMU just like the original drive, use an original drive screw to attach the back mounting hole, and use one of the M3x16mm screws to attach the front screw through the GDEMU board into the Dreamcast. | * Install the GDEMU just like the original drive, use an original drive screw to attach the back mounting hole, and use one of the M3x16mm screws to attach the front screw through the GDEMU board into the Dreamcast. | ||
== Clones == | |||
There are many clones of varying quality. While some can work just as well as the original, there are common issues that some units have listed below. | |||
=== Common Issues === | |||
* Clones advertising a firmware version prior to 5.20 cannot be updated. | |||
* Incorrect clock crystal (12.000MHz) prevents operation. Can be fixed by swapping it out with a 11.2896MHz crystal as pointed out by [https://twitter.com/citrus3000psi/status/1071805707803078658 citrus3000psi]. | |||
* The disc change button is not functional. This can be fixed by adding a bodge wire between these two points. | |||
<gallery> | |||
File:GDEMU Clone Crystal Issue.jpg|Incorrect clock crystal (12.000MHz instead of 11.2896MHz). | |||
File:GDEMU Clone Button Issue.jpg|Disc change button bodge. | |||
</gallery> | |||
Latest revision as of 17:06, 13 March 2024

The GDEMU is an ODE (Optical Drive Emulator) by a Polish engineer who goes by the name "Deunan", who is also responsible for other ODEs like the Rhea and Phoebe for the Saturn and the Marty:Doc Brown for the FM Town Marty.
It's a plug-and-play, all-in-one solution that allows you to load content from an SD card. GDEMU supports both CDI and TOSEC-style dumped GD-ROM rips (GDI), but is incompatible with Redump images.
As of 2022 it is no longer in production due to the component shortage. However, the developer intends to resume production in the future. While there are functional clones, many of them suffer issues as detailed below in the Clones section.
Note: Because the ODE doesn't use the 12v rail for the GD-Rom drive, it's safer to remove it from the power supply.
SD Card Management
Disc images are arranged on a GDEMU SD card so that each image resides in its own sequentially numbered folder (e.g., 01, 02, 03, etc.). Disc images can be cycled by pressing the button on the GDEMU PCB itself.
To simplify SD card management, as well as to leverage a visual menu system via GDMenu, additional tools can be utilized.
Note: In addition to the tools listed below which are intended for use with GDMenu, a new open-source menu system for GDEMU, named openMenu, is currently in development by Hayden Kowalchuk. It leverages a modified version of GDMENUCardManager.
GDMenu and SD Card Management Tools
- SD Card Maker by Madsheep
- GDMENUCardManager by Matheus Fraguas
- OpenMenu
3D-Printed Case
Bob from RetroRGB has made File:GDEMU SD Mount.zip for the GDEMU that makes it easier to install and change out. It requires a ~15cm SD card extension cable, 2x M2x8mm (for the SD card extension to the mount), 6x M3x8mm (for the case), and 1x M3x16mm (for the front most screw hole).
Assembly Instructions
- Use two M3x8mm thread forming screws to attach the GDEMU board to the SD mount bracket.
- Screw the SD extension into the SD Mount.
- Plug the SD Extension into the GDEMU.
- Place the Button into the SD mount, and attach the bracket to the SD mount. Use 4 M3x8mm screws to attach the parts together.
- Install the GDEMU just like the original drive, use an original drive screw to attach the back mounting hole, and use one of the M3x16mm screws to attach the front screw through the GDEMU board into the Dreamcast.
Clones
There are many clones of varying quality. While some can work just as well as the original, there are common issues that some units have listed below.
Common Issues
- Clones advertising a firmware version prior to 5.20 cannot be updated.
- Incorrect clock crystal (12.000MHz) prevents operation. Can be fixed by swapping it out with a 11.2896MHz crystal as pointed out by citrus3000psi.
- The disc change button is not functional. This can be fixed by adding a bodge wire between these two points.
Incorrect clock crystal (12.000MHz instead of 11.2896MHz).
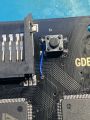
Disc change button bodge.

