Intellivision:Fred Kono RGB Mod
For many years, the only video modifications for the Intellivision in existence only involved adding composite video or S-video. In 2015, Fred Kono (going by the username juice2839 on AtariAge) developed a new RGB modification board for the Intellivision, which uses the individual color outputs from the STIC graphics chip to generate analog RGB output.
- **Warning - This guide is for an older version of the board and may not work with more recent boards.**
Materials and Tools
- Materials
- RGB kit
- Leaded solder
- Flux (optional but highly recommended)
- Thin gauge (26-28 AWG) hookup wire
- RGB connector of choice
- Tools
- Phillips head screwdriver
- Soldering iron
- Cordless drill with step bits
Installation
Please ensure that the Intellivision is completely unplugged before proceeding, as the Intellivision has an internal power supply with line voltage present.
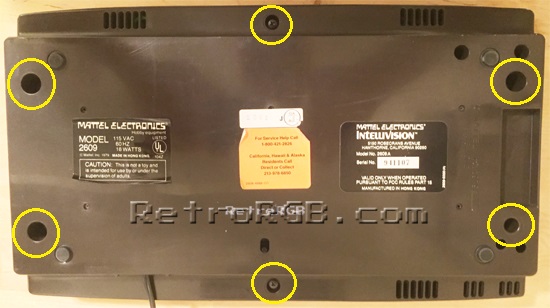
- Turn the console over and remove the six screws that hold the case together.
- Remove the top case and carefully feed the controllers through their holes. Remove the cover for the power switch.


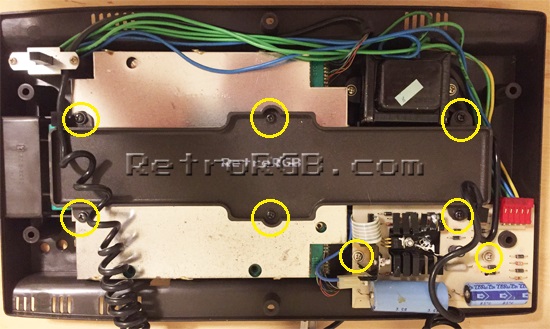
- Next, remove the six screws and the plastic center piece, as well as the two screws holding the power board in place.

\- Then carefully remove the main motherboard; As soon as you lift the board, you'll have access to the cables. _Very_ carefully unplug the two controller cables, as well as the two power cables:

\- Now you'll have to remove the shielding. This is a bit of a pain: I heated the joints with a soldering iron, while using a flat-head screwdriver to carefull pry the tabs away from the shield. I just went around the shield repeating this with each one until it was completely removed:

\- Now that the board is completely removed, locate the chip that's circled, as well as the RF module. Click for a full-sized picture: [[[File:Intellivision05-small.jpg)](https://cdn.retrorgb.com/images/Intellivision05.jpg]]
\- Find the RF module and solder a cable to the audio pin shown below. I used a shielded cable and soldered the ground wire to the RF module casing. Click for full-sized: [[[File:Intellivision06-small.jpg)](https://cdn.retrorgb.com/images/Intellivision06.jpg]]
\- Next, find the chip circled in the picture above and identify pin 1. Sometimes the writing on the chip may not match the orientation, so always look for the two divets marking pin 1:

\- Now solder wires to each of the marked pins on the chip.
Alternatively, if you're using a model 1 Intellivision and have one of the smaller RGB boards (2016 model), you can remove the chip and use the adapter boards. I find it much quicker and easier to just solder to the chip, however both are good options. Intellivision II consoles (and possibly some others) have the chip soldered directly to the motherboard, so soldering directly to the pins if your only option.

\- Solder the other ends of the wire to the corresponding pins on the RGB board. Also solder wires to the output pins on the other side. Click on whichever board matches yours for a full-sized view:
<tbody></tbody>
<a href="https://cdn.retrorgb.com/images/Intellivision09.jpg" target="_new"><img border="0" src="images/Intellivision09-Small.jpg"></a> | <a href="https://cdn.retrorgb.com/images/Intellivision09-2016.jpg" target="_new"><img title="" border="0" alt="" src="images/Intellivision09-2016-small.jpg"></a> |
\- Now move the power wire out of the way and cut a small section off from the "wing" of the mounting hole. This allows the RGB board to fit snugly in place. PLEASE NOTE: If you're using one of the newer RGB boards that's smaller, you won't have to trim the "wing". Simply secure the board to the bottom of the case with industrial-grade double sided tape, or small (_small!!_) dabs of hot glue. Click for full-sized: [[[File:Intellivision10-Small.jpg)](https://cdn.retrorgb.com/images/Intellivision10.jpg]]
\- Your RGB board should now fit in the area underneath the power board. Make sure to run the input and output wires around all the mounting posts and away from any place they can get pinched:

\- Next drill a hole in the rear case for the AV connector. I chose the far end, so it wouldn't be underneath the power board. Also, the kit doesn't come with screws, so I just used self-tapping screws I had laying around:

\- Run the cables through the AV hole (to make it easier to work with) and solder the output wires to the corresponding pins - Just make sure your connector's pinout matches your cable. Also the RGB SCART cable doesn't need _any_ components in the cable at all...it just needs a basic passthrough cable.
\- Here's a closeup of the connector I used in my installation, with all ground wires soldered to the top:

\- Now re-assemble all the components. I chose to leave the large metal shield off, as it made re-assembly much easier. I haven't found any negative side-effects of this, but please [contact.html let me know] if you have different results.

\- That's it! Now your Intellivision is outputting a high-quality RGB signal!

- Intellivision II:**
As an FYI, I've sucessfully installed the kit in an Intellivision II system as well as an original. All instructions were essentially the same, except the mounting location of the board. I chose to use small pieces of industrial-strength double sides tape to affix the board to two of the other chips on the motherboard. If you do the same, make sure not to cover the entire chip, for heat reasons. Also, I covered the bottom of the RGB board in non-conductive tape, just to be safe. Click for full-sized: [[[File:Intellivision2Install-small.jpg)](https://cdn.retrorgb.com/images/Intellivision2Install.jpg]]
- Summary:**
The Intellivision RGB mod can be time-consuming for beginners, but overall it's pretty easy. I'd definitely recommend it as a "must-have" for any fan of the Intellevision console!
If you'd like info on mods for other systems, head to the [/systems.html Getting RGB From Each System page] or check out [/ the main page] for more retro-awesomeness.