SNES:SNES Jr Pre-Assembled S-RGB Mod
- SNES Mini S-RGB Expansion Board**
 **
**

This guide shows you how to enable RGB and S-Video output on a SNES Mini / Jr using its built-in RGB amp (the 'S-RGB' chip). This method requires a custom board that connects all the components. If you plan on using the S-RGB Encoder, this is definitely the method I recommend.
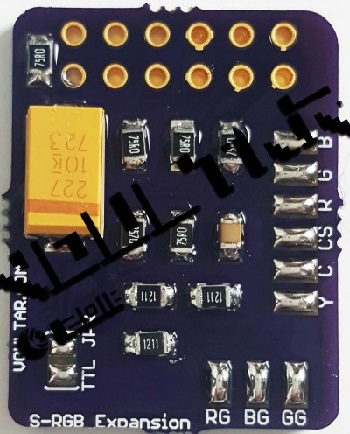
- Parts required: Voultar's Custom S-RGB Board**
- You'll need a few tools for this mod (more info on the tools can be found in [tools.html the tools section]):
- \- The S-RGB connection board linked above
- \- Soldering skills!
- \- [snescsync.html SNES RGB cable].
- \- The 4.5mm tool that opens the SNES
- \- Philips head screwdriver
- \- Soldering iron / solder
- \- Thin gauge wire
- \- Flux (or a flux pen) will make installation easier, but is not necessary.
- RGB Cable / Sync:**
- This page describes the RGB SCART cables you'd want to use with this mod: **SNES RGB SCART Cables**
- Installation Video:
- This is a video demonstrating everything shown in this guide. It may help in your installation:
- **\[iframe width="560" height="315" src="https://www.youtube.com/embed/QJOU3Lv6GaM?rel=0" frameborder="0" allowfullscreen=""\]**
- RGB Mod:**
The mod is pretty easy, however soldering to the S-RGB chip can be extremely challenging. I usually recommend beginners use an amp bypass mod for ease of installation, however if you're willing to solder to the small points this will work perfectly:
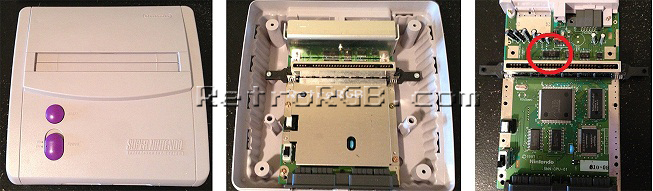
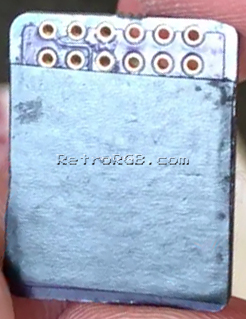
- \- Remove the 4 screws holding the plastic cover on using the 4.5mm tool. Then remove the 7 screws holding the motherboard in place (so, basically, just unbolt everything). Finally, unbolt the three screws holding the heatsink and find the S-RGB chip:
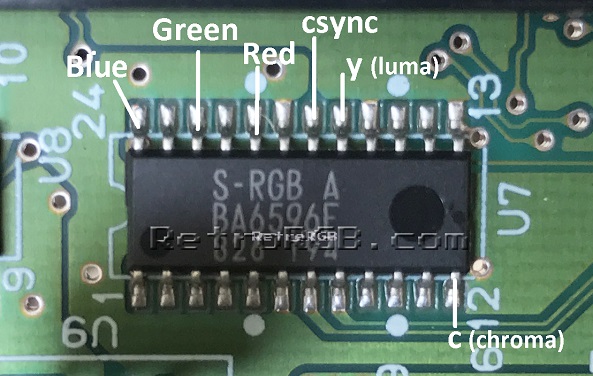
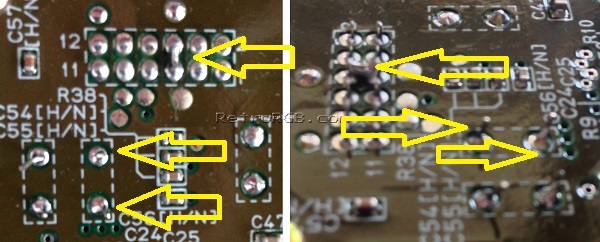
- \- Solder six wires to the pins on the “S-RGB A” chip as shown below. A few tips: These are extremely small pins and very difficult for people who aren't experienced at soldering to work on. Use a soldering tip that's extremely thin, as well as very thin solder. Make sure to "tin" each pin and each wire before trying to solder them together. I also like to add flux to each of the pins before tinning, as it makes soldering to them much easier:
- **
 **
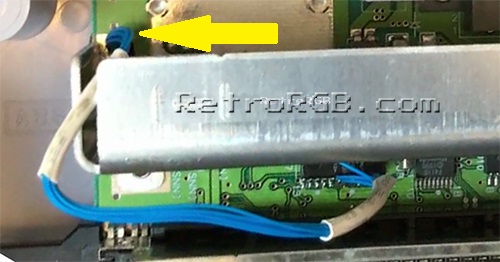
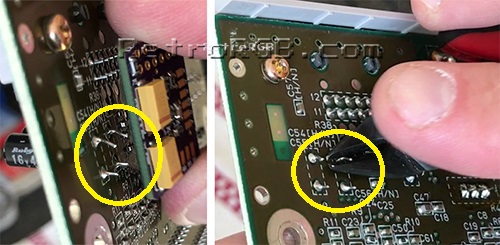
** - \- I like to use heatshrink tubing to keep the wires together and also protect them from touching any other components. Then, I replace the heaksink and run the cables through the hole pictured below on the left:
- \- I suggest adding non-conductive tape to the bottom of the circuit board. Many boards don't need this, however it's my opinion that since it won't hurt anything, better safe then sorry:
- \- Next, prepare to mount the circuit board over the multi-out pins. You may notice that there's a few larger components sticking up. If so, it's okay to snip them. Also, I've actually seen a few SNES Mini's come from the factory with the two ground pins soldered together. If your system has this, you could either cut the solder in the middle (be _really_ careful not to damage the pins), or use a solder-removing method (de-soldering iron, solder wick, etc):
 :
:
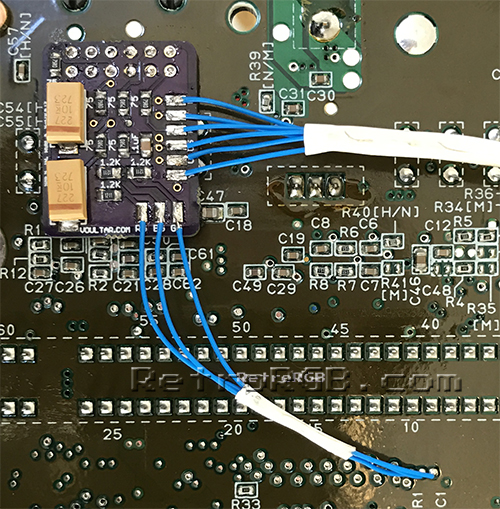
- \- Then, place the board over the multi-out connections and solder the multi-out pins to the board. Then solder wires from the bottom RGB pads to the via's (holes) marked below - Flux will make soldering to those holes MUCH easier (click for full-sized):
- [[[File:SNES_S-RGBboard_InstallPoints.jpg)](/images/SNES_S-RGBboard_InstallPoints-Large.jpg]]
- \- Finally, cut the RGBs / YC cables to size and solder them to the corresponding pins on the board. I prefer to use heat shrink tubing to keep them all in place:
- \- Then just bolt everything back together and give it a try!


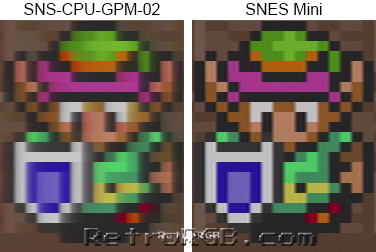
- Results:**
- A pretty easy mod and the picture quality is amazing!!! Check out the difference from an average SNES 1 to a SNES Mini (there are many more pictures on the [snesversioncompare.html SNES Version Compare page]):

When you're done, feel free to go back to the [snes.html main SNES page]. If you'd like info on mods for other systems, head to the [/systems.html Getting RGB From Each System page] or check out [/ the main page] for more retro-awesomeness.