PSP:Pandora Battery
A Pandora (original 2007 scene name) or JigKick (official name) battery is a device that forces a PSP to boot from sector 16 of a "Magic" Memory Stick instead of internal NAND.
Traditional definition
Traditionally, this means a battery with a serial number of FFFFFFFF, which can be achieved in a number of ways:
- Early consoles (all 1000 and the very first TA-085v1 2000s) can reprogram batteries, given the right software such as PSP:Hellcat's Recovery Flasher;
- Datel used to sell, under the "TOOL" product range, both pre-made batteries and a standalone programmer alternating between Pandora and generic serial numbers;
- Some 3rd party batteries were manufactured with a battery check button that, if held down for many seconds before inserting them in the console, overrode the serial number;
- If the EEPROM is disconnected from an official battery's regulator and interface chip, open bus behaviour will result in all-FF reads!
Such a device will work on every PSP-1000 and 2000; the Magic MS will also need to contain a valid bootloader (which is generally not a problem, as all of these consoles except TA-088v3 support traditional CIPL).
The TA-088v3, indeed, had for a long time been believed to be Pandora incompatible due to the conflation of that with traditional fakesigned CIPL[1] support, but it is compatible with the official (signed) service software - as long as the Memory Stick serial number is changed to satisfy DRM in said utility[2].
Only in 2018, thanks to the high-profile PS3 original exploitation and mathieulh's efforts, a proper (C)IPL signer was released, which resulted in PSP:Despertar del Cementerio 9 being supported on "all" models (limited by DC9 being based on 5.02).
Strict definition
On all newer consoles, the traditional Pandora battery will not work, as the official/authoritative definition of it includes a cryptographic handshake with the battery's regulator: Datel did allegedly invent such a battery by the end of 2008 (the Lite Blue TOOL) but it was unreleased due to legal trouble.
In 2021, Baryon Sweeper (a computer program that, combined with a 0-5V serial port, provides a sufficiently accurate emulation of a battery) was released.[3][4][5]
As of mid-2023, the combination of Baryon Sweeper and (official recovery images, or, if supported, DDC9) will provide full software recovery for 1000/2000/3000 models.
As for the N1000 and E1000, they are theoretically supported by Baryon Sweeper (the connection point for which was moved to the USB port[6][7], due to said models' non-smart and non-removable batteries), and can use
Creating a JigKick
Traditional Pandora Battery
As mentioned earlier, method will only work on PSP-1000 and PSP-2000 models. Newer models require the Baryon Sweeper method.
Softmod Method
- Requirements:
- Any PSP-1000 or PSP-2000 with a TA-085v1 that has custom firmware.
- Official 2200 mAh or 1200 mAh Sony battery.
- Any 128 MB or larger Memory Stick Pro, Pro Duo, M2, or a microSD card with a matching adapter.
- OEM Memory Stick with support for MagicGate is the recommended option if available.
Instructions TBW
Hardmod Method
- Requirements:
- Soldering Iron (Optional, but recommended to ensure the mod is reversable)
- Prying tool for opening the battery.
- Please be careful when opening the battery with a sharp tool, or else you risk puncuring the battery cell!
- Official 2200 mAh or 1200 mAh Sony battery.
- Any Memory Stick Pro (Duo) or a microSD card with a matching adapter.
- OEM Memory Stick Pro (Duo) with support for MagicGate is the recommended option if available.
Instructions TBW
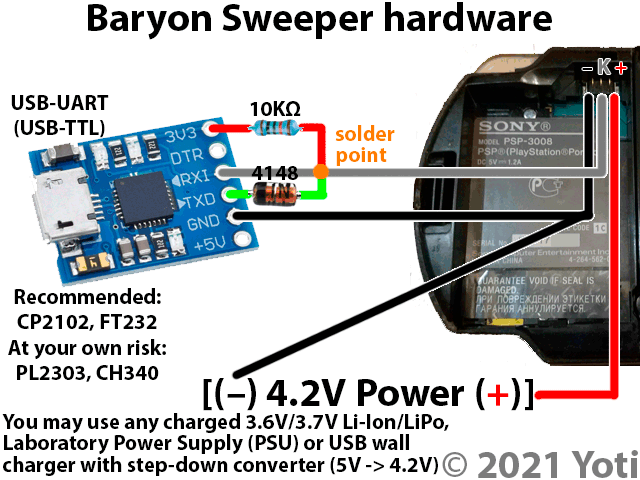
Baryon Sweeper
- Requirements:
- Soldering iron, solder, and flux.
- Baryon Sweeper can also be accomplished on a Wi-Fi UMD model without any soldering if you use a bread board, like in this video.
- Plastic prying tool for opening the battery, along with a PSP battery of your choice (Optional, this is only if you want to use a non-hackable battery as an easy shell for the UART adapter so it can be quickly disconnected.)
- Do not use any sharp prying tool, or else you risk puncuring the battery cell!
- Any 128 MB or larger Memory Stick Pro (Duo/M2) or a microSD card with a matching adapter.
- OEM Memory Stick Pro (Duo/M2) with support for MagicGate is the recommended option if available.
- USB-TTL adapter.
- Recommendations are the CP2102 and FT232.
- A through hole diode of your choice.
- Step down converter to reduce 5V to 4.2V. (Optional, only needed if you want to power a PSP-1000/2000/3000 directly with the TTL adapter instead of an external power supply or a battery cell. Mainly useful if you want to build an enclosed battery like this.)
- Standalone male mini-USB connector (Only for PSP-E1000, or PSP Street)
- A PSP-N340 cradle, or a clone of the PSP-N430 USB cable (Only for PSP-N1000, or PSP Go)
- Soldering iron, solder, and flux.
Building the JigKick (PSP-1000/2000/3000)
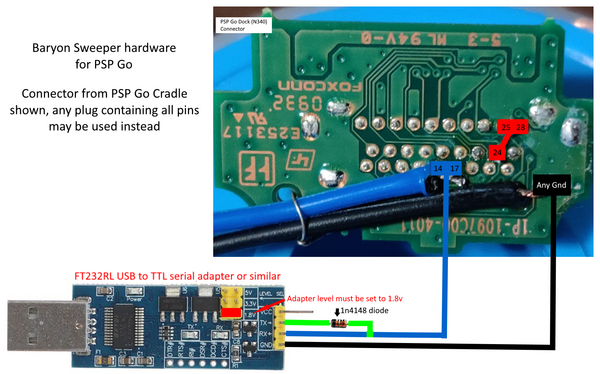
PSP-N1000 USB JigKick
To enable access to jigkicks on the USB port, you will need to ground the 24th pin on the USB connector to any available ground pin (like on the TTL adapter or one of the GND pins on the connector)
Make sure your TTL adapter is set to 1.8v.
- Using PSP:Connector Pinouts as a reference, connect the following wires from the TTL adapter to a male mini-USB connector:
- TTL adapter TX > in-line with RX wire with the cathode end (the side with a stripe) facing the TTL adapter.
- TTL Adapter RX > Pin 14 & 17 on the USB connector
- TTL Adapter GND > Pin 24 along with any ground pin on the USB connector
- The following is optional if you want to enable charging during the process:
- 5V power source (like from the TTL adapter) with 10k Ohm Resistor > Pin 20 on the USB connector
- 5V power source (like from the TTL adapter) > Pin 22 on the USB connector
- Example Diagram with a PSP-N340 Cradle:
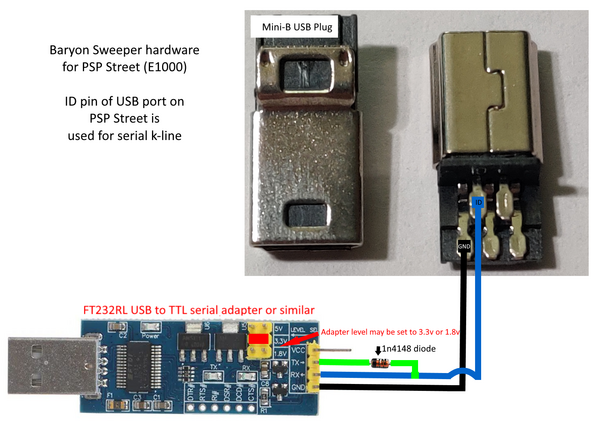
PSP-E1000 USB JigKick
Make sure your TTL adapter is set to 3.3v.
- Using PSP:Connector Pinouts as a reference, connect the following wires from the TTL adapter to a male mini-USB connector:
- TTL adapter TX > in-line with RX wire with the cathode end (the side with a stripe) facing the TTL adapter.
- TTL adapter RX > mini-USB sense pin
- TTL adapter GND > mini-USB GND
- (Optional if you want to enable charging during the process) TTL Adapter 3.3v VCC > mini-USB VCC
- Example Diagram:
References
- ↑ https://lolhax.org/2011/07/03/a-look-at-the-ta-88v3-ipl-hash/
- ↑ https://www.pspx.ru/forum/showthread.php?t=92463
- ↑ https://www.pspx.ru/forum/showthread.php?t=111113
- ↑ https://github.com/khubik2/pysweeper
- ↑ https://www.psx-place.com/threads/update-baryon-sweeper-unbrick-psp-1000-2000-3000-psp-slim-04g-07g-09g-psp-street-11g-model.32503/
- ↑ https://www.psdevwiki.com/psp/Psp_Go_Jigkick
- ↑ https://www.psdevwiki.com/psp/PSP_Street_Jigkick


